使用redis配置ip列表实现Nginx限制ip访问
一、概述
部分情况下,需要对有疑问的ip进行限制隔离,或者限制部分无效流量。例如抢购商品,当商品抢完后,剩余的流量访问不到服务端,在网络层拦截返回商品售完,或对恶意的ip地址进行拦截,拒绝访问等。
限制ip访问有很多方式,包括系统自身的防火墙,服务端校验等,这里是使用Nginx通过lua插件读取配置在redis中的ip黑名单,Nginx拦截请求进行校验ip是否被限制访问。
本文使用OpenResty的lua-resty-redis模块使用Nginx访问redis。OpenRestys类似一个全家桶,是一个通过lua扩展Nginx功能的插件,OpenResty 最新版本1.15.8.1的下载地址:http://openresty.org/cn/ann-1015008001.html。 由于安装环境的nginx为1.8,所以这里下载了1.13.6.2版本安装。 OpenResty 里面有操作redis和mysql的插件。如下图

二、安装
linux环境已经安装了Nginx1.8版本,所以这里只安装openresty.
- 下载解压
wget https://github.com/openresty/openresty/releases/download/v1.13.6.2/openresty-1.13.6.2.tar.gz
tar -xvf openresty-1.13.6.2.tar.gz
cd openresty-1.13.6.2
- 编译安装
./configure -j2
make
make install
- 安装lua
openresty解压后的安装包里面的bundle文件夹
cd openresty-1.13.6.2/bundle/LuaJIT-2.1-20180420/
make
make install
安装完成后配置环境变量,向/etc/profile文件中添加一下内容
# tell nginx's build system where to find LuaJIT 2.0:
export LUAJIT_LIB=/usr/local/openresty/luajit/lib
export LUAJIT_INC=/usr/local/openresty/luajit/include/luajit-2.1/
更新环境变量source /etc/profile
- 编译配置Nginx
linux环境已经安装了Nginx1.8版本,所以只需要重新编译Nginx然后替换安装文件sbin里的nginx文件夹即可。找到Nginx1.8版本之前的原安装文件,重新编译nginx
./configure --prefix=/usr/local/nginx --with-cc-opt=-O2 --add-module=/usr/local/openresty/openresty-1.13.6.2/bundle/ngx_devel_kit-0.3.0 --add-module=/usr/local/openresty/openresty-1.13.6.2/bundle/echo-nginx-module-0.61 --add-module=/usr/local/openresty/openresty-1.13.6.2/bundle/xss-nginx-module-0.06 --add-module=/usr/local/openresty/openresty-1.13.6.2/bundle/ngx_coolkit-0.2rc3 --add-module=/usr/local/openresty/openresty-1.13.6.2/bundle/set-misc-nginx-module-0.32 --add-module=/usr/local/openresty/openresty-1.13.6.2/bundle/form-input-nginx-module-0.12 --add-module=/usr/local/openresty/openresty-1.13.6.2/bundle/encrypted-session-nginx-module-0.08 --add-module=/usr/local/openresty/openresty-1.13.6.2/bundle/srcache-nginx-module-0.31 --add-module=/usr/local/openresty/openresty-1.13.6.2/bundle/ngx_lua-0.10.13 --add-module=/usr/local/openresty/openresty-1.13.6.2/bundle/ngx_lua_upstream-0.07 --add-module=/usr/local/openresty/openresty-1.13.6.2/bundle/headers-more-nginx-module-0.33 --add-module=/usr/local/openresty/openresty-1.13.6.2/bundle/array-var-nginx-module-0.05 --add-module=/usr/local/openresty/openresty-1.13.6.2/bundle/memc-nginx-module-0.19 --add-module=/usr/local/openresty/openresty-1.13.6.2/bundle/redis2-nginx-module-0.15 --add-module=/usr/local/openresty/openresty-1.13.6.2/bundle/redis-nginx-module-0.3.7 --add-module=/usr/local/openresty/openresty-1.13.6.2/bundle/rds-json-nginx-module-0.15 --add-module=/usr/local/openresty/openresty-1.13.6.2/bundle/rds-csv-nginx-module-0.09
make
如果linux环境没有安装nginx,可以额外添加部分module进行编译
–-with-http_stub_status_module –-with-http_realip_module –-with-http_gzip_static_module –-add-module=/home/smkapp/software/nginx-goodies-nginx-sticky-module-ng-08a395c66e42 –-add-module=/home/smkapp/software/nginx-http-sysguard-master –-add-module=/home/smkapp/software/nginx_upstream_check_module-master
参数
–prefix=/usr/local/nginx:nginx安装目录
–with-http_stub_status_module NGINX的状态
–with-http_gzip_static_module 获取先压缩好的GZ 文件读取)
–with-http_realip_module 获取真实IP
–add-module=/home/smkapp/software/nginx-goodies-nginx-sticky-module-ng session粘连
–add-module=/home/smkapp/software/nginx-http-sysguard-master 防止高负载
–add-module=/home/smkapp/software/nginx_upstream_check_module-master 检查负载均衡的 存活性
–add-module=/root/openresty-1.13.6.2/bundle:这个是刚刚下载的openresty安装包
–with-ld-opt=-Wl,-rpath,/usr/local/openresty/:lua安装的路径
编译完成进行make,但是不要make install 安装,否则会覆盖nginx安装文件,如果需要安装则可以make install。
编译完成后,会在原安装包nginx-1.8.1/objs下新生成一个nginx执行文件。测试相关插件有没有编译成功 ./nginx -V
进入linux环境的nginx安装目录,停掉nginx,并把objs/nginx 复制到安装目录下的sbin文件夹内,覆盖原有文件,先备份原安装文件的nginx文件夹。
![]()
cp -r /home/software/nginx-1.8.1/objs/nginx/ ./
重新启动nginx,
./sbin/nginx -t
三、lua脚本实现ip黑名单
nginx配置文件中添加一下内容
lua_shared_dict nginx_ip_list 1m;
server {
    listen       8081;
    server_name  web_server;
    location = /lua_print{
        echo "hello lua";
    }
    location = /lua_say{
        content_by_lua 'ngx.say("ngx say Hello Lua! ")';
    }
    location = /ip_limit{
        access_by_lua_file lua/ip_limitlist.lua;
    }
其中,lua_shared_dict nginx_ip_list 1m 是nginx进行分配1M的内存空间,用来缓存ip列表。access_by_lua_file lua/ip_limitlist.lua,是lua脚本文件的路径。
通过curl命令可查看到打印结果hello lua
curl http://127.0.0.1:8081/lua_print
我们在nginx的安装目录/usr/local/nginx/lua/里面新加lua文件夹存放lua脚本,ip_limitlist.lua文件内容来源网络内容如下
local redis_host = "192.168.110.110"
local redis_port = 6379
--connection timeout for redis in ms
local redis_connection_timeout = 100
--check a set with this key
local redis_key = "nginx_ip_list"
--cache lookups for this many seconds
local cache_ttl = 60
--end configuration

local ip = ngx.var.remote_addr
local nginx_ip_list = ngx.shared.nginx_ip_list
local last_update_time = nginx_ip_list:get("last_update_time");
--only update nginx_ip_list from redis once every cache_ttl seconds
if last_update_time == nil or last_update_time < (ngx.now() - cache_ttl) then
local redis = require "resty.redis";
local red = redis:new();
red:set_timeout(redis_connect_timeput);
local ok, err = red:connect(redis_host, redis_port);
if not ok then
        ngx.log(ngx.DEBUG, "redis connection error while retriecing nginx_ip_list: " ..err);
else
        local new_nginx_ip_list, err = red:smembers(redis_key);
        if err then
                ngx.log(ngx.DEBUG, "redis read error while retriecing nginx_ip_list: " ..err);
        else
                nginx_ip_list:flush_all();
                for index, banned_ip in ipairs(new_nginx_ip_list) do
                        nginx_ip_list:set(banned_ip, true);
                end
                --update time
                nginx_ip_list:set("last_update_time", ngx.now());
        end
end
end
if nginx_ip_list:get(ip) then
        ngx.log(ngx.DEBUG, "banned IP detected and refused access: " ..ip);
        return ngx.exit(ngx.HTTP_FORBIDDEN);
end
上面lua脚本中redis是单个ip的实例,如果用集群的可以用 “resty.rediscluster”。连接redis集群脚本
local redis_cluster= {
                name = "test",
                serv_list = {
                    {ip="127.0.0.1", port = 3100},
                    {ip="127.0.0.1", port = 3101},
                    {ip="127.0.0.1", port = 3102},
                },
            }
            local redis_cluster = require "resty.rediscluster"
            local red = redis_cluster:new(redis_cluster)
            for i = 1, 2 do
                red:init_pipeline()
                red:set("dog", "name")
                red:get("dog")
                local results = red:commit_pipeline()
                local cjson = require "cjson"
                ngx.say(cjson.encode(results))
            end
            red:close()
在redis中新建set集合nginx_ip_blacklist,添加你需要禁用的ip地址,

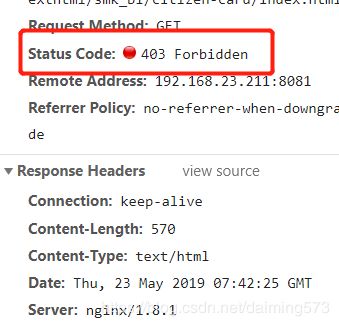
在浏览器中输入nginx拦截的地址测试结果

出现403说明ip被限制访问了,到此nginx使用lua脚本读取redis中的ip列表限制访问成功。Nginx通过Redis实现ip限制访问可以在多个nginx中共享redis数据,配置简单,在nginx层拦截流量不会访问到服务端,并且ip地址可以动态配置,nginx缓存的ip时间60秒可以进行调整。