【RabbitMQ】RabbitMQ入门 使用简单模式完成消息传递
RabbitMQ入门 使用简单模式完成消息传递
文章目录
- RabbitMQ入门 使用简单模式完成消息传递
- 搭建示例工程
- 创建工程
- 添加依赖
- 编写生产者
- 编写消费者
- 小结
搭建示例工程
入门程序
需求:使用简单模式完成消息传递
步骤:
①创建工程(生产者、消费者)
②分别添加依赖
③编写生产者发送消息
④编写消费者接收消息
创建工程
创建空项目 rabbitmq
创建modules
rabbitmq-consumer
rabbitmq-producer

添加依赖
往rabbitmq-consumner、rabbitmq-producer的pom.xml文件中添加如下依赖:
  <dependencies>

        <dependency>
            <groupId>com.rabbitmqgroupId>
            <artifactId>amqp-clientartifactId>
            <version>5.6.0version>
        dependency>
    dependencies>


    <build>
        <plugins>
            <plugin>
                <groupId>org.apache.maven.pluginsgroupId>
                <artifactId>maven-compiler-pluginartifactId>
                <version>3.8.0version>
                <configuration>
                    <source>1.8source>
                    <target>1.8target>
                configuration>
            plugin>
        plugins>
    build>
编写生产者
编写消息生产者
cn.liuawen.producer.Producer_HelloWorld
package cn.liuawen.producer;


import com.rabbitmq.client.Channel;
import com.rabbitmq.client.Connection;
import com.rabbitmq.client.ConnectionFactory;

import java.io.IOException;
import java.util.concurrent.TimeoutException;

/**
 * 发送消息
 */

public class Producer_HelloWorld {
    public static void main(String[] args) throws IOException, TimeoutException {


        //1.创建连接工厂
        ConnectionFactory factory = new ConnectionFactory();
        //2. 设置参数
        //http://39.99.254.180:15672/
        factory.setHost("39.99.254.180");//ip  默认值 localhost
        factory.setPort(5672); //端口  默认值 5672
        factory.setVirtualHost("/liuawen");//虚拟机 默认值/
        factory.setUsername("liuawen");//用户名 默认 guest
        factory.setPassword("liuawen");//密码 默认值 guest
        //3. 创建连接 Connection
        Connection connection = factory.newConnection();
        //4. 创建Channel
        Channel channel = connection.createChannel();
        //5. 创建队列Queue
        /*
        queueDeclare(String queue, boolean durable, boolean exclusive, boolean autoDelete, Map arguments)
        参数:
            1. queue:队列名称
            2. durable:是否持久化,当mq重启之后,还在
            3. exclusive:
                * 是否独占。只能有一个消费者监听这队列
                * 当Connection关闭时,是否删除队列
                *
            4. autoDelete:是否自动删除。当没有Consumer时,自动删除掉
            5. arguments:参数。

         */
        //如果没有一个名字叫hello_world的队列,则会创建该队列,如果有则不会创建
        channel.queueDeclare("hello_world",true,false,false,null);
        /*
        basicPublish(String exchange, String routingKey, BasicProperties props, byte[] body)
        参数:
            1. exchange:交换机名称。简单模式下交换机会使用默认的 ""
            2. routingKey:路由名称
            3. props:配置信息
            4. body:发送消息数据

         */

        String body = "hello rabbitmq~~~";

        //6. 发送消息
        channel.basicPublish("","hello_world",null,body.getBytes());


        //7.释放资源
        channel.close();
        connection.close();

    }
}

在执行上述的消息发送之后;
SLF4J: Failed to load class "org.slf4j.impl.StaticLoggerBinder".
SLF4J: Defaulting to no-operation (NOP) logger implementation
SLF4J: See http://www.slf4j.org/codes.html#StaticLoggerBinder for further details.

Process finished with exit code 0
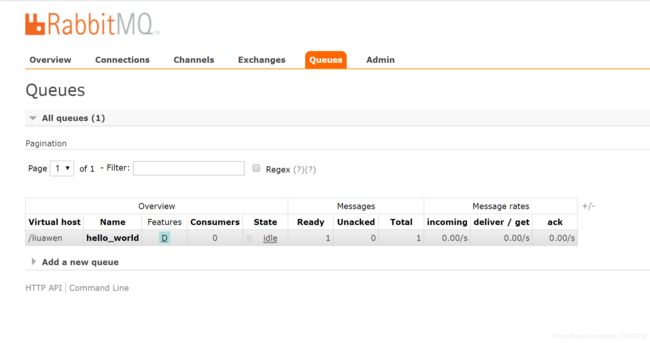
可以登录rabbitMQ的管理控制台,可以发现队列和其消息:

编写消费者
编写消息的消费 cn.liuawen.consumer.Consumer_HelloWorld
package cn.liuawen.consumer;

import com.rabbitmq.client.*;

import java.io.IOException;
import java.util.concurrent.TimeoutException;


public class Consumer_HelloWorld {
    public static void main(String[] args) throws IOException, TimeoutException {

        //1.创建连接工厂
        ConnectionFactory factory = new ConnectionFactory();
        //2. 设置参数
        factory.setHost("39.99.254.180");//ip  默认值 localhost
        factory.setPort(5672); //端口  默认值 5672
        factory.setVirtualHost("/liuawen");//虚拟机 默认值/
        factory.setUsername("liuawen");//用户名 默认 guest
        factory.setPassword("liuawen");//密码 默认值 guest
        //3. 创建连接 Connection
        Connection connection = factory.newConnection();
        //4. 创建Channel
        Channel channel = connection.createChannel();
        //5. 创建队列Queue
        /*
        queueDeclare(String queue, boolean durable, boolean exclusive, boolean autoDelete, Map arguments)
        参数:
            1. queue:队列名称
            2. durable:是否持久化,当mq重启之后,还在
            3. exclusive:
                * 是否独占。只能有一个消费者监听这队列
                * 当Connection关闭时,是否删除队列
                *
            4. autoDelete:是否自动删除。当没有Consumer时,自动删除掉
            5. arguments:参数。

         */
        //如果没有一个名字叫hello_world的队列,则会创建该队列,如果有则不会创建
        channel.queueDeclare("hello_world",true,false,false,null);

        /*
        basicConsume(String queue, boolean autoAck, Consumer callback)
        参数:
            1. queue:队列名称
            2. autoAck:是否自动确认
            3. callback:回调对象

         */
        // 接收消息
        Consumer consumer = new DefaultConsumer(channel){
            /*
                回调方法,当收到消息后,会自动执行该方法

                1. consumerTag:标识
                2. envelope:获取一些信息,交换机,路由key...
                3. properties:配置信息
                4. body:数据

             */
            @Override
            public void handleDelivery(String consumerTag, Envelope envelope, AMQP.BasicProperties properties, byte[] body) throws IOException {
                System.out.println("consumerTag:"+consumerTag);
                System.out.println("Exchange:"+envelope.getExchange());
                System.out.println("RoutingKey:"+envelope.getRoutingKey());
                System.out.println("properties:"+properties);
                System.out.println("body:"+new String(body));
            }
        };
        channel.basicConsume("hello_world",true,consumer);


        //关闭资源?不要
        //消费者  监听
    }
}
执行
"org.slf4j.impl.StaticLoggerBinder".
SLF4J: Defaulting to no-operation (NOP) logger implementation
SLF4J: See http://www.slf4j.org/codes.html#StaticLoggerBinder for further details.
consumerTag:amq.ctag-hvie61k1SqFB655rv3nPHQ
Exchange:
RoutingKey:hello_world
properties:#contentHeader(content-type=null, content-encoding=null, headers=null, delivery-mode=null, priority=null, correlation-id=null, reply-to=null, expiration=null, message-id=null, timestamp=null, type=null, user-id=null, app-id=null, cluster-id=null)
body:hello rabbitmq~~~
小结
上述的入门案例中中其实使用的是如下的简单模式:

在上图的模型中,有以下概念:
- P:生产者,也就是要发送消息的程序
- C:消费者:消息的接受者,会一直等待消息到来。
- queue:消息队列,图中红色部分。类似一个邮箱,可以缓存消息;生产者向其中投递消息,消费者从其中取出消息。