为什么80%的码农都做不了架构师?>>> 
几个Linux命令
reboot   #哈哈
rm -rf #删除文件夹
chmod -R 755 路径  #给权限
unlink  #删除文件
nginx重启:
service nginx restart
#or
/a/apps/nginx/sbin/nginx -s reload   #换成你自己的路径,有云锁的卸载了
LNMP安装:
yum install screen
wget -c https://dn-wsy.qbox.me/lnmp1.2-full.tar.gz && tar zxf lnmp1.2-full.tar.gz && cd lnmp1.2-full && ./install.sh lnmp
镜像:
下载版:http://soft.vpser.net/lnmp/lnmp1.2.tar.gz  (115KB)
MD5:75429551c2614e298e6df5ccda0d3968
完整版:http://soft.vpser.net/lnmp/lnmp1.2-full.tar.gz  (303MB)
MD5:9fda60bd8d699ec53c16545af6c16360
国内下载地址:
https://api.sinas3.com/v1/SAE_lnmp/soft/lnmp1.2-full.tar.gz 下载时wget需要加–no-check-certificate参数
http://7xjkan.com1.z0.glb.clouddn.com/lnmp1.2-full.tar.gz
LNMP状态管理命令:
LNMP 1.2状态管理: lnmp {start|stop|reload|restart|kill|status}
LNMP 1.2各个程序状态管理: lnmp {nginx|mysql|mariadb|php-fpm|pureftpd} {start|stop|reload|restart|kill|status}
LNMP 1.1状态管理: /root/lnmp {start|stop|reload|restart|kill|status}
Nginx状态管理:/etc/init.d/nginx {start|stop|reload|restart}
MySQL状态管理:/etc/init.d/mysql {start|stop|restart|reload|force-reload|status}
Memcached状态管理:/etc/init.d/memcached {start|stop|restart}
PHP-FPM状态管理:/etc/init.d/php-fpm {start|stop|quit|restart|reload|logrotate}
PureFTPd状态管理: /etc/init.d/pureftpd {start|stop|restart|kill|status}
ProFTPd状态管理: /etc/init.d/proftpd {start|stop|restart|reload}
如重启LNMP,输入命令:/root/lnmp restart 即可,单独重启mysql:/etc/init.d/mysql restartzip -q -r bak.zip /home/wwwroot/dir #打包压缩重置MySQL密码
wget http://soft.vpser.net/lnmp/ext/reset_mysql_root_password.sh;sh reset_mysql_root_password.shRedis安装:
在lnmp安装目录下[root@iZ28vomvjlnZ lnmp1.2-full]# ./addons.sh redis
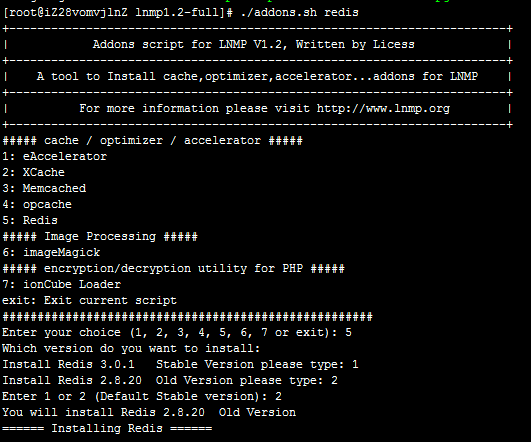
选择5:Redis ,版本的话由于我需要用到阿里云的KV-STORE这里选择2:2.89了
命令行操作redis:
lnmp redis安装在:/usr/local/redis/bin
所以:
[root@iZ28fcou6hqZ /]# cd /usr/local/redis/bin
[root@iZ28fcou6hqZ bin]# ./redis-cli
列出所有KEY:
keys *清空key
flushdbLNMP删除.user.ini
LNMP 1.1及之前的版本使用php.ini里面,open_basedir设置
LNMP 1.2及更高版本防跨目录功能使用.user.ini,该文件在网站根目录下,可以修改open_basedir的值来设置限制目录的访问。
.user.ini文件无法直接修改,而且是隐藏文件可能在winscp下可能无法看到,建议使用vim编辑器或nano编辑器进行修改。
如要修或删除需要先执行:chattr -i /网站目录/.user.ini
修改完成后再执行:chattr +i /网站目录/.user.ini
SSL配置
这里用到的是沃通wosign的免费数字证书
申请地址:https://buy.wosign.com/
第一步:将下载的证书文件for Nginx.zip中的
1_ssl.domain.com_bundle.crt 和 2_ssl.domain.com.key 上传到root目录下,并将其改名为 ssl.crt和ssl.key
第二步:
openssl rsa -in ssl.key -out /root/ssl.key
chmod 600 /root/ssl.key
第三步:修改vhost配置
server {
    listen       80;
    server_name t5.domain.com;
    rewrite ^/(.*) https://t5.domain.com/$1 permanent;
}
server
    {
        listen 80;
        listen 443 ssl;
        #listen [::]:80;
        ssl on;
        ssl_certificate /root/ssl.crt;
        ssl_certificate_key /root/ssl.key;
        server_name t5.zy62.com;
        index index.html index.htm index.php default.html default.htm default.php;
        root  /home/wwwroot/t5.domain.com;

        include none.conf;
        #error_page   404   /404.html;
        location ~ [^/]\.php(/|$)
        {
            # comment try_files $uri =404; to enable pathinfo
            try_files $uri =404;
            fastcgi_pass  unix:/tmp/php-cgi.sock;
            fastcgi_index index.php;
            include fastcgi.conf;
            #include pathinfo.conf;
        }

        location ~ .*\.(gif|jpg|jpeg|png|bmp|swf)$
        {
            expires      30d;
        }

        location ~ .*\.(js|css)?$
        {
            expires      12h;
        }

        access_log  /home/wwwlogs/ssl.domain.com.log  access;
    }
最后 lnmp restart 重启就好了
CSR在线生成:
https://www.chinassl.net/ssltools/generator-csr.html
LNMP/nginx Comodo Positive SSL证书配置
t5_domain_com.crt
COMODORSADomainValidationSecureServerCA.crt
COMODORSAAddTrustCA.crt
AddTrustExternalCARoot.crt
按先后顺序合并到一个文件,
t5_domain_com.crt上传t5_domain_com.key, nginx配置:
server {
listen 80;
server_name t5.domain.com;
rewrite ^/(.*) https://t5.domain.com/$1 permanent;
}
server
{
listen 443 ssl;
#listen [::]:80;
ssl on;
ssl_certificate /root/t5_domain_com.crt;
ssl_certificate_key /root/t5_domain_com.key;
ssl_session_timeout 5m;
ssl_protocols SSLv3 TLSv1 TLSv1.1 TLSv1.2;
ssl_ciphers "ECDHE-RSA-AES256-GCM-SHA384:ECDHE-RSA-AES128-GCM-SHA256:DHE-RSA-AES256-GCM-SHA384:DHE-RSA-AES128-GCM-SHA256:ECDHE-RSA-AES256-SHA384:ECDHE-RSA-AES128-SHA256:ECDHE-RSA-AES256-SHA:ECDHE-RSA-AES128-SHA:DHE-RSA-AES256-SHA256:DHE-RSA-AES128-SHA256:DHE-RSA-AES256-SHA:DHE-RSA-AES128-SHA:ECDHE-RSA-DES-CBC3-SHA:EDH-RSA-DES-CBC3-SHA:AES256-GCM-SHA384:AES128-GCM-SHA256:AES256-SHA256:AES128-SHA256:AES256-SHA:AES128-SHA:DES-CBC3-SHA:HIGH:!aNULL:!eNULL:!EXPORT:!DES:!MD5:!PSK:!RC4";
ssl_prefer_server_ciphers on;
server_name t5.domain.com;
index index.html index.htm index.php default.html default.htm default.php;
root /home/wwwroot/t5.domain.com;
include other.conf;
#error_page 404 /404.html;
location / {
index index.php;
if (-f $request_filename/index.php){
rewrite (.*) $1/index.php;
}
if (!-f $request_filename){
rewrite (.*) /index.php;
}
}
location ~ [^/]\.php(/|$)
{
# comment try_files $uri =404; to enable pathinfo
try_files $uri =404;
fastcgi_pass unix:/tmp/php-cgi.sock;
fastcgi_index index.php;
include fastcgi.conf;
#include pathinfo.conf;
}
location ~ .*\.(gif|jpg|jpeg|png|bmp|swf)$
{
expires 30d;
}
location ~ .*\.(js|css)?$
{
expires 12h;
}
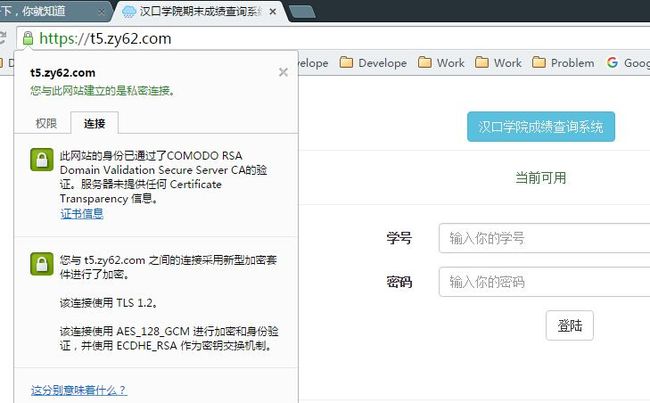
access_log /home/wwwlogs/t5.domain.com.log access;
}最后重启nginx,有图有真相:
更新系统时间:
ntpdate time-a.nist.gov