你想知道的布局优化都在这里了
目录
写在前面
一、Android绘制原理及工具选择
1.1、Android绘制原理
1.2、优化工具
二、Android布局加载原理
2.1、布局加载流程
2.2、性能瓶颈
2.3、LayoutInflater.Factory
三、优雅获取界面布局耗时
四、异步Inflate实战
五、X2C框架使用
六、视图绘制优化
写在前面
人到中年不得已,莫愁前路有知己!
本篇是Android性能优化系列专栏第三篇,上一篇中通过图文加实战的方式介绍了Android的内存优化,有需要的可以翻看一下:
《你的应用内存优化了吗?》,今天我们就继续来说说Android中的布局优化相关的知识。
一、Android绘制原理及工具选择
1.1、Android绘制原理
对于Android手机来说,它的画面渲染依赖于两个硬件:①、CPU;②、GPU:
- CPU负责计算显示内容,比如:视图创建、布局计算、图片解码、文本绘制等
- GPU负责栅格化(UI元素绘制到屏幕上),栅格化:将一些组件比如Button、Bitmap拆分成不同的像素进行显示然后完成绘制,这个操作相对比较耗时,所以引入GPU来加快栅格化操作
- 16ms发出VSync信号触发UI渲染,意思就是Android系统要求每一帧都要在16ms内完成,具体到项目中就是不管业务代码或者其他逻辑代码有多复杂,想要保证每一帧都很平滑,渲染代码就应该在16ms内完成
- 大多数的Android设备屏幕刷新频率:60Hz ,60帧/秒是人眼和大脑之间协作的极限
1.2、优化工具
①、Systrace
- 关注Frames
- 正常:绿色圆点,丢帧:黄色或红色
- Alerts:Systrace中自动分析并且标注异常性能的条目
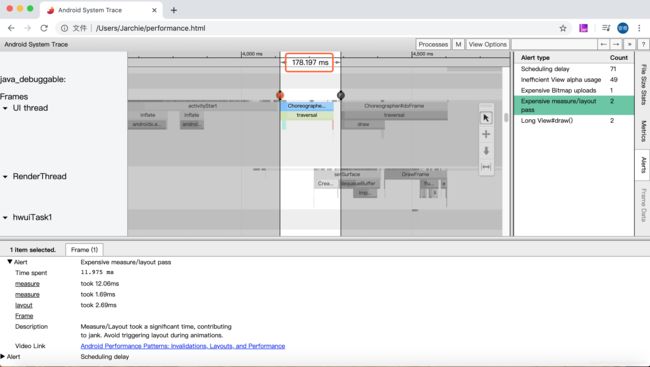
上面这张图是我找的一个使用Systrace生成的.html文件,图中每一个F的出现就表明出现了一帧,可以看到这两个F之间的时间间隔比16ms多了不少,Alert type这里面就是Systrace自动给出的一些提示信息,我们可以根据提示信息来查找修改的方向。
②、Layout Inspector
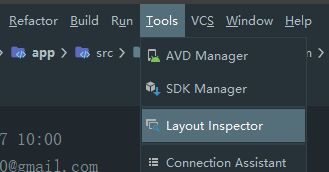
菜单栏——>Tools——>Layout Inspector
- Android Studio自带的工具
- 查看试图层次结构
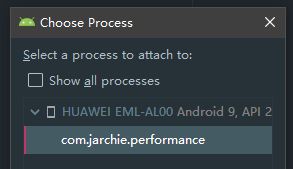
如果进程中存在多个Activity,还会提示让我们选择具体哪个Activity,当然了,我这里只有一个Activity,直接点击该进程即可:
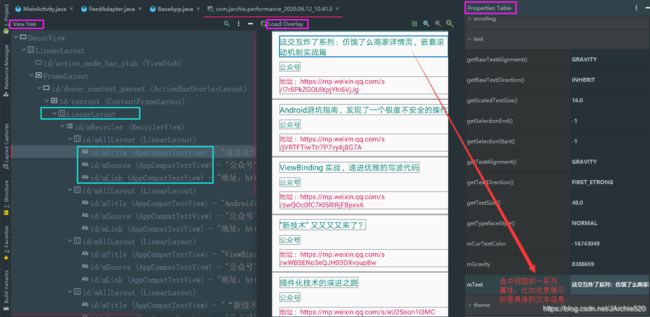
上面这张图就是Layout Inspector为我们生成的具体检测界面的信息,这个界面总共是分成了三个部分:
左侧:View Tree,即:视图在布局中的层次结构
中间:Load Overlay,即:相当于屏幕截图,并且这个截图自带各个视图控件的边距
右侧:Properties Table,即:选中视图的布局属性,比如我这里选中的是一个TextView,里面就会显示出这个TextView所显示出的具体信息
对于这个工具我们主要关注的是最左侧的这一栏层次结构,有了它就可以很方便的看到当前布局的层级,比如我这里的LinearLayout这是当前界面的根布局,它里面是一个RecyclerView,对于RecyclerView的每一个Item都有三个控件,这三个控件都处在同一层级,整个条目的层级相对还是比较简单的。
③、Choreographer
获取FPS,线上使用,具备实时性
- Api 16之后
- 使用方式是:Choreographer.getInstance().postFrameCallback
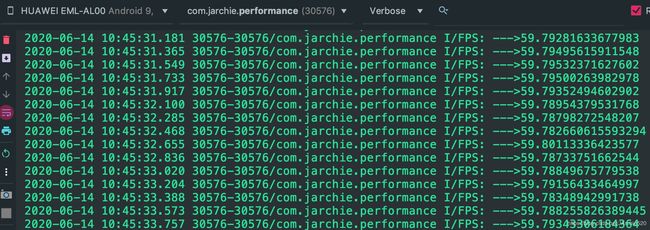
这里写了一个方法getFPS()来获取这个APP的FPS情况,方法内部一开始是做了一个保护性操作,确保使用的Choreographer发生在API16之后,然后在doFrame回调中首先判断是不是统计周期的第一次,如果是就记录第一次回调的时间,接下来就是判断时间间隔是否超过预设的阀值160ms,如果超过则计算FPS,计算方式是间隔时间除以间隔时间内发生的次数,如果没有超过则直接将次数加1。
输出的结果可以看到基本上都是59和60之间的数值。
二、Android布局加载原理
2.1、布局加载流程
①、源码解析
这一部分我们来看下源码,因为内容比较多,我就尽可能的简单说,对于源码阅读的流程我们之前已经说过几次了,这里就不再介绍了,基本上就是找到你需要的入口方法,然后一路跟踪下去,把整个流程串起来,不需要你把每一行的代码都读懂。
既然说的是布局加载,那么我们首先肯定是找入口方法,这个方法你回想一下每个页面加载布局都是调用的什么方法呢?很简单啦:
setContentView(R.layout.activity_main);然后点击这个方法进入源码中去就到了AppCompatActivity类的setContentView()方法中:
    @Override
    public void setContentView(@LayoutRes int layoutResID) {
        getDelegate().setContentView(layoutResID);
    }
继续跟踪点击setContentView()方法:
![]()
发现这是一个抽象方法,此时你需要去找它的实现类AppCompatDelegateImpl中的方法了,点击左侧向下的fx向下箭头:
    @Override
    public void setContentView(int resId) {
        ensureSubDecor();
        ViewGroup contentParent = mSubDecor.findViewById(android.R.id.content);
        contentParent.removeAllViews();
        LayoutInflater.from(mContext).inflate(resId, contentParent);
        mAppCompatWindowCallback.getWrapped().onContentChanged();
    }
这个方法中由于传递进来的resId也就是布局文件的id,它只在LayoutInflater这一行用到了,所以接着跟踪这一行,点击inflate()方法:
public View inflate(@LayoutRes int resource, @Nullable ViewGroup root) {
        return inflate(resource, root, root != null);
    }
这个方法内部又调用了另一个inflate()方法,所以继续点击:
public View inflate(@LayoutRes int resource, @Nullable ViewGroup root, boolean attachToRoot) {
        final Resources res = getContext().getResources();
        if (DEBUG) {
            Log.d(TAG, "INFLATING from resource: \"" + res.getResourceName(resource) + "\" ("
                  + Integer.toHexString(resource) + ")");
        }

        View view = tryInflatePrecompiled(resource, res, root, attachToRoot);
        if (view != null) {
            return view;
        }
        XmlResourceParser parser = res.getLayout(resource);
        try {
            return inflate(parser, root, attachToRoot);
        } finally {
            parser.close();
        }
    }
这里面又有一个inflate()方法,入参有一个parser,看了看上下的代码,知道了它其实是XmlResourceParser的实例,那我们先不去看这个inflate()方法具体的实现,先来看下这个parser究竟是什么?找到res.getLayout()方法,里面传入了我们的资源id,返回的是XmlResourceParser,看名字XML资源解析器,就知道这玩意应该很屌,来吧,继续点击getLayout():
@NonNull
    public XmlResourceParser getLayout(@LayoutRes int id) throws NotFoundException {
        return loadXmlResourceParser(id, "layout");
    }
没啥实质性的内容,继续点击它的实现方法loadXmlResourceParser():
    @NonNull
    @UnsupportedAppUsage
    XmlResourceParser loadXmlResourceParser(@AnyRes int id, @NonNull String type)
            throws NotFoundException {
        final TypedValue value = obtainTempTypedValue();
        try {
            final ResourcesImpl impl = mResourcesImpl;
            impl.getValue(id, value, true);
            if (value.type == TypedValue.TYPE_STRING) {
                return impl.loadXmlResourceParser(value.string.toString(), id,
                        value.assetCookie, type);
            }
            throw new NotFoundException("Resource ID #0x" + Integer.toHexString(id)
                    + " type #0x" + Integer.toHexString(value.type) + " is not valid");
        } finally {
            releaseTempTypedValue(value);
        }
    }
这个方法开始是一些对象的声明,后面是异常的处理,所以看下来真正有用的就是if判断里面的,它判断了value.type如果是String类型的,然后继续调用了impl的loadXmlResourceParser()方法,我们点进去看下:
    /**
     * Loads an XML parser for the specified file.
     *
     * @param file the path for the XML file to parse
     * @param id the resource identifier for the file
     * @param assetCookie the asset cookie for the file
     * @param type the type of resource (used for logging)
     * @return a parser for the specified XML file
     * @throws NotFoundException if the file could not be loaded
     */
    @NonNull
    XmlResourceParser loadXmlResourceParser(@NonNull String file, @AnyRes int id, int assetCookie,
            @NonNull String type)
            throws NotFoundException {
        ...
        //代码有点多就不贴了,不然文章会很长,大家有需要的自己对照这个过程读一下源码,敬请谅解
    }
主要看注释那里的说明哈,Android中的布局都是写在XML文件中的,这个方法就是为我们具体所写的布局文件准备一个XML的解析器,所以它实际上就是一个XML的Pull解析的过程。需要注意的是:android的布局实际上是一个XML文件,它在加载的时候会首先将它读取到内存中,这个过程实际上就是一个IO过程,一般在android开发中操作IO都会将其置于工作线程中,所以这里可能会成为我们优化的一个方向。
关于这个XmlResourceParser就说到这里,下面继续回到上面说的那个inflate()方法中:
public View inflate(XmlPullParser parser, @Nullable ViewGroup root, boolean attachToRoot) {
synchronized (mConstructorArgs) {
。。。
if (TAG_MERGE.equals(name)) {
if (root == null || !attachToRoot) {
throw new InflateException("这里同样的省略了部分代码,我们知道日常开发中经常会碰到一些报错,其实这些报错在Android的源码中都是有所体现的,比如这里定义的关于merge标签的一个异常信息。接着看createViewFromTag()这个方法,看名字我们应该能大致猜测出来它是干嘛的了,它应该就是通过一系列的Tag来创建相对应的View,我们点击该方法跟进:
    @UnsupportedAppUsage
    private View createViewFromTag(View parent, String name, Context context, AttributeSet attrs) {
        return createViewFromTag(parent, name, context, attrs, false);
    }
这里面又调用了另一个createViewFromTag()方法,继续跟进:
    @UnsupportedAppUsage
    View createViewFromTag(View parent, String name, Context context, AttributeSet attrs,
            boolean ignoreThemeAttr) {
        if (name.equals("view")) {
            name = attrs.getAttributeValue(null, "class");
        }

        // Apply a theme wrapper, if allowed and one is specified.
        if (!ignoreThemeAttr) {
            final TypedArray ta = context.obtainStyledAttributes(attrs, ATTRS_THEME);
            final int themeResId = ta.getResourceId(0, 0);
            if (themeResId != 0) {
                context = new ContextThemeWrapper(context, themeResId);
            }
            ta.recycle();
        }

        try {
            View view = tryCreateView(parent, name, context, attrs);

            if (view == null) {
                final Object lastContext = mConstructorArgs[0];
                mConstructorArgs[0] = context;
                try {
                    if (-1 == name.indexOf('.')) {
                        view = onCreateView(context, parent, name, attrs);
                    } else {
                        view = createView(context, name, null, attrs);
                    }
                } finally {
                    mConstructorArgs[0] = lastContext;
                }
            }

            return view;
        } catch (InflateException e) {
            throw e;

        } catch (ClassNotFoundException e) {
            final InflateException ie = new InflateException(
                    getParserStateDescription(context, attrs)
                    + ": Error inflating class " + name, e);
            ie.setStackTrace(EMPTY_STACK_TRACE);
            throw ie;

        } catch (Exception e) {
            final InflateException ie = new InflateException(
                    getParserStateDescription(context, attrs)
                    + ": Error inflating class " + name, e);
            ie.setStackTrace(EMPTY_STACK_TRACE);
            throw ie;
        }
    }
这里就到了重点的地方了,这里面就是创建View的过程了:
首先:View view = tryCreateView(parent, name, context, attrs); 它通过这个tryCreateView()方法构建出View对象,进到这个方法中:
    @UnsupportedAppUsage(trackingBug = 122360734)
    @Nullable
    public final View tryCreateView(@Nullable View parent, @NonNull String name,
        @NonNull Context context,
        @NonNull AttributeSet attrs) {
        if (name.equals(TAG_1995)) {
            // Let's party like it's 1995!
            return new BlinkLayout(context, attrs);
        }

        View view;
        if (mFactory2 != null) {
            view = mFactory2.onCreateView(parent, name, context, attrs);
        } else if (mFactory != null) {
            view = mFactory.onCreateView(name, context, attrs);
        } else {
            view = null;
        }

        if (view == null && mPrivateFactory != null) {
            view = mPrivateFactory.onCreateView(parent, name, context, attrs);
        }

        return view;
    }
这个方法里面就是判断了几个factory是否为空,首先是Factory2,如果Factory2不为空则调用Factory2的onCreateView()方法创建View对象,否则判断Factory是否为空,如果Factory不为空则调用Factory的onCreateView()创建View对象,如果都为空,则View为空。如果view为空并且PrivateFactory不为空,则调用PrivateFactory的onCreateView()方法构建View,需要注意的是PrivateFactory它只用于Fragment标签的加载。当这些条件都不满足的时候,我们回到上面的createViewFromTag()方法中接着看,它会走到view==null的条件判断中去,它会走onCreateView()或者createView(),点击createView()继续跟踪:
@Nullable
    public final View createView(@NonNull Context viewContext, @NonNull String name,
            @Nullable String prefix, @Nullable AttributeSet attrs)
            throws ClassNotFoundException, InflateException {
        Objects.requireNonNull(viewContext);
        Objects.requireNonNull(name);
        Constructor constructor = sConstructorMap.get(name);
        if (constructor != null && !verifyClassLoader(constructor)) {
            constructor = null;
            sConstructorMap.remove(name);
        }
        Class clazz = null;

        try {
            Trace.traceBegin(Trace.TRACE_TAG_VIEW, name);

            if (constructor == null) {
                // Class not found in the cache, see if it's real, and try to add it
                clazz = Class.forName(prefix != null ? (prefix + name) : name, false,
                        mContext.getClassLoader()).asSubclass(View.class);

                if (mFilter != null && clazz != null) {
                    boolean allowed = mFilter.onLoadClass(clazz);
                    if (!allowed) {
                        failNotAllowed(name, prefix, viewContext, attrs);
                    }
                }
                constructor = clazz.getConstructor(mConstructorSignature);
                constructor.setAccessible(true);
                sConstructorMap.put(name, constructor);
            } else {
                // If we have a filter, apply it to cached constructor
                if (mFilter != null) {
                    // Have we seen this name before?
                    Boolean allowedState = mFilterMap.get(name);
                    if (allowedState == null) {
                        // New class -- remember whether it is allowed
                        clazz = Class.forName(prefix != null ? (prefix + name) : name, false,
                                mContext.getClassLoader()).asSubclass(View.class);

                        boolean allowed = clazz != null && mFilter.onLoadClass(clazz);
                        mFilterMap.put(name, allowed);
                        if (!allowed) {
                            failNotAllowed(name, prefix, viewContext, attrs);
                        }
                    } else if (allowedState.equals(Boolean.FALSE)) {
                        failNotAllowed(name, prefix, viewContext, attrs);
                    }
                }
            }

            Object lastContext = mConstructorArgs[0];
            mConstructorArgs[0] = viewContext;
            Object[] args = mConstructorArgs;
            args[1] = attrs;

            try {
                final View view = constructor.newInstance(args);
                if (view instanceof ViewStub) {
                    // Use the same context when inflating ViewStub later.
                    final ViewStub viewStub = (ViewStub) view;
                    viewStub.setLayoutInflater(cloneInContext((Context) args[0]));
                }
                return view;
            } finally {
                mConstructorArgs[0] = lastContext;
            }
        }
        。。。
    }
这个方法里面constructor = clazz.getConstructor(mConstructorSignature); constructor.setAccessible(true); 这两行首先找到clazz的构造方法,通过反射的方式将其设置为外部可调用的,然后下面final View view = constructor.newInstance(args); 这一行它通过构造函数反射创建了View,在这个方法中是真正进行了View的创建,当然这是在没有使用Factory的情况下哦。这个过程实际上它是使用了反射,反射是有可能导致程序变慢的一个因素,所以这里也可以作为我们的一个优化点。
②、布局加载流程总结
2.2、性能瓶颈
布局文件解析:IO过程(文件过大时可能会导致卡顿)
创建View对象:反射(使用过多也会导致变慢)
2.3、LayoutInflater.Factory
在上面解读setContentView的源码时,我们知道创建View的过程优先是使用Factory2和Factory进行创建,下面对这两个类作简要说明:
LayoutInflater.Factory:
- LayoutInflater创建View的一个Hook,Hook其实就是我们可以将自己的代码挂在它的原始代码之上,可以对它的流程进行更改
- 定制创建View的过程:比如全局替换自定义TextView等
Factory与Factory2
- Factory2继承于Factory
- 多了一个参数:parent
我们来看一下它们的源码,首先来看Factory2:
    public interface Factory2 extends Factory {
        @Nullable
        View onCreateView(@Nullable View parent, @NonNull String name,
                @NonNull Context context, @NonNull AttributeSet attrs);
    }
可以看到Factory2是一个接口,并且它是继承自Factory的,来看一下Factory:
public interface Factory {
        /**
         * Hook you can supply that is called when inflating from a LayoutInflater.
         * You can use this to customize the tag names available in your XML
         * layout files.
         *
         *
         * Note that it is good practice to prefix these custom names with your
         * package (i.e., com.coolcompany.apps) to avoid conflicts with system
         * names.
         *
         * @param name Tag name to be inflated.
         * @param context The context the view is being created in.
         * @param attrs Inflation attributes as specified in XML file.
         *
         * @return View Newly created view. Return null for the default
         *         behavior.
         */
        @Nullable
        View onCreateView(@NonNull String name, @NonNull Context context,
                @NonNull AttributeSet attrs);
    }
入参中有个name,来看一下它的注释,意思就是我们要加载的Tag,比如这个Tag是TextView,那么通过这个方法返回的就是TextView,实际上如果你继续跟踪的话,你会发现这个Tag实际上就是我们平时在布局中写的一个个的控件:比如TextView、ImageView等等,它会根据具体的Tag来进行对应View的创建:
switch (name) {
            case "TextView":
                view = createTextView(context, attrs);
                verifyNotNull(view, name);
                break;
            case "ImageView":
                view = createImageView(context, attrs);
                verifyNotNull(view, name);
                break;
            case "Button":
                view = createButton(context, attrs);
                verifyNotNull(view, name);
                break;
            case "EditText":
                view = createEditText(context, attrs);
                verifyNotNull(view, name);
                break;
            case "Spinner":
                view = createSpinner(context, attrs);
                verifyNotNull(view, name);
                break;
            case "ImageButton":
                view = createImageButton(context, attrs);
                verifyNotNull(view, name);
                break;
            case "CheckBox":
                view = createCheckBox(context, attrs);
                verifyNotNull(view, name);
                break;
            case "RadioButton":
                view = createRadioButton(context, attrs);
                verifyNotNull(view, name);
                break;
            case "CheckedTextView":
                view = createCheckedTextView(context, attrs);
                verifyNotNull(view, name);
                break;
            case "AutoCompleteTextView":
                view = createAutoCompleteTextView(context, attrs);
                verifyNotNull(view, name);
                break;
            case "MultiAutoCompleteTextView":
                view = createMultiAutoCompleteTextView(context, attrs);
                verifyNotNull(view, name);
                break;
            case "RatingBar":
                view = createRatingBar(context, attrs);
                verifyNotNull(view, name);
                break;
            case "SeekBar":
                view = createSeekBar(context, attrs);
                verifyNotNull(view, name);
                break;
            case "ToggleButton":
                view = createToggleButton(context, attrs);
                verifyNotNull(view, name);
                break;
            default:
                // The fallback that allows extending class to take over view inflation
                // for other tags. Note that we don't check that the result is not-null.
                // That allows the custom inflater path to fall back on the default one
                // later in this method.
                view = createView(context, name, attrs);
        }
并且我们对比两个接口,可以发现Factory2比Factory就是入参多了一个parent,这个parent就是你创建的View的parent,所以综上可得Factory2比Factory功能上更加强大。
三、优雅获取界面布局耗时
随着项目的不断升级,项目体量逐渐变大,页面可能也变的越来越多,然后我们希望能够在线上进行统计,了解到具体哪些页面用户在进入时会出现卡顿,布局文件加载也可能会导致卡顿。
常规方式:覆写方法(setContentView)、手动埋点上报服务端(不够优雅,代码具有侵入性)
AOP方式:切Activity的setContentView(切面点)
@ Around("execution(*android.app.Activity.setContentView(..))")
具体实现:
    @Around("execution(* android.app.Activity.setContentView(..))")
    public void getSetContentViewTime(ProceedingJoinPoint joinPoint) {
        Signature signature = joinPoint.getSignature();
        String name = signature.toShortString();
        long time = System.currentTimeMillis();
        try {
            joinPoint.proceed();
        } catch (Throwable throwable) {
            throwable.printStackTrace();
        }
        Log.i(name, " cost " + (System.currentTimeMillis() - time));
    }
结果如下:
![]()
对AOP忘记了的可以去看本专栏的第一篇启动优化部分有介绍:《Android启动优化你真的了解吗?》
思考:如何获取每一个控件加载耗时?
我们在上面使用setContentView获取到的是页面中所有控件的耗时情况,那现在我想要知道这个页面中各个控件的耗时分布情况,以便于整体的把控分析并且可以对耗时较多的控件做针对性的优化,这样一个场景该如何实现呢?由于每个页面布局中的控件都是不可控的,有可能多也有可能少,所以我们应该尽量做到低侵入性,这个问题大家可以好好想想,看看有什么解决方案。
解决方案:使用LayoutInflaterCompat.Factory2(LayoutInflaterCompat是LayoutInflater的兼容类)让它在创建View时进行Hook:
LayoutInflaterCompat.setFactory2(getLayoutInflater(), new LayoutInflater.Factory2() {
            @Override
            public View onCreateView(View parent, String name, Context context, AttributeSet attrs) {
                long time = System.currentTimeMillis();
                View view = getDelegate().createView(parent, name, context, attrs);
                Log.i(name,"控件耗时:" + (System.currentTimeMillis() - time));
                return view;
            }

            @Override
            public View onCreateView(String name, Context context, AttributeSet attrs) {
                return null;
            }
        });
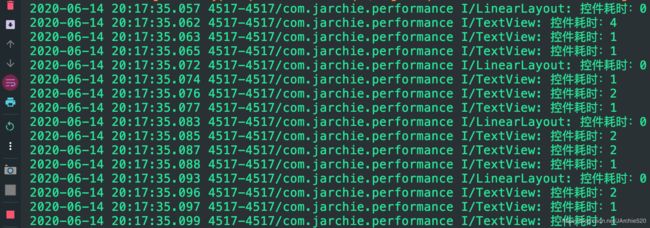
结果如下:可以看到我们确实获取到了列表Item中的每个控件的耗时情况
四、异步Inflate实战
在上面我们已经说过了布局文件加载慢主要的原因是有以下两点:
- 布局文件读取慢:IO过程
- 创建View慢:通过反射创建一个对象比直接new一个对象要慢3倍,布局嵌套层级复杂则反射更多
针对上面说的这两种情况,相对应的解决套路也就是两种:
- 根本性解决:去掉IO过程、不使用反射
- 侧面缓解:让主线程不耗时,不影响主线程
这里针对侧面缓解的方案来介绍一种实现方式:AsyncLayoutInflater,谷歌提供的一个类,简称异步Inflate
- WorkThread加载布局,原生是在UI Thread加载布局
- 加载完成之后回调主线程,此时主线程拿到的是创建完成的View对象可以直接使用
- 节约主线程时间,因为耗时是发生在了异步线程中,主线程的响应能够得到保障
使用方式:首先导入asynclayoutinflater的依赖库,这里我们参考谷歌官方文档中androidx的使用:
然后来修改我们的MainActivity中的onCreate()方法:
    @Override
    protected void onCreate(Bundle savedInstanceState) {
        new AsyncLayoutInflater(this).inflate(R.layout.activity_main, null, new AsyncLayoutInflater.OnInflateFinishedListener() {
            @Override
            public void onInflateFinished(@NonNull View view, int resid, @Nullable ViewGroup parent) {
                setContentView(view);
                mRecycler = findViewById(R.id.mRecycler);
                mRecycler.setLayoutManager(new LinearLayoutManager(MainActivity.this));
                mRecycler.addItemDecoration(new DividerItemDecoration(MainActivity.this, DividerItemDecoration.VERTICAL));
                mRecycler.setAdapter(mAdapter);
                mAdapter.setOnFeedShowCallBack(MainActivity.this);
            }
        });
        super.onCreate(savedInstanceState);
//        setContentView(R.layout.activity_main);
        mAdapter = new FeedAdapter(this, mList);
        initData();
//        getFPS();
    }
然后运行我们的应用发现也是可以正常跑起来的:
有兴趣的可以去看一下AsyncLayoutInflater的源码,理解起来应该不难,这个类内部有一个Handler对象,一个InflateThread类继承于Thread,还有一个inflate方法,该方法有三个入参resid、parent、callback,同时将这三个参数封装成了InflateRequest的数据结构,然后加到线程的队列中,线程中同时有一个run()方法在不断执行,它会从队列中取出一条InflateRequest,然后这个request.inflate开始执行inflate()方法并返回request.view,这个方法是执行在子线程中的,最后通过Handler将它回调到主线程中,同时有一个相关联的Callback,在Callback中进行判断如果没有创建完成的话,会回退到主线程中进行布局的加载,最后将request.view回调到onInflateFinished()方法中,这样主线程就可以在该方法中拿到对应的view了。
总结:①、不能设置LayoutInflater.Factory(),需要自定义AsyncLayoutInflater解决;②、注意View中不能有依赖主线程的操作
五、X2C框架使用
上面这一部分是介绍了一种侧面缓解的方式,那这一部分我们来思考一下从根本上解决该如何实现?
首先来说一下思路哈,其实也没啥思路,就是利用Java代码写布局,这种方案的特点如下:
- 本质上解决了性能问题(没有xml文件也就没有了IO的过程,直接new对象没有了反射的过程)
- 引入新问题:不便于开发、可维护性差
思路有了但是看着实现起来却不太现实哈,那咋办呢?咋办呢?咋办呢?嗯,这样拌,大神还是很多的,我们使用开源方案X2C:
X2C框架介绍:保留XML优点,解决其性能问题
- 开发人员写XML,加载Java代码
- 原理:APT编译期翻译XML为Java代码
X2C框架的使用方式:
①、添加依赖:app/build.gradle中添加
annotationProcessor 'com.zhangyue.we:x2c-apt:1.1.2'
implementation 'com.zhangyue.we:x2c-lib:1.0.6'
②、添加注解:在使用布局的任意java类或方法上面添加:
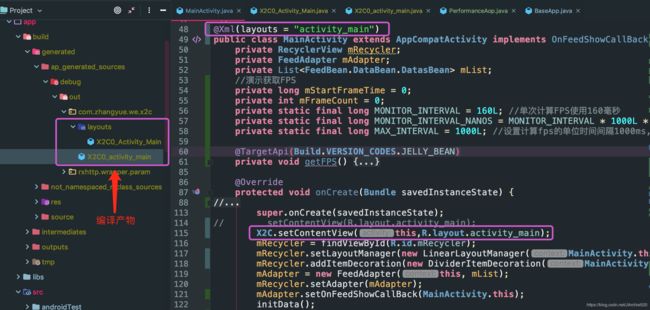
@Xml(layouts = "activity_main")③、代码实战
将原有的setContentView注释掉,然后使用X2C.setContentView()来设置布局,运行之后发现是可以正常加载的,图中左侧圈出来的是使用X2C编译之后的产物,这个其实就是它的底层实现原理了,我们来看一下:
首先是布局文件:
然后是编译之后的代码:
public class X2C0_activity_main implements IViewCreator {
  @Override
  public View createView(Context context) {
    return new com.zhangyue.we.x2c.layouts.X2C0_Activity_Main().createView(context);
  }
}
public class X2C0_Activity_Main implements IViewCreator {
@Override
public View createView(Context ctx) {
Resources res = ctx.getResources();
LinearLayout linearLayout0 = new LinearLayout(ctx);
linearLayout0.setOrientation(LinearLayout.VERTICAL);
RecyclerView recyclerView1 = new RecyclerView(ctx);
LinearLayout.LayoutParams layoutParam1 = new LinearLayout.LayoutParams(ViewGroup.LayoutParams.MATCH_PARENT,ViewGroup.LayoutParams.MATCH_PARENT);
recyclerView1.setId(R.id.mRecycler);
recyclerView1.setLayoutParams(layoutParam1);
linearLayout0.addView(recyclerView1);
return linearLayout0;
}
}可以看到它内部就是将我们布局文件中的控件全都以Java对象的形式给new出来了。
X2C存在的问题:
- XML中有的部分属性Java不支持(虽然不多但是也有)
- 失去了系统的兼容(AppCompat,如果你需要使用AppCompatXXX下面的控件可以通过修改X2C源码来定制化实现相关功能)
六、视图绘制优化
①、视图绘制流程
- 测量:确定大小(自顶向下进行视图树的遍历,确定ViewGroup和View应该有多大)
- 布局:确定位置(执行另一个自顶向下的遍历操作,ViewGroup会根据测量阶段测定的大小确定自己应该摆放的位置)
- 绘制:绘制视图(对于视图树中的每个对象系统都会为它创建一个Canvas对象,然后向GPU发送一条绘制命令进行绘制)
可能存在的性能问题:
- 每个阶段耗时
- 自顶而下的遍历(如果Layout层级比较深则遍历也是很耗时的)
- 触发多次(比如嵌套使用RelativeLayout有可能会导致绘制环节触发多次)
②、布局层级及复杂度
编写布局的准则:减少View树层级
- 不嵌套使用RelativeLayout
- 不在嵌套的LinearLayout中使用weight
- merge标签:减少一个层级,只能用于根View
这里推荐使用:ConstraintLayout,网上关于它有很多的文章,后面我也准备专门写一篇它的使用总结
- 实现几乎完全扁平化布局
- 构建复杂布局性能更高
- 具有RelativeLayout和LinearLayout特性
③、过度绘制
- 一个像素最好只被绘制一次
- 调试GPU过度绘制
- 蓝色可接受
避免过度绘制方法:
- 去掉多余背景色,减少复杂shape使用
- 避免层级叠加
- 自定义View使用clipRect屏蔽被遮盖View绘制(当覆写onDraw()之后,系统就无法知道View中各个元素的位置和层级关系,就无法做自动优化,即无法自动忽略绘制那些不可见的元素)
④、布局绘制的其它优化技巧
- ViewStub:高效占位符、延迟初始化(这个标签没有大小,也没有绘制功能不参与measure和layout过程,资源消耗非常低,一般用于延迟初始化)
- onDraw中避免:创建大对象、耗时操作
- TextView相关优化(setText显示静态文本)
关于布局优化相关的知识点就总结这么多了,有些地方还是通过实际代码实践之后才能有所体会,好了,天也不早了,人也都走了,今天就先到这里吧,下期再会!

