CentOS8 FastDFS文件服务器搭建-配合nginx url访问
CentOS8 FastDFS文件服务器
1. 下载并解压所需安装包
Fast DFS文件服务器官网源码下载地址
注:需要gcc环境,我的在安装mysql时就安装了
cd /home/hanhuibing/workspace/fastdfs-packages
# -S print server response
# -O write documents to file
wget https://github.com/happyfish100/fastdfs/archive/V6.06.tar.gz -SO fastdfs.tar.gz
wget https://github.com/happyfish100/libfastcommon/archive/V1.0.43.tar.gz -SO libfastcommon.tar.gz
wget https://github.com/happyfish100/fastdfs-nginx-module/archive/V1.22.tar.gz -SO fastdfs-nginx-module.tar.gz
# 解压
tar -zxvf xxx.tar.gz
2. 安装 libfastcommon
cd libfastcommon-1.0.43/
#编译 安装
./make.sh
./make.sh install
注意:打印出日志 ln -s /usr/lib64/libfastcommon.so /usr/lib/libfastcommon.so 自动软连接库到lib包,自己不要 cp /home/hanhuibing/workspace/fastdfs-packages/libfastcommon-1.0.43/src/libfastcommon.so /usr/lib;
3. 安装FastDFS
cd fastdfs-6.06/
./make.sh
./make.sh install
#安装结束,程序在/usr/bin/fdfs_trackerd 目录,配置文件在/etc/fdfs下
which fdfs_trackerd
cd /fastdfs-6.06/conf
cp * /etc/fdfs/	#将配置文件复制到/etc 并修改
4. 安装tracker
vi /etc/fdfs/tracker.conf
# tracker 跟踪服务器端口
port=22122
# 存储数据和日志文件的基本路径
base_path = /home/yuqing/fastdfs/tracker
http.server_port=9270

#启动tracker并查看是启动成功
fdfs_trackerd /etc/fdfs/tracker.conf start
netstat -unltp | grep tracker
netstat -tnlp
#若启动报错:/home/yuqing/fastdfs" can't be accessed,执行:
mkdir -p /home/yuqing/fastdfs
#查看日志
tail -n10 /home/yuqing/fastdfs/tracker/logs/trackerd.log
5. 安装storage
vi /etc/fdfs/storage.conf
# storage所属的组 必须和tracker的组名相同
group_name=group1
# 存储服务器端口
port=23000
# 存储数据和日志文件的基本路径
base_path=/home/yuqing/fastdfs/storage
# 路径必须存在 实际储存文件路径,可以配置多个
store_path0=/home/yuqing/fastdfs/storage
#store_path1=/home/yuqing/fastdfs2
# 连接tracker服务器地址,虽然是同一台机器上,但是不能写127.0.0.1,可配多个
tracker_server=192.168.209.121:22122
#http访问文件的端口默认为8888,nginx中配置的监听端口保持一致
http.server_port=801

#启动storage并查看是启动成功
fdfs_storaged /etc/fdfs/storage.conf start
netstat -unltp | grep storage
netstat -unltp | grep fdfs
#查看日志
tail -n10 /home/yuqing/fastdfs/storage/logs/storaged.log

#最后 查看tracker和storage是不是在通信
fdfs_monitor /etc/fdfs/storage.conf
#出现ACTIVE,表示二者均正常启动
设置开机自启tracker、storage
vi /etc/rc.d/rc.local
/etc/init.d/fdfs_trackerd start
/etc/init.d/fdfs_storaged start
6. 测试上传下载删除文件
client.conf文件修改内容 通过Client.conf连接tracker服务器
vi /etc/fdfs/client.conf
# 存储日志文件的基本路径
base_path= /home/yuqing/fastdfs/client
# 对于多跟踪服务器,tracker_server可以执行多次ocur操作
tracker_server= 192.168.1.100:22122
#HTTP settings 默认80
http.tracker_server_port=9270
#用fdfs_test测试上传
fdfs_test /etc/fdfs/client.conf upload /home/hanhuibing/workspace/001.jpg
# fdfs_test测试下载
fdfs_test <config_file> download <group_name> <remote_filename>
fdfs_test /etc/fdfs/client.conf download group1 M00/00/00/wKgBZF68rs6AIxTDAADBeEe-3Ks249_big.jpg
#删除文件
fdfs_delete_file /etc/fdfs/client.conf group1/M00/00/00/wKgSslVkLFOAWOw_AADfP3RIu5Y687_big.jpg
#删除文件需要完整的group_name和remote_filename。
7. 安装fastdfs-nginx-module
cd nginx-1.18.0/
#把module添加nginx中 通过设置安装参数方式添加模块。
./configure --add-module=/home/hanhuibing/workspace/fastdfs-packages/fastdfs-nginx-module-1.22/src
make && make install
cd fastdfs-packages/fastdfs-nginx-module-1.22/src/
cp mod_fastdfs.conf /etc/fdfs/
配置mod_fastdfs.conf文件内容
vi /etc/fdfs/mod_fastdfs.conf
# 连接超时时间默认2
connect_timeout=10
# Tracker Server
tracker_server=192.168.1.100:22122
# StorageServer 默认端口
storage_server_port=23000
# 如果文件ID的uri中包含/group**,则要设置为true
url_have_group_name = true
# Storage 配置的store_path0路径,必须和storage.conf中的一致*****
store_path0=/home/yuqing/fastdfs/storage
# the base path to store log files
base_path=/home/yuqing/fastdfs/nginx
#false url不含group访问,true url加group访问
#亲身测试 设为true 加不加都可以访问
url_have_group_name = false
创建一个软连接,链接到实际存放数据的目录 (可忽略)
ln -s /home/yuqing/fastdfs/storage/data/ /home/yuqing/fastdfs/storage/data/M00
配置Nginx
vi /usr/local/nginx/conf/nginx.conf
erver {
    listen       801;
    server_name  192.168.1.100;
    location ~/group([0-9])/M00 {
       root	/home/yuqing/fastdfs/storage/data;	#(可忽略)
       ngx_fastdfs_module;
    }
}
注:listen 801 要与 /etc/fdfs/storage.conf 的 http.server_port=801相对应
  location 的配置,如果有多个group则配置location ~/group([0-9])/M00 ,没有则不用配group。
启动测试nginx
/usr/local/nginx/sbin/nginx
#查看nginx日志
tail -n10 /usr/local/nginx/logs/error.log
在地址栏访问成功上传的图片: http://192.168.1.100:801/M00/00/00/wKgBZF67-iuATgRAAAGqHGXfVog960.jpg
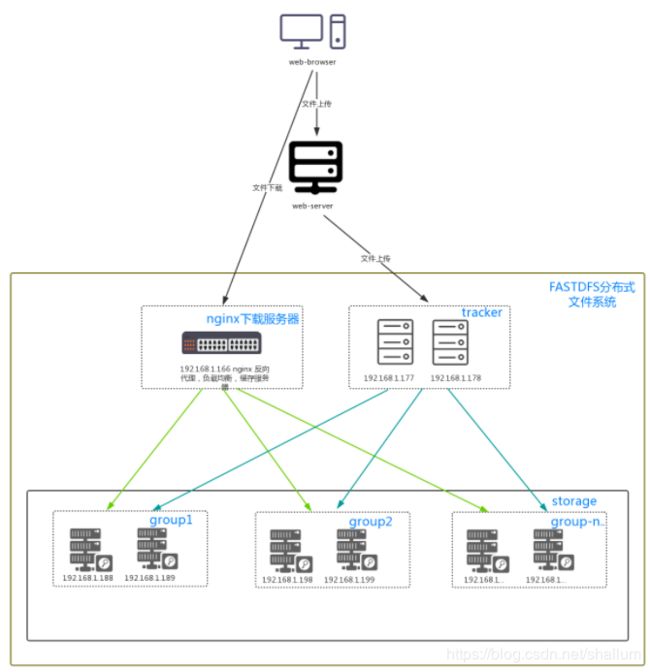
附一张借鉴配置图:

此时你的FSDF文件服务器就搭建OK了