ActivityThread源码解析之Application与Activity启动
-
前言
在看ActivityThread源码的时候,看到有博客提到它承担着整个应用的运转以及生命周期。于是很好奇想一探究竟,跟着跟着大概就把应用启动过程过程了解了一下。这篇文章主要是介绍ActivityThread中有关于应用启动过程以及Activity启动部分。有关Binder的机制或者其他部分内容太多了,以后专门看看。
-
源码分析
Activity有且只有一个ActivityThread对象,他是每一个应用程序所在进程的主线程,。先看看主入口方法main,整个应用的loop死循环是从这边启动的。贴上代码:
public static void main(String[] args) {
	...
    ActivityThread thread = new ActivityThread();
    thread.attach(false);
    ...
    Looper.loop();
    throw new RuntimeException("Main thread loop unexpectedly exited");
}
第一部分是ActivityThread对象执行attach方法。这个是本文要分析的部分,就是他来启动应用。
第二部分是启动Looper,这个是整个应用程序的心脏。下一篇文章将分析。
OK!先跟进attach方法看下。贴上代码:
private void attach(boolean system) {
   	if (!system) {
    	final IActivityManager mgr = ActivityManagerNative.getDefault();
     	try {
        	mgr.attachApplication(mAppThread);
     	} catch (RemoteException ex) {
          	throw ex.rethrowFromSystemServer();
     	}
 	} else {
      	...
 	}
    ...
}
传入system值为false,那么这里会进入判断为true的代码块里面。其中attachApplication是启动Application的方法,也是作为本文分析流程的入口。
1、ActivityThread把mAppThread对象传给AMS
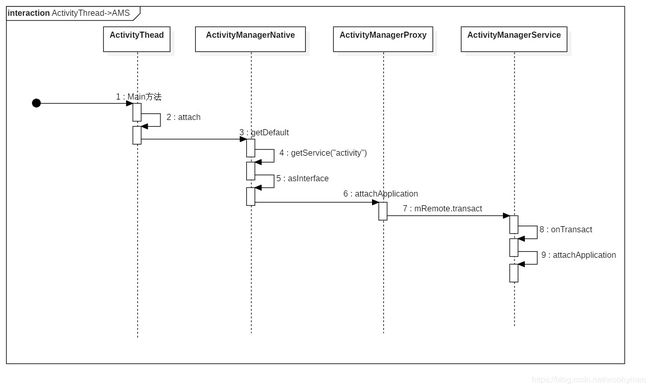
上面介绍到了attachApplication方法,那么接下来看下mAppThread怎么传给AMS的。贴上时序图:
可以看到Activity通过ActivityManagerProxy代理来和AMS通信的。
那么先看下ActivityManagerNative.getDefault()是怎么获取对象的。先进入ActivityManagerNative的getDefault方法,贴上代码:
	/**
     * Retrieve the system's default/global activity manager.
     */
    static public IActivityManager getDefault() {
        return gDefault.get();
    }
注意到是gDefault对象的方法,跟进去:
private static final Singleton gDefault = new Singleton() {
        protected IActivityManager create() {
            IBinder b = ServiceManager.getService("activity");
            if (false) {
                Log.v("ActivityManager", "default service binder = " + b);
            }
            IActivityManager am = asInterface(b);
            if (false) {
                Log.v("ActivityManager", "default service = " + am);
            }
            return am;
        }
    };

public abstract class Singleton {
    private T mInstance;
    protected abstract T create();
    public final T get() {
        synchronized (this) {
            if (mInstance == null) {
                mInstance = create();
            }
            return mInstance;
        }
    }
}
首先Singleton是一个获取单例对象的方法。首次调用get()方法就会执行create(),那么回到gDefault对象的create()方法看看。
首先是ServiceManager.getService("activity")。跟进ServiceManager类源码看一下:
 private static IServiceManager getIServiceManager() {
        if (sServiceManager != null) {
            return sServiceManager;
        }   // Find the service manager
    sServiceManager = ServiceManagerNative.asInterface(BinderInternal.getContextObject());
    return sServiceManager;
}

/**
 * Returns a reference to a service with the given name.
 *
 * @param name the name of the service to get
 * @return a reference to the service, or null if the service doesn't exist
 */
public static IBinder getService(String name) {
    try {
        IBinder service = sCache.get(name);
        if (service != null) {
            return service;
        } else {
            return getIServiceManager().getService(name);
        }
    } catch (RemoteException e) {
        Log.e(TAG, "error in getService", e);
    }
    return null;
}
先看下getIServiceManager()方法,他返回的sServiceManager对象(ServiceManagerService的代理)。ServiceManagerService不是真实存在的,而是存在于C++层的一个单独的进程。
那么getService就是通过代理获取String为activity的服务的IBinder对象,其实也就是AMS的IBinder对象。
现在回到gDefault方法中。看下asInterface(b)方法,其中b也就是上面从ServiceManagerService获取的IBinder对象。
现在看下asInterface方法,贴上代码:
static public IActivityManager asInterface(IBinder obj) {
        if (obj == null) {
            return null;
        }
        IActivityManager in =
            (IActivityManager)obj.queryLocalInterface(descriptor);
        if (in != null) {
            return in;
        }
   	return new ActivityManagerProxy(obj);
}
queryLocalInterface方法用于检查obj是否位于本地进程,很明显前面获取AMS的IBinder对象位于另一个进程。那么asInterface返回的就是new出来的ActivityManagerProxy对象了。
到这一步返回到上面的getDefault()方法,可以知道他实际上返回的是AMS的ActivityManagerProxy代理对象。也就是说attach方法中的mgr对象其实也就是AMS的代理了。
那么看下attach方法中的mgr.attachApplication(mAppThread),也就是通过代理把mAppThread参数传给了AMS。
那到底是传什么东西呢?
看看ActivityManagerProxy源码:
class ActivityManagerProxy implements IActivityManager
{
    ...
    public void attachApplication(IApplicationThread app) throws RemoteException
    {
        Parcel data = Parcel.obtain();
        Parcel reply = Parcel.obtain();
        data.writeInterfaceToken(IActivityManager.descriptor);
        data.writeStrongBinder(app.asBinder());
        mRemote.transact(ATTACH_APPLICATION_TRANSACTION, data, reply, 0);
        reply.readException();
        data.recycle();
        reply.recycle();
    }
}
先是把app写入data数据,然后传给远程的AMS。然后看下AMS那边的接收代码:
@Override
    public boolean onTransact(int code, Parcel data, Parcel reply, int flags)
            throws RemoteException{
        	...
            case ATTACH_APPLICATION_TRANSACTION: {
            	data.enforceInterface(IActivityManager.descriptor);
            	IApplicationThread app = ApplicationThreadNative.asInterface(
                    data.readStrongBinder());
            	if (app != null) {
                	attachApplication(app);
                 }
            	reply.writeNoException();
            	return true;
        }
}
注意到ApplicationThreadNative.asInterface(data.readStrongBinder()),返回的是ApplicationThread的代理对象。然后再看下attachApplication(app),也就是说AMS这边其实获取到的是传进来的ApplicationThread参数对象的代理。
2、AMS通过mAppThread参数对象创建Application
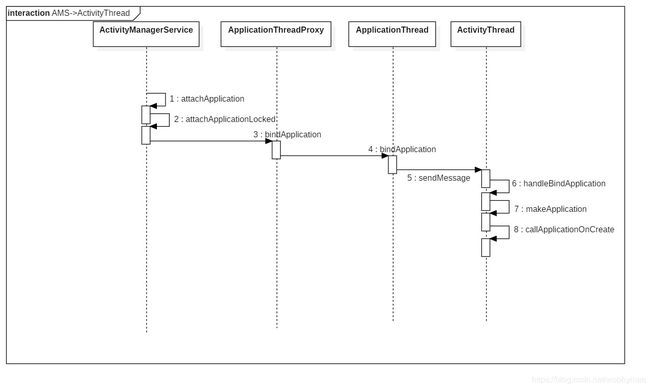
上面说到mAppThread作为传给了AMS,那么AMS持有该对象并回调bindApplication方法。先看下时序图:
上面讲到ActivityThread通过代理调用了AMS的attachApplication方法。那么AMS这边的attachApplication方法是怎么样的呢?看下源码:
@Override
    public final void attachApplication(IApplicationThread thread) {
        synchronized (this) {
            int callingPid = Binder.getCallingPid();
            final long origId = Binder.clearCallingIdentity();
            attachApplicationLocked(thread, callingPid);
            Binder.restoreCallingIdentity(origId);
        }
    }
thread也就是上面提到的ApplicationThread的代理对象applicationThread。重点看下attachApplicationLocked方法,贴上代码:
private final boolean attachApplicationLocked(IApplicationThread thread,
            int pid){
                ...
             thread.bindApplication(processName, appInfo, providers, app.instrumentationClass,
                    profilerInfo, app.instrumentationArguments, app.instrumentationWatcher,
                    app.instrumentationUiAutomationConnection, testMode,
                    mBinderTransactionTrackingEnabled, enableTrackAllocation,
                    isRestrictedBackupMode || !normalMode, app.persistent,
                    new Configuration(mConfiguration), app.compat,
                    getCommonServicesLocked(app.isolated),
                    mCoreSettingsObserver.getCoreSettingsLocked());
            }
也就是说通过这个代理对象执行了bindApplication方法。那么ApplicationThreadProxy是怎么个逻辑呢?
@Override
    public final void bindApplication(String packageName, ApplicationInfo info,
            List<ProviderInfo> providers, ComponentName testName, ProfilerInfo profilerInfo,
            Bundle testArgs, IInstrumentationWatcher testWatcher,
            IUiAutomationConnection uiAutomationConnection, int debugMode,
            boolean enableBinderTracking, boolean trackAllocation, boolean restrictedBackupMode,
            boolean persistent, Configuration config, CompatibilityInfo compatInfo,
            Map<String, IBinder> services, Bundle coreSettings) throws RemoteException {
        Parcel data = Parcel.obtain();
        data.writeInterfaceToken(IApplicationThread.descriptor);
        ...
        mRemote.transact(BIND_APPLICATION_TRANSACTION, data, null,
                IBinder.FLAG_ONEWAY);
        data.recycle();
    }
这个是在AMS里面执行的,也就是把那么一大堆参数存入data中。再调用mRemote.transact传给ActivityThread。那现在看下ActivityThread怎么处理接收到的数据。
case BIND_APPLICATION_TRANSACTION:
{
     data.enforceInterface(IApplicationThread.descriptor);
     ...
     bindApplication(packageName, info, providers, testName, profilerInfo, testArgs,testWatcher, 		uiAutomationConnection, testMode, enableBinderTracking,trackAllocation, 			restrictedBackupMode, persistent, config, compatInfo, services,coreSettings);
     return true;
}
在ActivityThread中回调bindApplication方法。因为传过去的是ApplicationThread对象,也就是说调用ApplicationThread中该方法的实现。贴上代码:
public final void bindApplication(String processName, ApplicationInfo appInfo,
                List providers, ComponentName instrumentationName,
                ProfilerInfo profilerInfo, Bundle instrumentationArgs,
                IInstrumentationWatcher instrumentationWatcher,
                IUiAutomationConnection instrumentationUiConnection, int debugMode,
                boolean enableBinderTracking, boolean trackAllocation,
                boolean isRestrictedBackupMode, boolean persistent, Configuration config,
                CompatibilityInfo compatInfo, Map services, Bundle coreSettings) {

            if (services != null) {
                // Setup the service cache in the ServiceManager
                ServiceManager.initServiceCache(services);
            }

            setCoreSettings(coreSettings);

            AppBindData data = new AppBindData();
            data.processName = processName;
            data.appInfo = appInfo;
            data.providers = providers;
            data.instrumentationName = instrumentationName;
            data.instrumentationArgs = instrumentationArgs;
            data.instrumentationWatcher = instrumentationWatcher;
            data.instrumentationUiAutomationConnection = instrumentationUiConnection;
            data.debugMode = debugMode;
            data.enableBinderTracking = enableBinderTracking;
            data.trackAllocation = trackAllocation;
            data.restrictedBackupMode = isRestrictedBackupMode;
            data.persistent = persistent;
            data.config = config;
            data.compatInfo = compatInfo;
            data.initProfilerInfo = profilerInfo;
            sendMessage(H.BIND_APPLICATION, data);
        }
OK!那就是接收到数据之后,给系统发个Message。系统的Looper接收到信息之后会跳转到handleBindApplication方法中。那么到这边,ActivityThread就开始根据AMS返回回来的信息开始创建应用了。
3、Application的创建以及Activity创建
那么先看下handleBindApplication方法,贴上该方法:
private void handleBindApplication(AppBindData data) {
    ...
    mInstrumentation = (Instrumentation)
        cl.loadClass(data.instrumentationName.getClassName())
        .newInstance();
    ...
    Application app = data.info.makeApplication(data.restrictedBackupMode, null);
    mInitialApplication = app;
    ...
    mInstrumentation.callApplicationOnCreate(app);
    ...
}
首先是利用反射初始化一个mInstrumentation对象出来,后续会经常用到。
data.info是AMS传过来的LoadedApk对象,那么下面看下data.info.makeApplication做了些什么:
public Application makeApplication(boolean forceDefaultAppClass,
    Instrumentation instrumentation) {
    if (mApplication != null) {
            return mApplication;
    }
    ...
    String appClass = mApplicationInfo.className;
    ...
    ContextImpl appContext = ContextImpl.createAppContext(mActivityThread, this);
    app = mActivityThread.mInstrumentation.newApplication( cl, appClass, appContext);
    ...
}
看下newApplication这个方法:
public Application newApplication(ClassLoader cl, String className, Context context)
            throws InstantiationException, IllegalAccessException,
            ClassNotFoundException {
        return newApplication(cl.loadClass(className), context);
    }

static public Application newApplication(Class clazz, Context context)
        throws InstantiationException, IllegalAccessException,
        ClassNotFoundException {
    Application app = (Application)clazz.newInstance();
    app.attach(context);
    return app;
}
可以看到执行了两个步骤:
1、通过反射新建了一个Application对象
2、app调用attach方法,将app与context绑定
回到handleBindApplication的mInstrumentation.callApplicationOnCreate(app)方法:
public void callApplicationOnCreate(Application app) {
    app.onCreate();
}
OK!mInstrumentation可以说是一个代理层,最终Apllication的创建,Activity的创建,以及生命周期都会经过这个对象去执行。个人理解这是代理模式的一个典型例子。
当Application初始化完成后,系统会根据Manifests中的配置的来启动对应的Activity。本文对这个过程不做介绍,先说下处于ActicityThread部分。当启动Activity之后,ActivityThred的H就收到了一条LAUNCH_ACTIVITY。接收到该Message之后,便会调用到handleLaunchActivity方法:
private void handleLaunchActivity(ActivityClientRecord r
    , Intent customIntent
    , String reason) {
    ...
    Activity a = performLaunchActivity(r, customIntent);
    ...
    if (a != null) {
        ...
        handleResumeActivity(r.token
        , false
        , r.isForward
        ,!r.activity.mFinished && !r.startsNotResumed
        , r.lastProcessedSeq, reason);
        ...
    }
}
首先看下performLaunchActivity代码:
private Activity performLaunchActivity(ActivityClientRecord r
    , Intent customIntent) {
    ...
    activity = mInstrumentation.newActivity(cl, component.getClassName(), r.intent);
    ...
    Application app = r.packageInfo.makeApplication(false, mInstrumentation);
    ...
    activity.attach(appContext
        , this
        , getInstrumentation()
        , r.token
        ,.ident
        , app
        , r.intent
        , r.activityInfo
        , title
        , r.parent
        , r.embeddedID
        , r.lastNonConfigurationInstances
        , config
        ,r.referrer
        , r.voiceInteractor
        , window);
    ...
    if (r.isPersistable()) {
        mInstrumentation.callActivityOnCreate(activity, r.state, r.persistentState);
    } else {
        mInstrumentation.callActivityOnCreate(activity, r.state);
    }
    ...
}
先看下mInstrumentation.newActivity。可以看到Activity也交由mInstrumentation代理了,下面是代码。
public Activity newActivity(ClassLoader cl, String className,Intent intent)
            throws InstantiationException, IllegalAccessException,ClassNotFoundException {
        return (Activity)cl.loadClass(className).newInstance();
}
创建Activity其实也是通过反射直接new出来的。
再看下callActivityOnCreate方法,也是交给mInstrumentation处理。他最终会调用Activity的两个方法:
final void performCreate(Bundle icicle) {
        restoreHasCurrentPermissionRequest(icicle);
        onCreate(icicle);
        mActivityTransitionState.readState(icicle);
        performCreateCommon();
}

final void performCreate(Bundle icicle, PersistableBundle persistentState) {
    restoreHasCurrentPermissionRequest(icicle);
    onCreate(icicle, persistentState);
    mActivityTransitionState.readState(icicle);
    performCreateCommon();
}
这也就是Activity的oncreate生命周期,至此Activity也跑起来了。
-
后续任务
1、应用的启动过程还涉及到很多东西,比如说Manifest解析,Binder机制等等。可以逐渐了解。

