activeMQ简单示例
消息队列:
消息队列中间件是分布式系统中重要的组件,主要解决应用耦合,异步消息,流量削锋等问题。
实现高性能,高可用,可伸缩和最终一致性架构。
使用较多的消息队列有ActiveMQ,RabbitMQ,ZeroMQ,Kafka,MetaMQ,RocketMQ。
为什么使用消息队列?消息队列有什么好处请看?
https://www.zhihu.com/question/54152397?sort=created
在官网下载
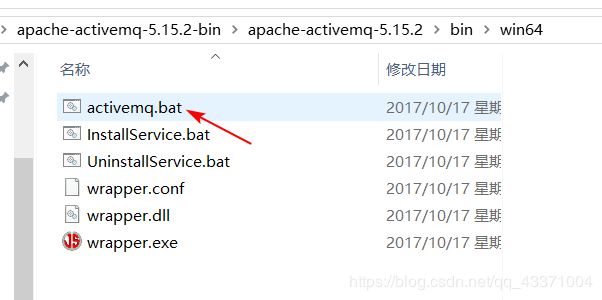
下载完毕解压,安装对应的系统位数打开bat文件

启动成功:(如果出现wrapper失败,因该是端口占用的问题,百度就行。)
在http://127.0.0.1:8161就可以看到管理页面。用户名密码都是admin

Maven项目演示:
普及知识:向消息队列里面放消息的叫做生产者。
从消息队列里面取消息的叫做消费者。
新建项目引入依赖
<dependency>
        <groupId>org.apache.activemqgroupId>
        <artifactId>activemq-coreartifactId>
        <version>5.7.0version>
    dependency>
生产者代码:
 package com.jf.mq.producer;


import org.apache.activemq.ActiveMQConnectionFactory;

import javax.jms.*;

public class Producer {
    public static void main(String[] args) throws JMSException {
        //得到连接工厂
        ActiveMQConnectionFactory connectionFactory = new ActiveMQConnectionFactory(ActiveMQConnectionFactory.DEFAULT_USER, ActiveMQConnectionFactory.DEFAULT_PASSWORD
                , "tcp://127.0.0.1:61616");
        //创建jms连接
        Connection connection = connectionFactory.createConnection();
        connection.start();
        //创建session,参数是否开启事务,签收模式(自动签收Session.AUTO_ACKNOWLEDGE)
        Session session = connection.createSession(false, Session.AUTO_ACKNOWLEDGE);

        //创建queue
        Queue queue = session.createQueue("jf-queue");//Destination
        //消息生产者
        MessageProducer producer = session.createProducer(queue);
        //设置不持久化
        producer.setDeliveryMode(DeliveryMode.NON_PERSISTENT);
        //发送消息
        String string="hello activeMQ,第一次使用自动签收。1112222222";
        TextMessage message = session.createTextMessage(string);
        producer.send(message);
        //session.commit();//使用session签收之后,需要提交。
        System.out.println("生产成功");
        // 关闭连接
        connection.close();


    }
}
消费者代码:
package com.jf.mq.consumer;

import org.apache.activemq.ActiveMQConnectionFactory;

import javax.jms.*;

public class Consumer {
    public static void main(String[] args) throws JMSException {
        //得到连接工厂
        ActiveMQConnectionFactory connectionFactory = new ActiveMQConnectionFactory(ActiveMQConnectionFactory.DEFAULT_USER, ActiveMQConnectionFactory.DEFAULT_PASSWORD
                , "tcp://127.0.0.1:61616");
        //创建jms连接
        Connection connection = connectionFactory.createConnection();
        connection.start();
        //创建session,参数是否开启事务,签收模式(手动签收false,Session.CLIENT_ACKNOWLEDGE)
        Session session = connection.createSession(false, Session.AUTO_ACKNOWLEDGE);
        //创建queue
        Queue queue = session.createQueue("jf-queue");//Destination
        //消息生产者
        MessageConsumer consumer = session.createConsumer(queue);

        while (true) {
            TextMessage message = (TextMessage) consumer.receive();
            if (message != null) {
                System.out.println("收到消息:" + message.getText());
                //message.acknowledge();//使用收到签收时候需要使用。手动签收
                //session.commit();//使用session签收时候需要使用。接收消息 session签收
            } else {
                break;
            }
        }
        //关闭连接
        connection.close();
    }
}
消息接收模式
Session createSession(boolean transacted, int acknowledgeMode) throws JMSException;
两个参数,第一个是是否开启事务,第二个接收方式
自动接收方式:
Session session = connection.createSession(false, Session.AUTO_ACKNOWLEDGE);
手动接收方式:
Session session = connection.createSession(false, Session.CLIENT_ACKNOWLEDGE);
并且在消息的消费者方需要加上,确认接收message.acknowledge();//使用收到签收时候需要使用。手动签收
注意:如果不签收,每次启动消费者都会收到消息。
session事务接收方式:
Session session = connection.createSession(true, Session.SESSION_TRANSACTED);
在消息提供者方需要加上提交。session.commit();//使用session签收之后,需要提交。
并在消息消费者方加上,确认接收,session.commit();//使用session签收时候需要使用。接收消息 session签收
两种类型模式(queue和topic) 还有一种是发布订阅模式(topic)。和redis中的差不多。类似于关注公众号的效果。
区别:queue模式,如果先生产消息,消费者不管在生产者之前开启还是之后开启,都会收到全部消息。
topic,只有订阅了生产者(发布者)的,才能收到消息。就是说生产者先生产了消息,消费者后开启,是收不到它开启之前生产者生产的消息的。
发布订阅模式代码改动的地方,生产者消费者都只需要改,生产者和消费者前期的定义是统一的:

springboot中使用activeMQ
pom
 <dependencies>
        <dependency>
            <groupId>org.springframework.bootgroupId>
            <artifactId>spring-boot-starterartifactId>
        dependency>
        <dependency>
            <groupId>org.springframework.bootgroupId>
            <artifactId>spring-boot-starter-webartifactId>
        dependency>
        <dependency>
            <groupId>com.alibabagroupId>
            <artifactId>fastjsonartifactId>
            <version>1.2.40version>
        dependency>

        <dependency>
            <groupId>org.springframework.bootgroupId>
            <artifactId>spring-boot-starter-activemqartifactId>

        dependency>
        <dependency>
            <groupId>org.springframework.bootgroupId>
            <artifactId>spring-boot-starter-testartifactId>
            <scope>testscope>
            <exclusions>
                <exclusion>
                    <groupId>org.junit.vintagegroupId>
                    <artifactId>junit-vintage-engineartifactId>
                exclusion>
            exclusions>
        dependency>
    dependencies>
主要是这个依赖
 <dependency>
            <groupId>org.springframework.bootgroupId>
            <artifactId>spring-boot-starter-activemqartifactId>

        dependency>
package com.jf.config;

import org.apache.activemq.command.ActiveMQQueue;
import org.springframework.beans.factory.annotation.Value;
import org.springframework.context.annotation.Bean;
import org.springframework.context.annotation.Configuration;

import javax.jms.Queue;


@Configuration
public class QueueConfig {

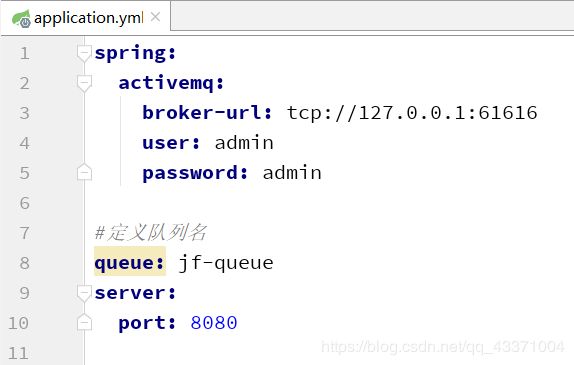
    @Value("${queue}")//拿到配置文件中的队列名
    private String queue;
    @Bean
    public Queue queue(){
        return new ActiveMQQueue(queue);
    }
}
发送消息类(消息提供者)
package com.jf.config;

import org.springframework.beans.factory.annotation.Autowired;
import org.springframework.jms.core.JmsMessagingTemplate;
import org.springframework.stereotype.Component;

import javax.jms.Queue;

@Component
public class SendServer {
    @Autowired
    private JmsMessagingTemplate jmsMessagingTemplate;
    @Autowired
    private Queue queue;

    public void send(String msg){
        jmsMessagingTemplate.convertAndSend(queue,msg);

    }
}
为了模拟真实环境,加入了json。
导入依赖
<dependency>
            <groupId>com.alibabagroupId>
            <artifactId>fastjsonartifactId>
            <version>1.2.40version>
        dependency>
消息接收者(消费者)(可以单独部署)
package com.jf.listen;

import com.alibaba.fastjson.JSON;
import com.alibaba.fastjson.JSONObject;
import org.springframework.jms.annotation.JmsListener;
import org.springframework.stereotype.Component;

@Component
public class Consumer {

    @JmsListener(destination = "${queue}")
    public void receive(String msg){
        //解析json
        JSONObject jsonObject = JSON.parseObject(msg);
        if ("email".equals(jsonObject.get("type"))){
            System.out.println("监听器收到消息:发送email给"+jsonObject.get("to")+",内容为:"+jsonObject.get("content"));
        }

    }
}
controller类
package com.jf.controller;

import com.alibaba.fastjson.JSONObject;
import com.jf.config.SendServer;
import org.springframework.beans.factory.annotation.Autowired;
import org.springframework.stereotype.Controller;
import org.springframework.web.bind.annotation.RequestMapping;
import org.springframework.web.bind.annotation.RestController;

@RestController
public class UserController {

    @Autowired
    private SendServer sendServer;


    @RequestMapping("/register")
    public String register(String name) {

        //构造json环境
        JSONObject jsonObject = new JSONObject();
        jsonObject.put("type", "email");
        jsonObject.put("to", "[email protected]");
        jsonObject.put("content", "你好啊!"+name);
        sendServer.send(jsonObject.toJSONString());
        return "注册成功";
    }

}
