一、git、github、gitlab的区别
Git是版本控制系统,Github是在线的基于Git的代码托管服务。
GitHub是2008年由Ruby on Rails编写而成。GitHub同时提供付费账户和免费账户。这两种账户都可以创建公开的代码仓库,只有付费账户可以创建私有的代码仓库。
Gitlab解决了这个问题, 可以在上面创建免费的私人repo。
二、gitlab server搭建过程
[root@gitlab ~]#  yum install -y curl openssh-server openssh-clients postfix cronie policycoreutils-python

//10.x以后开始依赖policycoreutils-python
[root@gitlab ~]#  systemctl start postfix
[root@gitlab ~]# systemctl enable postfix
gitlab的下载地址:https://mirrors.tuna.tsinghua.edu.cn/gitlab-ce/yum/el7/
安装gitlab:
[root@gitlab ~]# rpm -ivh  gitlab-ce-11.1.4-ce.0.el7.x86_64.rpm
warning: gitlab-ce-11.1.4-ce.0.el7.x86_64.rpm: Header V4 RSA/SHA1 Signature, key ID f27eab47: NOKEY
Preparing...                          ################################# [100%]
Updating / installing...
   1:gitlab-ce-11.1.4-ce.0.el7        ################################# [100%]
It looks like GitLab has not been configured yet; skipping the upgrade script.

       *.                  *.
      ***                 ***
     *****               *****
    .******             *******
    ********            ********
   ,,,,,,,,,***********,,,,,,,,,
  ,,,,,,,,,,,*********,,,,,,,,,,,
  .,,,,,,,,,,,*******,,,,,,,,,,,,
      ,,,,,,,,,*****,,,,,,,,,.
         ,,,,,,,****,,,,,,
            .,,,***,,,,
                ,*,.

     _______ __  __          __
    / ____(_) /_/ /   ____ _/ /_
   / / __/ / __/ /   / __ `/ __ \
  / /_/ / / /_/ /___/ /_/ / /_/ /
  \____/_/\__/_____/\__,_/_.___/

Thank you for installing GitLab!
GitLab was unable to detect a valid hostname for your instance.
Please configure a URL for your GitLab instance by setting `external_url`
configuration in /etc/gitlab/gitlab.rb file.
Then, you can start your GitLab instance by running the following command:
  sudo gitlab-ctl reconfigure

For a comprehensive list of configuration options please see the Omnibus GitLab readme
https://gitlab.com/gitlab-org/omnibus-gitlab/blob/master/README.md
gitlab的配置文件 /etc/gitlab/gitlab.rb, 编辑如下:
[root@gitlab ~]# vim /etc/gitlab/gitlab.rb
[root@gitlab ~]# grep "^external_url" /etc/gitlab/gitlab.rb
external_url 'http://192.168.174.131'   绑定监听的域名或IP
[root@gitlab ~]#  grep "'listen_port" /etc/gitlab/gitlab.rb
nginx['listen_port'] = 8000   可以修改登陆端口没有端口占用可以不改
[root@gitlab ~]#
使用gitlab-ctl reconfigure 自动配置,并安装数据库,初始化信息,时间较长,如下:
[root@gitlab ~]#  gitlab-ctl reconfigure
                                    ······
使用gitlab-ctl start 启动gitlab服务,如下所示:
[root@gitlab ~]# gitlab-ctl start
ok: run: alertmanager: (pid 13983) 171s
ok: run: gitaly: (pid 13914) 190s
ok: run: gitlab-monitor: (pid 13945) 180s
ok: run: gitlab-workhorse: (pid 13897) 193s
ok: run: logrotate: (pid 12757) 1081s
ok: run: nginx: (pid 12712) 1092s
ok: run: node-exporter: (pid 12929) 1024s
ok: run: postgres-exporter: (pid 14004) 172s
ok: run: postgresql: (pid 12193) 1459s
ok: run: prometheus: (pid 13959) 177s
ok: run: redis: (pid 12064) 1481s
ok: run: redis-exporter: (pid 13108) 951s
ok: run: sidekiq: (pid 12597) 1105s
ok: run: unicorn: (pid 12530) 1116s
[root@gitlab ~]# lsof -i:8000
COMMAND  PID       USER   FD   TYPE DEVICE SIZE/OFF NODE NAME
nginx   3188       root    7u  IPv4  27028      0t0  TCP *:irdmi (LISTEN)
nginx   3189 gitlab-www    7u  IPv4  27028      0t0  TCP *:irdmi (LISTEN)
nginx   3190 gitlab-www    7u  IPv4  27028      0t0  TCP *:irdmi (LISTEN)
nginx   3191 gitlab-www    7u  IPv4  27028      0t0  TCP *:irdmi (LISTEN)
nginx   3192 gitlab-www    7u  IPv4  27028      0t0  TCP *:irdmi (LISTEN)
修改配置文件,添加smtp邮件功能
[root@gitlab ~]# vim /etc/gitlab/gitlab.rb
[root@gitlab ~]# grep -P "^[^#].*smtp_|user_email|gitlab_email" /etc/gitlab/gitlab.rb
gitlab_rails['gitlab_email_enabled'] = true
gitlab_rails['gitlab_email_from'] = '[email protected]'
gitlab_rails['gitlab_email_display_name'] = 'Gitlab'
gitlab_rails['gitlab_email_reply_to'] = '[email protected]'
gitlab_rails['gitlab_email_subject_suffix'] = '[gitlab]'
gitlab_rails['smtp_enable'] = true
gitlab_rails['smtp_address'] = "smtp.aliyun.com"
gitlab_rails['smtp_port'] = 465
gitlab_rails['smtp_user_name'] = "[email protected]"
gitlab_rails['smtp_password'] = "STMP授权码"
gitlab_rails['smtp_domain'] = "smtp.aliyun.com"
gitlab_rails['smtp_authentication'] = "login"
gitlab_rails['smtp_enable_starttls_auto'] = true
gitlab_rails['smtp_tls'] = true
user['git_user_email'] = "[email protected]"

[root@gitlab ~]# gitlab-ctl reconfigure
                                    ······

[root@gitlab ~]# gitlab-ctl stop
ok: down: alertmanager: 0s, normally up
ok: down: gitaly: 1s, normally up
ok: down: gitlab-monitor: 0s, normally up
ok: down: gitlab-workhorse: 1s, normally up
ok: down: logrotate: 0s, normally up
ok: down: nginx: 1s, normally up
ok: down: node-exporter: 0s, normally up
ok: down: postgres-exporter: 0s, normally up
ok: down: postgresql: 0s, normally up
ok: down: prometheus: 0s, normally up
ok: down: redis: 1s, normally up
ok: down: redis-exporter: 0s, normally up
ok: down: sidekiq: 0s, normally up
ok: down: unicorn: 0s, normally up

[root@gitlab ~]# gitlab-ctl start
ok: run: alertmanager: (pid 12757) 1s
ok: run: gitaly: (pid 12759) 0s
ok: run: gitlab-monitor: (pid 12784) 1s
ok: run: gitlab-workhorse: (pid 12788) 0s
ok: run: logrotate: (pid 12797) 0s
ok: run: nginx: (pid 12814) 0s
ok: run: node-exporter: (pid 12823) 0s
ok: run: postgres-exporter: (pid 12830) 1s
ok: run: postgresql: (pid 12837) 0s
ok: run: prometheus: (pid 12845) 1s
ok: run: redis: (pid 12859) 0s
ok: run: redis-exporter: (pid 12865) 1s
ok: run: sidekiq: (pid 12877) 0s
ok: run: unicorn: (pid 12885) 1s
使用gitlab-rails console命令进行发送邮件测试,如下所示:
[root@gitlab ~]# gitlab-rails console
-------------------------------------------------------------------------------------
 GitLab:       11.1.4 (63daf37)
 GitLab Shell: 7.1.4
 postgresql:   9.6.8
-------------------------------------------------------------------------------------
Loading production environment (Rails 4.2.10)
irb(main):001:0> Notify.test_email('[email protected]', 'Message Subject', 'Message Body').deliver_now

Notify#test_email: processed outbound mail in 616.6ms

Sent mail to [email protected] (1584.9ms)
Date: Tue, 21 Aug 2018 09:59:10 +0800
From: Gitlab
Reply-To: Gitlab
To: [email protected]
Message-ID: <5b7b71ee509b8_1acd3ff08d2daf8874395@gitlab_3.mail>
Subject: Message Subject
Mime-Version: 1.0
Content-Type: text/html;
 charset=UTF-8
Content-Transfer-Encoding: 7bit
Auto-Submitted: auto-generated
X-Auto-Response-Suppress: All


Message Body

=> #, >, >, , >, , , , , , >
irb(main):002:0> exit
[root@gitlab ~]#
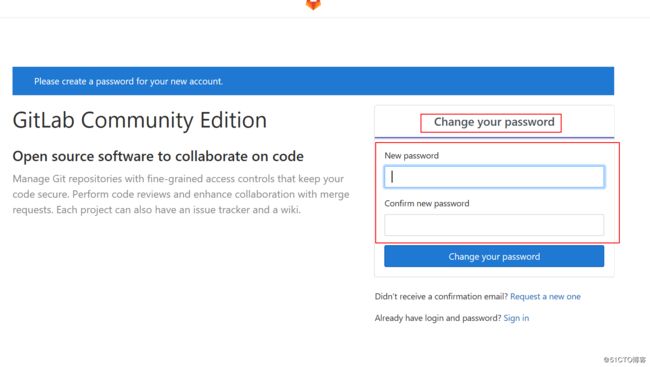
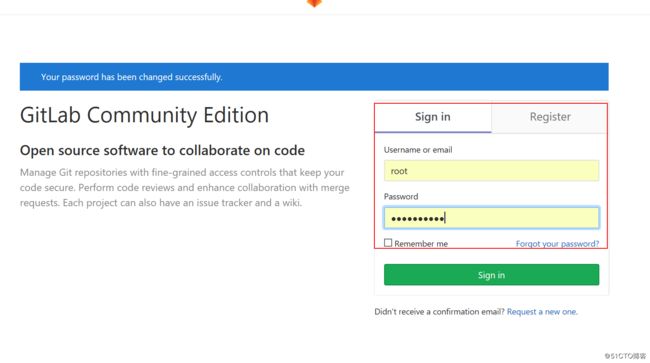
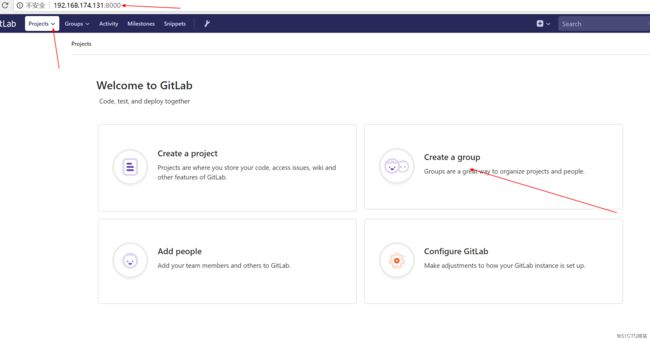
三、gitlab的使用在浏览器中输入 http://192.168.174.131:8000 ,然后 change password: ,并使用root用户登录 即可 (后续动作根据提示操作,要开放端口)
登陆:
创建 group,组名为date:
去掉用户的自动注册功能:
admin are -> settings -> Sign-up Restrictions 去掉钩钩,然后拉到最下面保存,重新登录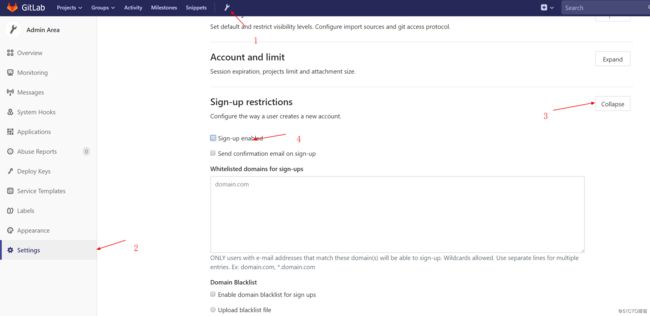
创建用户liqing如下所示,下拉保存:
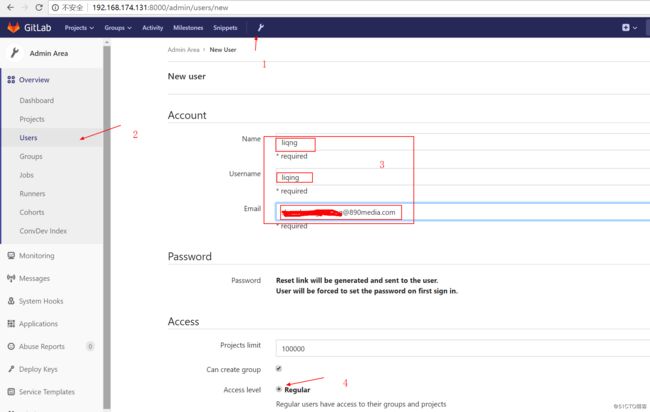
同样的方法,再创建libai 、luban 用户。用户添加完毕后,
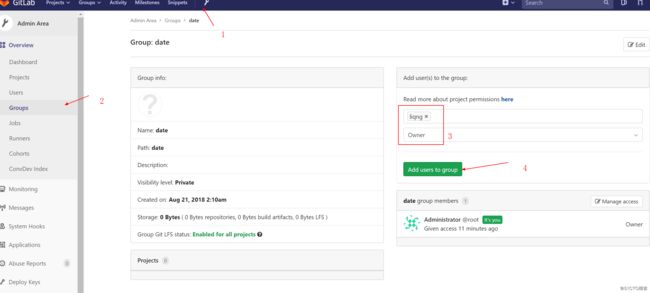
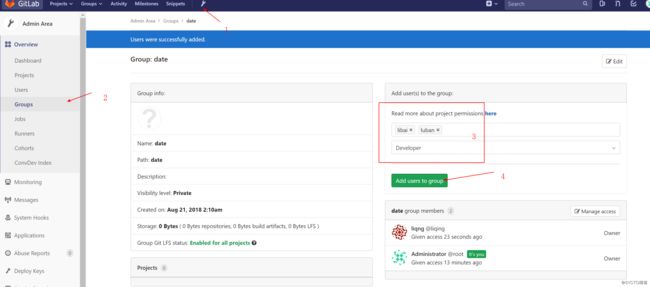
将用户添加到组中,并指定liqing为本组的owner:
同样的方法将用户libai、luban也添加到组中,并指定他们为Developer:
使用liqing用户的身份与密码登录到gitlab界面中,并创建Project ,如下所示:
密码重置邮件,如果找不到网页,请注意端口我这边端口8000需要访问添加8000端口。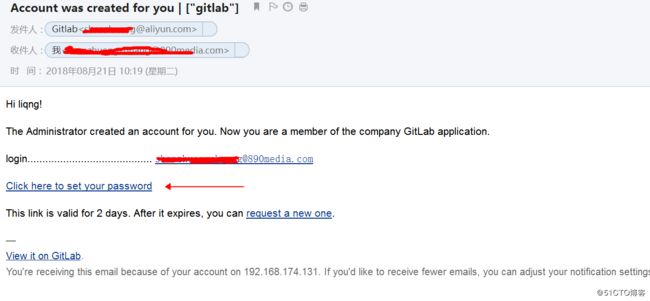
liqing用户的身份登陆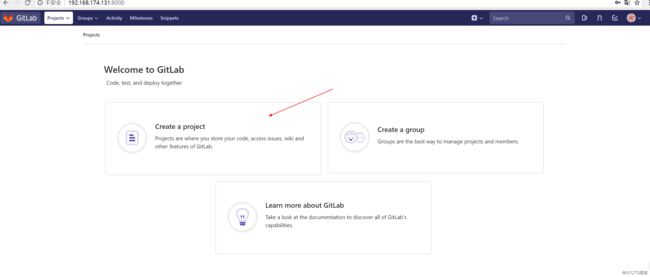
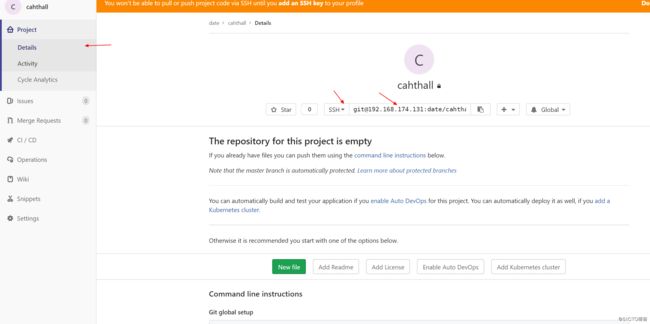
指定项目的存储路径和项目名称,如下所示
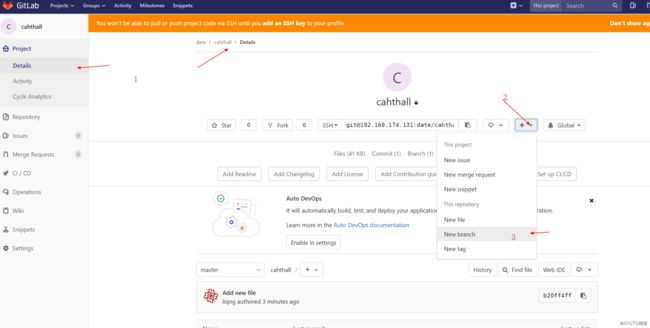
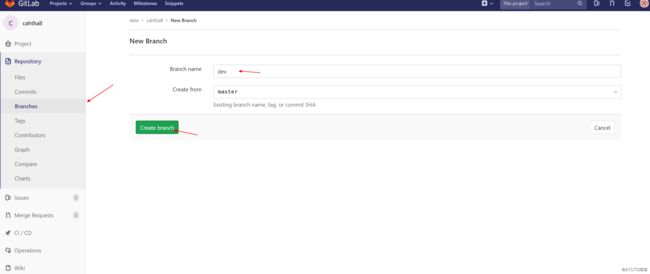
为项目创建分支,dev
在 client 上添加所创的用户:
[root@gitlab ~]# useradd liqing
[root@gitlab ~]# useradd libai
[root@gitlab ~]# useradd luban
[root@gitlab ~]# su - liqing
[liqing@gitlab ]$ ssh-keygen -C 注册使用的邮箱@890media.com
Generating public/private rsa key pair.
Enter file in which to save the key (/home/liqing/.ssh/id_rsa):
Created directory '/home/liqing/.ssh'.
Enter passphrase (empty for no passphrase):
Enter same passphrase again:
Your identification has been saved in /home/liqing/.ssh/id_rsa.
Your public key has been saved in /home/liqing/.ssh/id_rsa.pub.
The key fingerprint is:
SHA256:867FHnQ3nI24E9djXBJmCKBBD9E5jcsYmJYwUHEhRoQ
The key's randomart image is:
+---[RSA 2048]----+
|.*Xoo*=o.=.. .+  |
|E. += .== . .o . |
|   .  .+.o    . .|
|      . o    o.*.|
|        S . + B+o|
|         = . =...|
|          = o    |
|         + . .   |
|        ..o      |
+----[SHA256]-----+
[liqing@gitlab ~]$ cat .ssh/id_rsa.pub
ssh-rsa AAAAB3NzaC1yc2EAAAADAQABAAABAQDFHHXUXiKBZT3e3UaeMwVyBoVcu1MavRca4fl91ZynQHI5U2w/QhcdO694OHGjUU5eZ5WbtZLsHD2MDlT4wo475h3HUTtGQ8q6+AHFvZvh9kyPs3dN/LG5ETfBC58T0tanr4FdhcfSNP5ZtRXIFpBbvHJjHaMvj7Y0BUMR9RD9RwKdD0c+P+60//rWMZnfZuB4iNAEJaODEVJUvuvcglzcI/1qhNeLAKIeVLIkObfsA35dd2Iw/yAm547KSxfov6tANh0Es9PkrgApH6G24PHD0lI7RhS5ixkwfv/KBFrMuYZ9VriYk+8xN5V7oXwmdVCyb0kHGGipCneWB4ugCt/R  邮箱地址@890media.com
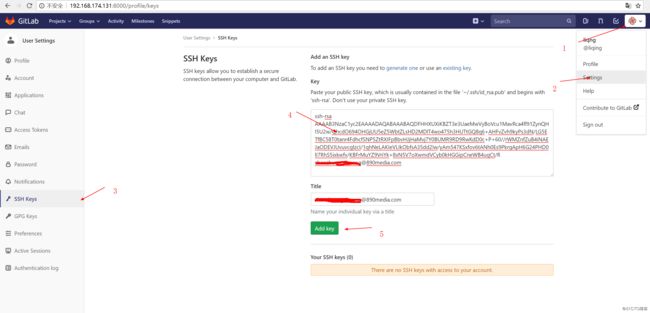
将liqing的公钥复制到gitlab中: 使用liqing用户的身份与密码登录到gitlab界面中,然后在ssh-key中添加 相关的key ,如下所示:
为liqing用户配置git ,如下所示:
[liqing@gitlab ~]$ git config --global user.email "邮箱@890media.com"
[liqing@gitlab ~]$ git config --global user.name "liqing"
[liqing@gitlab ~]$ git clone [email protected]:date/cahthall.git
正克隆到 'cahthall'...
The authenticity of host '192.168.174.131 (192.168.174.131)' can't be established.
ECDSA key fingerprint is SHA256:58irR7pXLQYPeqtrpL0d6kBwlBlF5zmBVcD5yTU+baE.
ECDSA key fingerprint is MD5:ce:d9:0d:3a:e7:a3:a1:17:6a:94:dc:65:bc:1a:42:19.
Are you sure you want to continue connecting (yes/no)? yes
Warning: Permanently added '192.168.174.131' (ECDSA) to the list of known hosts.
remote: Counting objects: 3, done.
remote: Total 3 (delta 0), reused 0 (delta 0)
接收对象中: 100% (3/3), done.
[liqing@gitlab ~]$ ls
cahthall
[liqing@gitlab ~]$ cd cahthall/
[liqing@gitlab cahthall]$ ls
ret
[liqing@gitlab cahthall]$
创建一下新文件,添加内容,并提交到master分支:
[liqing@gitlab cahthall]$ vim test.sh
[liqing@gitlab cahthall]$ cat test.sh
#!/bin/bash
echo "gitlab test"
[liqing@gitlab cahthall]$ git add .
[liqing@gitlab cahthall]$ git commit -m '201808211101'
[master 879e985] 201808211101
 1 file changed, 2 insertions(+)
 create mode 100644 test.sh
[liqing@gitlab cahthall]$ git push -u origin master
Counting objects: 4, done.
Delta compression using up to 4 threads.
Compressing objects: 100% (2/2), done.
Writing objects: 100% (3/3), 303 bytes | 0 bytes/s, done.
Total 3 (delta 0), reused 0 (delta 0)
To [email protected]:date/cahthall.git
   b20ff4f..879e985  master -> master
分支 master 设置为跟踪来自 origin 的远程分支 master。
使用luban用户登录,并clone 项目,如下所示:
[root@gitlab ~]# su - luban
[luban@gitlab ~]$ ssh-keygen -C 邮箱@aliyun.com
Generating public/private rsa key pair.
Enter file in which to save the key (/home/luban/.ssh/id_rsa):
Created directory '/home/lubani/.ssh'.
Enter passphrase (empty for no passphrase):
Enter same passphrase again:
Your identification has been saved in /home/lubani/.ssh/id_rsa.
Your public key has been saved in /home/luban/.ssh/id_rsa.pub.
The key fingerprint is:
SHA256:D8w2iEnhnUwKw2HcrpG2agyvX5U69L58UN6DCF++0lI
The key's randomart image is:
+---[RSA 2048]----+
| o=o. .          |
| .o+.* .         |
|   o+ +          |
|  +.oo =o        |
| . ++o+*So       |
|. o. ++.E+o      |
|oo  + .+ ...     |
|.o.. +o +        |
|oo.   +=         |
+----[SHA256]-----+
[luban@gitlab ~]$ cat .ssh/id_rsa.pub
ssh-rsa AAAAB3NzaC1yc2EAAAADAQABAAABAQDQeyj3qVK37eXw95DmlVSc4Ix6TJ0N8ya0aJIq3q0c+F7sewxTygrqxaUBLD9q48WsEEQPebC7xJuIDG+hGcwHg4Mtv2aWSjJl+ZknW5xh/DogtH9Qr1q3wUoPRA3wCIG/Al9ggEW+nL3CiyBCgQh6JZ7SUMs4xfVMI/ogOnUMxS2uVKXow5SZS2yOtwALlguwG6hbRNX9fHgD2IC7tjU0UxaXLc/AvjxoRhca+Fg7exzoh1nSr9WfVfsdf/Sx3LFD9iW1xH881ladXKLM8wcn6fw81DYk5kOiGwUVybxrEv4IyRc0iHYhJDvmuwPfE2MqtBzeR3/M3vFEjIwG0Hgz 邮箱@aliyun.com
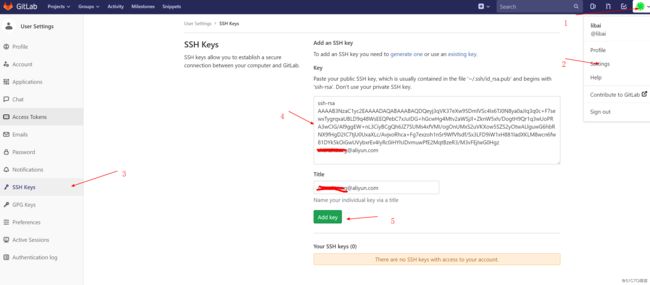
同样需要使用luban用户登录gitlab web 界面,并添加相应的ssh-key。然后设置git ,并clone项目:
[luban@gitlab ~]$ git config --global user.email "[email protected]"
[luban@gitlab ~]$ git config --global user.name "luban"
[luban@gitlab ~]$ git clone [email protected]:date/cahthall.git
正克隆到 'cahthall'...
The authenticity of host '192.168.174.131 (192.168.174.131)' can't be established.
ECDSA key fingerprint is SHA256:58irR7pXLQYPeqtrpL0d6kBwlBlF5zmBVcD5yTU+baE.
ECDSA key fingerprint is MD5:ce:d9:0d:3a:e7:a3:a1:17:6a:94:dc:65:bc:1a:42:19.
Are you sure you want to continue connecting (yes/no)? yes
Warning: Permanently added '192.168.174.131' (ECDSA) to the list of known hosts.
remote: Counting objects: 6, done.
remote: Compressing objects: 100% (3/3), done.
remote: Total 6 (delta 0), reused 0 (delta 0)
接收对象中: 100% (6/6), done.
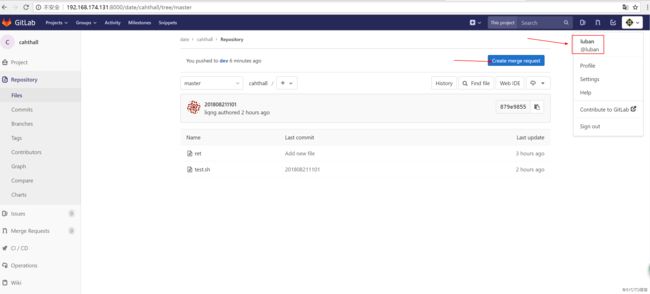
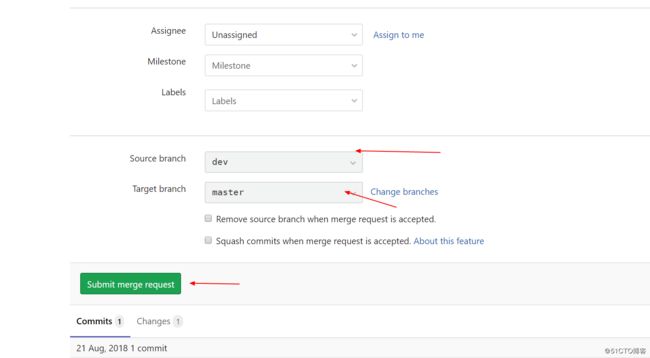
切换到dev分支,修改文件内容,并将新code提交到dev分支(Developer角色默认并没有提交master的权限):
[luban@gitlab ~]$ ls
cahthall
[luban@gitlab ~]$ cd cahthall/
[luban@gitlab cahthall]$ ls
ret  test.sh
[luban@gitlab cahthall]$ cat test.sh
#!/bin/bash
echo "gitlab test"
[luban@gitlab cahthall]$ git checkout dev
分支 dev 设置为跟踪来自 origin 的远程分支 dev。
切换到一个新分支 'dev'
[luban@gitlab cahthall]$ ls
ret  test.sh
[luban@gitlab cahthall]$ vim test.sh
[luban@gitlab cahthall]$ git add .
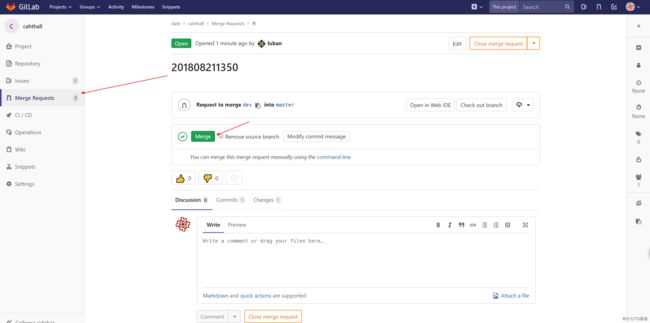
[luban@gitlab cahthall]$ git commit -m '201808211350'
[dev e1ad4c1] 201808211350
 1 file changed, 1 insertion(+)
[luban@gitlab cahthall]$ git push -u origin dev
Counting objects: 5, done.
Delta compression using up to 4 threads.
Compressing objects: 100% (3/3), done.
Writing objects: 100% (3/3), 303 bytes | 0 bytes/s, done.
Total 3 (delta 0), reused 0 (delta 0)
remote:
remote: To create a merge request for dev, visit:
remote:   http://192.168.174.131/date/cahthall/merge_requests/new?merge_request%5Bsource_branch%5D=dev
remote:
To [email protected]:date/cahthall.git
   879e985..e1ad4c1  dev -> dev
分支 dev 设置为跟踪来自 origin 的远程分支 dev。
[luban@gitlab cahthall]$
[luban@gitlab cahthall]$ git checkout master
切换到分支 'master'
[luban@gitlab cahthall]$ git branch
  dev
* master
[luban@gitlab cahthall]$ 