环境准备
本文只搭建一个虚拟机,适合初学者练习,同时本文也列出了现实中集群部署的操作与建议。
- VMWare
虚拟机分配2G内存时创建数据库报错。注意内存分配多一些。 - CentOS 7.3.1611: 网易开源镜像站下载
版本建议(CentOS版本不要学我!):
This directory (and version of CentOS) is deprecated. For normal users,
you should use /7/ and not /7.3.1611/ in your path. Please see this FAQ
concerning the CentOS release scheme:
https://wiki.centos.org/FAQ/General
If you know what you are doing, and absolutely want to remain at the 7.3.1611
level, go to http://vault.centos.org/ for packages.
Please keep in mind that 7.3.1611 no longer gets any updates, nor
any security fix's. - Greenplum 5.4.0:官方下载
 Greenplum官方下载
 - 部署目标:一台机器搭建Greenplum:Master + 2 * Primary Segment + 2 * Mirror Segment。
1. VMWare安装CentOS及准备工作
VMWare上安装CentOS步骤略
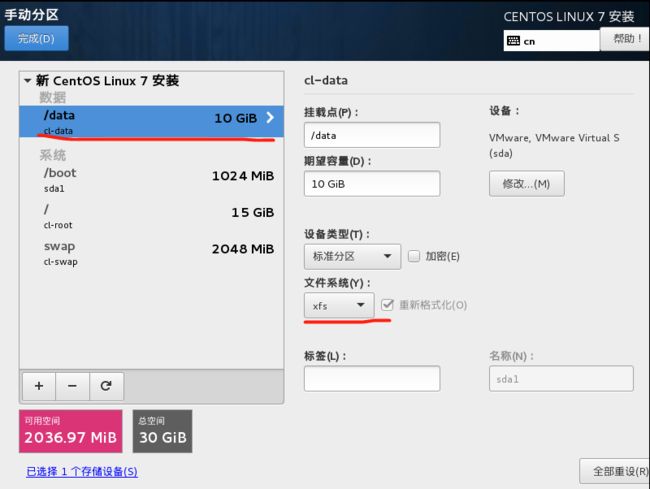
1.1 数据盘
Greenplum数据盘需要使用xfs格式,建议建立独立的分区,方便管理。在RHEL/CentOS 6中,需要注意设置;在RHEL/CentOS 7中,默认为xfs格式。
1.2 配置选择
- 典型的Greenplum集群由Master + Master Standby + n * Segment构成。
- Master Standby通常是独立的物理节点,也可以和某一个Segment部署在一起(不推荐)。在不要求高可用的情况下,甚至可以不设置Master Standby。
- 要求每台Segment应具有相同的硬件配置。
- Master及Master Standby不存储数据,对磁盘空间无特殊要求。
- 交换机要尽量高配置的。
- 本例为单台机器,和集群部署不同的地方会单独指出。
1.3 主机名
集群中建议如下命名,方便统一管理:
- mdw0: Master
- mdw1: Master Standby
- sdw0: Segment 1
……- sdwn: Segment n
设置主机名,vi /etc/sysconfig/network,加入如下内容:
# for gpdb
NETWORKING=yes
HOSTNAME=mdw1
vi /etc/hostname:
mdw1
1.4 hosts
集群中所有的服务器都要配置,本例中只有一台。vi /etc/hosts,加入如下内容:
# for gpdb
192.168.199.244 mdw1
测试:ping mdw1。
双网卡
vi /etc/systemcfg/network-scrits,略
1.5 关闭防火墙
依次执行:systemctl stop firewalld.service,systemctl disable firewalld.service。
查看防火墙状态systemctl status firewalld.service。
1.6 关闭SELINUX
关闭SELINUX,vi /etc/selinux/config:
SELINUX=disabled
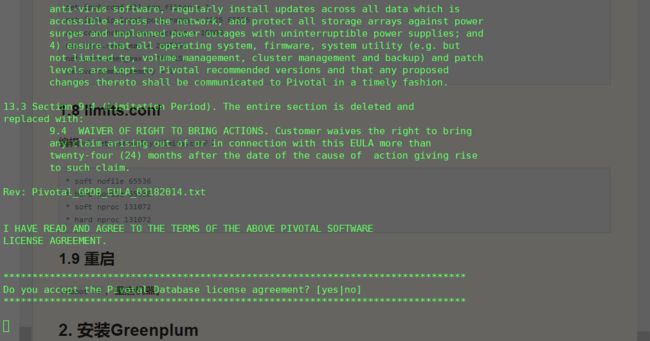
1.7 重启
reboot -f,重启机器。
2. 安装Greenplum
本节所有操作均在Master节点上,以root用户进行操作。
2.1 上传、解压缩、安装
- 上传安装包"greenplum-db-5.4.0-rhel7-x86_64.zip";
- 解压缩:
unzip greenplum-db-5.4.0-rhel7-x86_64.zip; - 安装:
./greenplum-db-5.4.0-rhel7-x86_64.bin; -
空格键滚动安装信息,按照提示一路安装;
 安装提示
安装提示 -
完成安装。
 完成安装
完成安装
2.2 引入Greenplum运行环境
source /usr/local/greenplum-db/greenplum_path.sh,如果改动了步骤2.1中的安装路径,请自行调整。后面安装过程中重启机器时,需要再执行一下此操作。
2.3 hostlist和seglist
分别创建两个文件,其中hostlist中填写所有节点的主机名;seglist中填写所有Segment的主机名(即不包括Master和Master Standby)。本例中只有一个节点,且为Master + Segment,故vi hostlist:
mdw1
保存文件。这两个文件(本例中由于单节点,是一个文件)后面会用到。
2.4 免密登录
执行命令:gpssh-exkeys -f hostlist。

2.5 gpseginstall
执行命令,向所有节点部署:
gpseginstall -f hostlist -u gpadmin -p gpadmin
会创建系统用户gpadmin,初始密码为gpadmin。
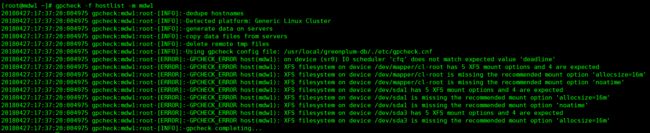
2.6 gpcheck
执行命令:
gpcheck -f hostlist -m mdw1
本例中没有Master Standby节点,如果有,需要在上述命令后面再加上-s 主机名选项。
可以看到,报出了大量错误,下面将根据提示,逐个修改:
20180427:16:46:32:004229 gpcheck:mdw1:root-[INFO]:-dedupe hostnames
20180427:16:46:32:004229 gpcheck:mdw1:root-[INFO]:-Detected platform: Generic Linux Cluster
20180427:16:46:32:004229 gpcheck:mdw1:root-[INFO]:-generate data on servers
20180427:16:46:33:004229 gpcheck:mdw1:root-[INFO]:-copy data files from servers
20180427:16:46:33:004229 gpcheck:mdw1:root-[INFO]:-delete remote tmp files
20180427:16:46:33:004229 gpcheck:mdw1:root-[INFO]:-
20180427:16:46:33:004229 gpcheck:mdw1:root-[ERROR]:-GPCHECK_ERROR host(mdw1): on device (sr0) IO scheduler 'cfq' does not match expected value 'deadline'
20180427:16:46:33:004229 gpcheck:mdw1:root-[ERROR]:-GPCHECK_ERROR host(mdw1): on device (/dev/sda3) blockdev readahead value '8192' does not match expected value '16384'
20180427:16:46:33:004229 gpcheck:mdw1:root-[ERROR]:-GPCHECK_ERROR host(mdw1): on device (/dev/sda1) blockdev readahead value '8192' does not match expected value '16384'
20180427:16:46:33:004229 gpcheck:mdw1:root-[ERROR]:-GPCHECK_ERROR host(mdw1): on device (/dev/sda2) blockdev readahead value '8192' does not match expected value '16384'
20180427:16:46:33:004229 gpcheck:mdw1:root-[ERROR]:-GPCHECK_ERROR host(mdw1): on device (/dev/sda) blockdev readahead value '8192' does not match expected value '16384'
20180427:16:46:33:004229 gpcheck:mdw1:root-[ERROR]:-GPCHECK_ERROR host(mdw1): variable not detected in /etc/sysctl.conf: 'net.ipv4.ip_local_port_range'
20180427:16:46:33:004229 gpcheck:mdw1:root-[ERROR]:-GPCHECK_ERROR host(mdw1): variable not detected in /etc/sysctl.conf: 'vm.overcommit_memory'
20180427:16:46:33:004229 gpcheck:mdw1:root-[ERROR]:-GPCHECK_ERROR host(mdw1): variable not detected in /etc/sysctl.conf: 'kernel.msgmax'
20180427:16:46:33:004229 gpcheck:mdw1:root-[ERROR]:-GPCHECK_ERROR host(mdw1): variable not detected in /etc/sysctl.conf: 'net.ipv4.tcp_syncookies'
20180427:16:46:33:004229 gpcheck:mdw1:root-[ERROR]:-GPCHECK_ERROR host(mdw1): variable not detected in /etc/sysctl.conf: 'net.ipv4.tcp_max_syn_backlog'
20180427:16:46:33:004229 gpcheck:mdw1:root-[ERROR]:-GPCHECK_ERROR host(mdw1): variable not detected in /etc/sysctl.conf: 'net.core.netdev_max_backlog'
20180427:16:46:33:004229 gpcheck:mdw1:root-[ERROR]:-GPCHECK_ERROR host(mdw1): variable not detected in /etc/sysctl.conf: 'kernel.sem'
20180427:16:46:33:004229 gpcheck:mdw1:root-[ERROR]:-GPCHECK_ERROR host(mdw1): variable not detected in /etc/sysctl.conf: 'net.ipv4.conf.all.arp_filter'
20180427:16:46:33:004229 gpcheck:mdw1:root-[ERROR]:-GPCHECK_ERROR host(mdw1): variable not detected in /etc/sysctl.conf: 'kernel.shmall'
20180427:16:46:33:004229 gpcheck:mdw1:root-[ERROR]:-GPCHECK_ERROR host(mdw1): variable not detected in /etc/sysctl.conf: 'kernel.msgmnb'
20180427:16:46:33:004229 gpcheck:mdw1:root-[ERROR]:-GPCHECK_ERROR host(mdw1): variable not detected in /etc/sysctl.conf: 'net.ipv4.ip_forward'
20180427:16:46:33:004229 gpcheck:mdw1:root-[ERROR]:-GPCHECK_ERROR host(mdw1): variable not detected in /etc/sysctl.conf: 'kernel.shmmax'
20180427:16:46:33:004229 gpcheck:mdw1:root-[ERROR]:-GPCHECK_ERROR host(mdw1): variable not detected in /etc/sysctl.conf: 'kernel.shmmni'
20180427:16:46:33:004229 gpcheck:mdw1:root-[ERROR]:-GPCHECK_ERROR host(mdw1): variable not detected in /etc/sysctl.conf: 'net.ipv4.conf.default.accept_source_route'
20180427:16:46:33:004229 gpcheck:mdw1:root-[ERROR]:-GPCHECK_ERROR host(mdw1): variable not detected in /etc/sysctl.conf: 'kernel.msgmni'
20180427:16:46:33:004229 gpcheck:mdw1:root-[ERROR]:-GPCHECK_ERROR host(mdw1): variable not detected in /etc/sysctl.conf: 'kernel.core_uses_pid'
20180427:16:46:33:004229 gpcheck:mdw1:root-[ERROR]:-GPCHECK_ERROR host(mdw1): variable not detected in /etc/sysctl.conf: 'net.ipv4.tcp_tw_recycle'
20180427:16:46:33:004229 gpcheck:mdw1:root-[ERROR]:-GPCHECK_ERROR host(mdw1): variable not detected in /etc/sysctl.conf: 'kernel.sysrq'
20180427:16:46:33:004229 gpcheck:mdw1:root-[ERROR]:-GPCHECK_ERROR host(mdw1): soft nofile not found in /etc/security/limits.conf
20180427:16:46:33:004229 gpcheck:mdw1:root-[ERROR]:-GPCHECK_ERROR host(mdw1): hard nproc not found in /etc/security/limits.conf
20180427:16:46:33:004229 gpcheck:mdw1:root-[ERROR]:-GPCHECK_ERROR host(mdw1): soft nproc not found in /etc/security/limits.conf
20180427:16:46:33:004229 gpcheck:mdw1:root-[ERROR]:-GPCHECK_ERROR host(mdw1): hard nofile not found in /etc/security/limits.conf
20180427:16:46:33:004229 gpcheck:mdw1:root-[ERROR]:-GPCHECK_ERROR host(mdw1): XFS filesystem on device /dev/mapper/cl-root has 5 XFS mount options and 4 are expected
20180427:16:46:33:004229 gpcheck:mdw1:root-[ERROR]:-GPCHECK_ERROR host(mdw1): XFS filesystem on device /dev/mapper/cl-root is missing the recommended mount option 'allocsize=16m'
20180427:16:46:33:004229 gpcheck:mdw1:root-[ERROR]:-GPCHECK_ERROR host(mdw1): XFS filesystem on device /dev/mapper/cl-root is missing the recommended mount option 'noatime'
20180427:16:46:33:004229 gpcheck:mdw1:root-[ERROR]:-GPCHECK_ERROR host(mdw1): XFS filesystem on device /dev/sda1 has 5 XFS mount options and 4 are expected
20180427:16:46:33:004229 gpcheck:mdw1:root-[ERROR]:-GPCHECK_ERROR host(mdw1): XFS filesystem on device /dev/sda1 is missing the recommended mount option 'allocsize=16m'
20180427:16:46:33:004229 gpcheck:mdw1:root-[ERROR]:-GPCHECK_ERROR host(mdw1): XFS filesystem on device /dev/sda1 is missing the recommended mount option 'noatime'
20180427:16:46:33:004229 gpcheck:mdw1:root-[ERROR]:-GPCHECK_ERROR host(mdw1): XFS filesystem on device /dev/sda3 has 5 XFS mount options and 4 are expected
20180427:16:46:33:004229 gpcheck:mdw1:root-[ERROR]:-GPCHECK_ERROR host(mdw1): XFS filesystem on device /dev/sda3 is missing the recommended mount option 'allocsize=16m'
20180427:16:46:33:004229 gpcheck:mdw1:root-[ERROR]:-GPCHECK_ERROR host(mdw1): XFS filesystem on device /dev/sda3 is missing the recommended mount option 'noatime'
20180427:16:46:33:004229 gpcheck:mdw1:root-[INFO]:-gpcheck completing...
3. 根据gpcheck提示进行调整
本节为系统参数调整,需要针对gpcheck检查结果,对各个机器进行调整,均以root用户进行操作。
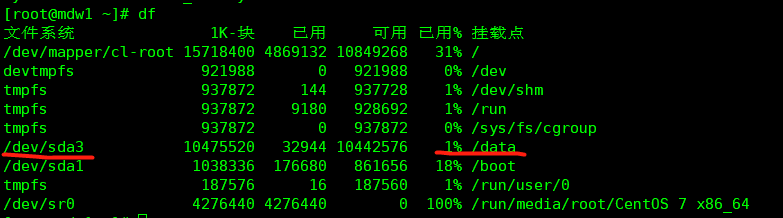
本例中,计划将所有数据都放在/data盘中,别的硬盘可以不管,查看盘符命令df:
gpcheck日志中有这么一句话:
Using gpcheck config file: /usr/local/greenplum-db/./etc/gpcheck.cnf
gpcheck.cnf是gpcheck的检查依据,那么我们也可以通过这个文件来进行我们的配置:
[global]
configfile_version = 3

[linux]
xfs_mount_options = rw,noatime,inode64,allocsize=16m
sysctl.kernel.shmmax = 500000000
sysctl.kernel.shmmni = 4096
sysctl.kernel.shmall = 4000000000
sysctl.kernel.sem = 250 512000 100 2048
sysctl.kernel.sysrq = 1
sysctl.kernel.core_uses_pid = 1
sysctl.kernel.msgmnb = 65536
sysctl.kernel.msgmax = 65536
sysctl.kernel.msgmni = 2048
sysctl.net.ipv4.tcp_syncookies = 1
sysctl.net.ipv4.ip_forward = 0
sysctl.net.ipv4.conf.default.accept_source_route = 0
sysctl.net.ipv4.tcp_tw_recycle = 1
sysctl.net.ipv4.tcp_max_syn_backlog = 4096
sysctl.net.ipv4.conf.all.arp_filter = 1
sysctl.net.ipv4.ip_local_port_range = 1025 65535
sysctl.net.core.netdev_max_backlog = 10000
sysctl.vm.overcommit_memory = 2
3.1 内核参数
gpcheck提示:
variable not detected in /etc/sysctl.conf: 'net.ipv4.ip_local_port_range'
……
variable not detected in /etc/sysctl.conf: 'kernel.sysrq'
命令vi /etc/sysctl.conf修改内核参数,之后sysctl -p生效。
# gpdb
kernel.shmmax = 500000000
kernel.shmmni = 4096
kernel.shmall = 4000000000
kernel.sem = 250 512000 100 2048
kernel.sysrq = 1
kernel.core_uses_pid = 1
kernel.msgmnb = 65536
kernel.msgmax = 65536
kernel.msgmni = 2048
net.ipv4.tcp_syncookies = 1
net.ipv4.ip_forward = 0
net.ipv4.conf.default.accept_source_route = 0
net.ipv4.tcp_tw_recycle = 1
net.ipv4.tcp_max_syn_backlog = 4096
net.ipv4.conf.all.arp_filter = 1
net.ipv4.ip_local_port_range = 1025 65535
net.core.netdev_max_backlog = 10000
vm.overcommit_memory = 2
3.2 PAM 配置文件
gpcheck提示:
soft nofile not found in /etc/security/limits.conf
hard nproc not found in /etc/security/limits.conf
soft nproc not found in /etc/security/limits.conf
hard nofile not found in /etc/security/limits.conf
执行命令vi /etc/security/limits.conf:
# gpdb
* soft nofile 65536
* hard nofile 65536
* soft nproc 131072
* hard nproc 131072
保存。
3.3 IO调度
gpcheck提示:
on device (sr0) IO scheduler 'cfq' does not match expected value 'deadline'
device (sr0)并非我使用的数据盘,不用管。
关于IO调度:参考资料
3.4 预读扇区
gpcheck提示:
on device (/dev/sda3) blockdev readahead value '8192' does not match expected value '16384'
修改方法如下:
# 查看 /dev/sda2 盘的预读扇区
blockdev --getra /dev/sda3
# 显示8192,与gpcheck提示符合

#修改 /dev/sda2 盘的预读扇区
blockdev --setra 16384 /dev/sda3
#修改完成后再查看一下

#将修改命令写入/etc/rc.local,否则重启后会失效
echo '/sbin/blockdev --setra 16384 /dev/sda2' >> /etc/rc.local

#查看是否写入成功
cat /etc/rc.local

#必要时可重启系统进行验证
3.5 XFS 文件系统 mount 参数
gpcheck提示
XFS filesystem on device /dev/sda3 has 5 XFS mount options and 4 are expected
XFS filesystem on device /dev/sda3 is missing the recommended mount option 'allocsize=16m'
XFS filesystem on device /dev/sda3 is missing the recommended mount option 'noatime'
vi /etc/fstab,修改前:
UUID=203ac506-a2fb-4465-88ac-df2caefd3268 /data xfs defaults 0 0
修改后:
UUID=203ac506-a2fb-4465-88ac-df2caefd3268 /data xfs defaults,allocsize=16348k,inode64,noatime 0 0
命令mount -o remount /data使之生效,mount命令查看。
注意:本例为CentOS7.3,这里不能写allocsize=16m,要写成allocsize=16348k。
3.6 时钟同步
本例中只有一台节点,不涉及时钟同步的问题,如果是多台机器,gpcheck会提示:
ntpd not detected on machine
假设以某个服务器上的时间为基准时间,该服务器的IP为x.x.x.x。
编辑文件vi /etc/ntp.conf,在末尾追加信息(三种节点添加的东西不一样):
# Master 节点
server x.x.x.x

# Master Standby 节点
server mdw perfer
server x.x.x.x

# Segment 节点
server mdw perfer
server mdw1 perfer

# mdw为Master,mdw1为Master Standby
设置ntpd服务开机启动,在/etc/rc.local中添加如下信息:
/etc/init.d/ntpd start
如果只是简单的试验环境,并没有时间服务器,则只需要从Master上同步时间即可,自行调整。
3.7 再次gpcheck
再次gpcheck,gpcheck -f hostlist -m mdw1,本例中的最终结果如下:
4. 初始化Greenplum数据库
本节内容在Master机器上,以gpadmin用户进行操作。
root用户将/data盘交给gpadmin:
chown gpadmin /data
chgrp gpadmin /data
将刚才的hostlist和seglist文件复制给gpadmin用户,登录gpadmin用户:
用gpssh-exkeys创建gpadmin用户之间的ssh免密登录,后续初始化时会用到。
source /usr/local/greenplum-db/greenplum_path.sh
gpssh-exkeys -f hostlist
4.1 创建数据目录
- Master和Master Standby上创建:
mkdir /data/master - Segment上创建Primary Segment:
mkdir /data/primary - Segment上创建Mirror Segment(非必须):
mkdir /data/mirror
本例只有一台服务器,只好在一台机器上创建master、primary、mirror三个目录。当Segment比较多时,可以使用gpssh-exkeys命令辅助操作。
不要在Master/Master Standby上也创建primary和mirror目录!
4.2 gpinitsystem_config
Greenplum配置文件模板位置:/usr/local/greenplum-db/docs/cli_help/gpconfigs/gpinitsystem_config,复制一份出来。
其中关键的配置项如下:
- DATA_DIRECTORY:决定了每个Segment上部署多少个Primary Instance,一个目录就是一个Instance。这里建议把所有的Instance都指向一个目录,例如部署两个实例,则为:/gpdata/primary /gpdata/primary。原因是我们在使用中会创建新的文件系统,这样便于和文件系统区分。
- MASTER_HOSTNAME:Master的主机名。
- MASTER_DIRECTORY:Master文件目录。
- MASTER_PORT:该端口用于访问Greenplum数据库。
- MIRROR_DATA_DIRECTORY:(如果需要部署Mirror),决定了每个Segment上部署多少个Mirror Instance。类似于DATA_DIRECTORY,例如:/gpdata/mirror /gpdata/mirror。
- DATABASE_NAME:创建一个数据库,输入数据库名称。也可以之后手工创建。
本例中只有一台机器,两主(DATA_DIRECTORY)两备(MIRROR_DATA_DIRECTORY)。本例中的配置如下:
# FILE NAME: gpinitsystem_config

# Configuration file needed by the gpinitsystem

################################################
#### REQUIRED PARAMETERS
################################################

#### Name of this Greenplum system enclosed in quotes.
ARRAY_NAME="Greenplum Data Platform"

#### Naming convention for utility-generated data directories.
SEG_PREFIX=gpseg

#### Base number by which primary segment port numbers
#### are calculated.
PORT_BASE=40000

#### File system location(s) where primary segment data directories
#### will be created. The number of locations in the list dictate
#### the number of primary segments that will get created per
#### physical host (if multiple addresses for a host are listed in
#### the hostfile, the number of segments will be spread evenly across
#### the specified interface addresses).
declare -a DATA_DIRECTORY=(/data/primary /data/primary)

#### OS-configured hostname or IP address of the master host.
MASTER_HOSTNAME=mdw1

#### File system location where the master data directory
#### will be created.
MASTER_DIRECTORY=/data/master

#### Port number for the master instance.
MASTER_PORT=5432

#### Shell utility used to connect to remote hosts.
TRUSTED_SHELL=ssh

#### Maximum log file segments between automatic WAL checkpoints.
CHECK_POINT_SEGMENTS=8

#### Default server-side character set encoding.
ENCODING=UNICODE

################################################
#### OPTIONAL MIRROR PARAMETERS
################################################

#### Base number by which mirror segment port numbers
#### are calculated.
MIRROR_PORT_BASE=50000

#### Base number by which primary file replication port
#### numbers are calculated.
REPLICATION_PORT_BASE=41000

#### Base number by which mirror file replication port
#### numbers are calculated.
MIRROR_REPLICATION_PORT_BASE=51000

#### File system location(s) where mirror segment data directories
#### will be created. The number of mirror locations must equal the
#### number of primary locations as specified in the
#### DATA_DIRECTORY parameter.
declare -a MIRROR_DATA_DIRECTORY=(/data/mirror /data/mirror)


################################################
#### OTHER OPTIONAL PARAMETERS
################################################

#### Create a database of this name after initialization.
DATABASE_NAME=my

#### Specify the location of the host address file here instead of
#### with the the -h option of gpinitsystem.
#MACHINE_LIST_FILE=/home/gpadmin/gpconfigs/hostfile_gpinitsystem
4.3 初始化Greenplum
一般的集群部署中:
gpinitsystem -h seglist -c gpdb-config -s sdw2 -S
其中gpdb-config是刚才的配置文件名;-S指Spread分布,是primary和mirror的分布关系,此为推荐值。-mdw2是指定了Master Standby。一般集群部署中,也可以挑选一个Segment作为Master Standby。
本例只有一台机器,命令是这样的:
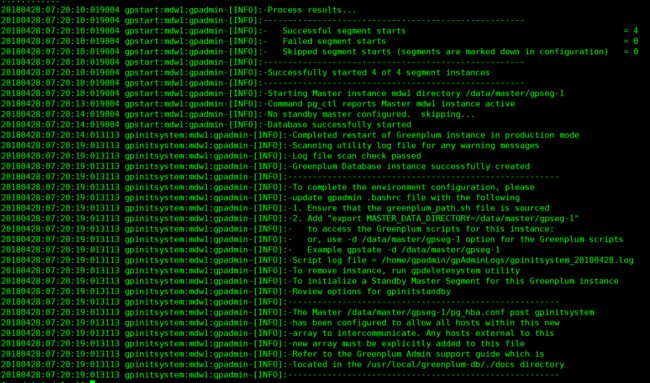
gpinitsystem -h hostlist -c gpdb-config
安装过程中,核对安装信息:


按照提示输入Y,回车确定:
4.4 环境变量
编辑文件:vi .bashrc,以本例的环境为准,加入如下信息
# for greenplum DB
source /usr/local/greenplum-db/greenplum_path.sh
export MASTER_DATA_DIRECTORY=/gpdata/master/gpseg-1
export PGPORT=5432
export PGDATABASE=my
生效:
source .bashrc
登录GPDB,如图所示,应该能看到如下形式:

如果部署了Master Standby,将环境变量copy到Master Standby中。大功告成!
4.5 最后一件事
- 在安装的时候,我们为root用户之间建立了ssh免密登录,现在安装完成了,应该删除掉,以免发生安全隐患。
- gpadmin用户之间的ssh免密登录不要删除!现在gpadmin用户的密码均为“gpadmin”,为了避免发生安全隐患,请修改gpadmin用户的密码。