自定义控件之-TopBar
一个项目中大部分的界面title一般都是风格相同的,本文介绍title的自定义模板。
1.首先是attrs.xml中声明自定义控件的属性
2.新建TopBar继承RelativeLayout,定义属性,和控件方法
3.在布局文件中摆放自定义控件
4.在代码中调用控件自定义方法
先看下效果图:

1.新建attrs.xml,目录:main/res/values/attrs.xml

<resources>
    <declare-styleable name="Topbar">
        <attr name="mTitle" format="string" />
        <attr name="mTitleTextSize" format="dimension" />
        <attr name="mTitleTextColor" format="color|reference" />
        <attr name="leftText" format="string" />
        <attr name="leftTextColor" format="color" />
        <attr name="leftBackground" format="color|reference" />
        <attr name="rightText" format="string" />
        <attr name="rightTextColor" format="color" />
        <attr name="rightBackground" format="color|reference" />
    declare-styleable>

resources>
2.自定义控件TopBar。
package com.interjoy.democustom;

import android.content.Context;
import android.content.res.TypedArray;
import android.graphics.drawable.Drawable;
import android.util.AttributeSet;
import android.view.Gravity;
import android.view.View;
import android.widget.Button;
import android.widget.RelativeLayout;
import android.widget.TextView;

/**
 * Created by ylwang on 2017/1/17.
 */
public class Topbar extends RelativeLayout {
    private Button leftButton, rightButton;
    private TextView tvTitle;

    private int leftTextColor;
    private Drawable leftBackground;
    private String leftText;
    private LayoutParams leftParams;//定义宽高属性

    private int rightTextColor;
    private Drawable rightBackground;
    private String rightText;
    private LayoutParams rightParams;

    private float titleTextSize;
    private int titleTextColor;
    private String title;
    private LayoutParams titleParams;

    public Topbar(Context context) {
        super(context);

    }

    public Topbar(Context context, AttributeSet attrs) {
        super(context, attrs);
        //从xml中获取我们定义好的属性
        TypedArray ta = context.obtainStyledAttributes(attrs, R.styleable.Topbar);
        //TypedArray中是以键值对形式存储属性,键由AS按照规则命名的,“styleable名_属性名”
        leftTextColor = ta.getColor(R.styleable.Topbar_leftTextColor, 0);
        leftBackground = ta.getDrawable(R.styleable.Topbar_leftBackground);
        leftText = ta.getString(R.styleable.Topbar_leftText);

        rightTextColor = ta.getColor(R.styleable.Topbar_rightTextColor, 0);
        rightBackground = ta.getDrawable(R.styleable.Topbar_rightBackground);
        rightText = ta.getString(R.styleable.Topbar_rightText);

        title = ta.getString(R.styleable.Topbar_mTitle);
        titleTextSize = ta.getDimension(R.styleable.Topbar_mTitleTextSize, 0);
        titleTextColor = ta.getColor(R.styleable.Topbar_mTitleTextColor, 0);

        ta.recycle();//用完记得回收,避免内存浪费,或者缓存引起其他错误

        final int TAG_LEFT = 0x001;
        final int TAG_RIGHT = 0x002;

        //动态生成控件
        leftButton = new Button(context);
        rightButton = new Button(context);
        tvTitle = new TextView(context);
        //给控件设置属性
        leftButton.setBackground(leftBackground);
        leftButton.setText(leftText);
        leftButton.setTextColor(leftTextColor);
        leftButton.setTag(TAG_LEFT);//为了绑定监听时区分,设置一个tag

        rightButton.setBackground(rightBackground);
        rightButton.setText(rightText);
        rightButton.setTextColor(rightTextColor);
        rightButton.setTag(TAG_RIGHT);

        tvTitle.setText(title);
        tvTitle.setTextColor(titleTextColor);
        tvTitle.setTextSize(titleTextSize);
        tvTitle.setGravity(Gravity.CENTER);//设置居中
        //给Topbar设置背景颜色
        setBackgroundColor(0xFFF59563);
        //设置宽高及一些规则属性
        leftParams = new LayoutParams(LayoutParams.WRAP_CONTENT, LayoutParams.WRAP_CONTENT);
        leftParams.addRule(RelativeLayout.ALIGN_PARENT_LEFT, TRUE);//添加规则左对齐父控件,注意第二个参数TRUE全大写
        addView(leftButton, leftParams);//把控件添加到布局中

        rightParams = new LayoutParams(LayoutParams.WRAP_CONTENT, LayoutParams.WRAP_CONTENT);
        rightParams.addRule(RelativeLayout.ALIGN_PARENT_RIGHT, TRUE);
        addView(rightButton, rightParams);

        titleParams = new LayoutParams(LayoutParams.WRAP_CONTENT, LayoutParams.MATCH_PARENT);//高度填充父控件
        titleParams.addRule(RelativeLayout.CENTER_IN_PARENT, TRUE);
        addView(tvTitle, titleParams);
        //4.绑定监听,调接口方法
        OnClickListener sysListener = new OnClickListener() {
            @Override
            public void onClick(View v) {
                switch ((int) v.getTag()) {
                    case TAG_LEFT:
                        listener.leftClick();
                        break;
                    case TAG_RIGHT:
                        listener.rightClick();
                        break;
                }
            }
        };
        leftButton.setOnClickListener(sysListener);
        rightButton.setOnClickListener(sysListener);
    }

    //1.定义接口和抽象方法
    public interface TopbarClickListener {
        //左侧点击
        void leftClick();

        //右侧点击
        void rightClick();
    }

    //2.声明接口对象
    private TopbarClickListener listener;

    //3.定义对外监听方法传参接口对象
    public void setTopbarClickListener(TopbarClickListener listener) {
        this.listener = listener;
    }

    //设置左侧button是否可见,同样可以设置右侧等,此处仅拿左侧button来示例
    public void setLeftVisinility(boolean flag) {
        if (flag) leftButton.setVisibility(VISIBLE);
        else leftButton.setVisibility(INVISIBLE);
    }

    public Topbar(Context context, AttributeSet attrs, int defStyleAttr) {
        super(context, attrs, defStyleAttr);
    }
}
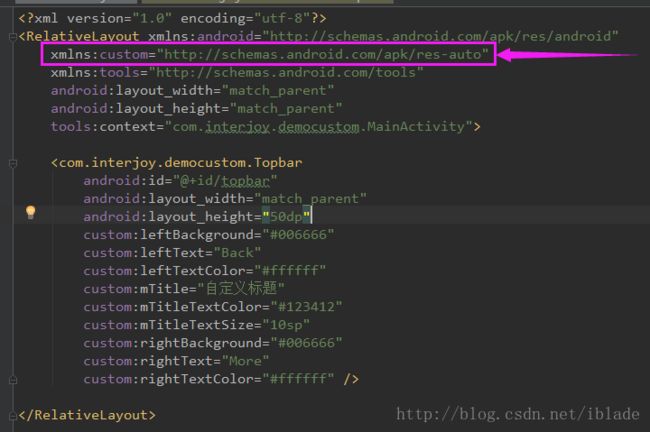
3.在activity_main.xml布局文件中摆放自定义控件,注意自定义属性的调用,添加如图代码

<RelativeLayout xmlns:android="http://schemas.android.com/apk/res/android"
    xmlns:custom="http://schemas.android.com/apk/res-auto"
    xmlns:tools="http://schemas.android.com/tools"
    android:layout_width="match_parent"
    android:layout_height="match_parent"
    tools:context="com.interjoy.democustom.MainActivity">

    <com.interjoy.democustom.Topbar
        android:id="@+id/topbar"
        android:layout_width="match_parent"
        android:layout_height="50dp"
        custom:leftBackground="#006666"
        custom:leftText="Back"
        custom:leftTextColor="#ffffff"
        custom:mTitle="自定义标题"
        custom:mTitleTextColor="#123412"
        custom:mTitleTextSize="10sp"
        custom:rightBackground="#006666"
        custom:rightText="More"
        custom:rightTextColor="#ffffff" />

RelativeLayout>
4.在代码中加载布局,调用自定义控件的方法
package com.interjoy.democustom;

import android.os.Bundle;
import android.support.v7.app.AppCompatActivity;
import android.widget.ImageView;
import android.widget.Toast;

public class MainActivity extends AppCompatActivity {
    private Topbar topbar;

    @Override
    protected void onCreate(Bundle savedInstanceState) {
        super.onCreate(savedInstanceState);
        setContentView(R.layout.activity_main);
        initView();
        setListener();
    }

    private  T f(int id) {
        return (T) findViewById(id);
    }

    private void initView() {
        topbar = f(R.id.topbar);
    }

    private void setListener() {
        topbar.setTopbarClickListener(new Topbar.TopbarClickListener() {
            @Override
            public void leftClick() {
                Toast.makeText(MainActivity.this, "点击左侧", Toast.LENGTH_SHORT).show();
            }

            @Override
            public void rightClick() {
                Toast.makeText(MainActivity.this, "点击More", Toast.LENGTH_SHORT).show();
            }
        });
    }


}
总结下接口回调四个步骤:
1.定义接口和抽象方法
2.声明接口对象
3.设置对外暴露的方法传参接口对象
4.在系统原生监听中调用接口的抽象方法。