【Android】Glide 实现图片再处理(比如在右下角添加 GIF 标识、圆角处理、添加水印等,通过在原 bitmap 的基础上进行再处理)
先提前说明,此文有坑,请看完再根据具体情况考虑要不要采用。
依旧是项目需要,需要在列表 item 显示了 GIF 图片的 imageview 的右下角添加 GIF 标识。
查阅了 glide 的方法,发现有个 transform 方法,其作用就是改变原始资源在客户端上最终的展现结果,里面传入 BitmapTransformation(可以多个),我们可以根据需要复写 BitmapTransformation。
下面就以右下角添加 GIF 标识为例子进行说明。
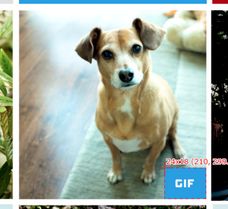
先上效果图:
下面说实现:
首先是自定义 Application:
    public class MyApplication extends Application {
        private static Context context;

        @Override
        public void onCreate() {
            super.onCreate();

            context = getApplicationContext();
        }

        public static Context getContext(){
            return context;
        }

    }
然后在 AndroidManifest.xml 里面设置 Application:
...
下面是复写的代码:
public class GifIconTransformation extends BitmapTransformation {
    private boolean isGif = false;
    private static Paint paint;
    private static Bitmap gifbmp;

    public GifIconTransformation(Context context, String url) {
        super(context);

        if (url.toLowerCase().endsWith(".gif")) isGif = true;
    }

    public GifIconTransformation(Context context, boolean isGif) {
        super(context);
        this.isGif = isGif;
    }

    static {
        gifbmp = BitmapFactory.decodeResource(DigitApp.getContext().getResources(), R.drawable.ic_gif_white_18dp);

        paint = new Paint();
        paint.setColor(Color.parseColor("#469de6"));
        paint.setStyle(Paint.Style.FILL);
    }

    @Override
    protected Bitmap transform(BitmapPool pool, Bitmap toTransform, int outWidth, int outHeight) {
        if(isGif) return addGifIcon(toTransform);
        else return toTransform;
    }

    @Override
    public String getId() {
        return "xxxxxxxx.GifIconTransformation";//xxxxx为对应的包名,用做独立标识
    }

    private Bitmap addGifIcon(Bitmap oldbitmap) {
        int width = oldbitmap.getWidth();
        int height = oldbitmap.getHeight();

        int gifbmpWidth = gifbmp.getWidth();
        int gifbmpHeight = gifbmp.getHeight();

        Canvas canvas = new Canvas(oldbitmap);
        canvas.drawBitmap(oldbitmap, 0, 0, null);
        canvas.drawRect(width - gifbmpWidth - 18, height - gifbmpHeight, width, height, paint);
        canvas.drawBitmap(gifbmp, width - gifbmpWidth - 9, height - gifbmpHeight, null);
        //canvas.save(Canvas.ALL_SAVE_FLAG);
        //canvas.restore();

        return oldbitmap;
    }
}
现在来简单说明下:
首先,这里的 GIF 图片判断是通过图片链接(因为项目中图片的链接后面会带有格式),如果后缀是 .gif 或者 .GIF,均需要加入 GIF 标识。当然这里只是举例,如果你有自己的判断也可以自己写,判断可以在类外或者类内,如果在类外,那么直接通过 GifIconTransformation(Context context, boolean isGif) 传个 boolean 值进来;如果在类内,那么你得再自行修改。
bitmap 和 paint 设为静态,为的是节约内存。bitmap 取的是中间那个 GIF 白色图标,paint 画的是那个蓝色的长方形背景框。Paint.Style.FILL 是填充满,而不是只画边框。
transform(BitmapPool pool, Bitmap toTransform, int outWidth, int outHeight) 中的 toTransform 就是最终的 bitmap。
对于这个方法,在进行相关查阅资料后,需要注意几点:
*对于传入的 toTransform Bitmap,不要去回收它或者把它放入到缓存池。如果实现者返回了一个不同的 Bitmap 实例,Glide 会负责去回收或者复用 toTransform 这个 Bitmap。
*不要去回收作为这个方法返回值的 bitmap。
*如果在这个方法的执行过程中产生了临时的 Bitmap 实例,那么最好把它放入缓存池,或者回收它。
然后我们可以直接就在这个 bitmap 上进行再次绘制并返回给 transform。
绘制过程就不多说了,先画原来的 bitmap ,再画蓝色长方形背景,再画 GIF 图标,具体绘制方法请参考 Canvas 的相关绘制。
当然这里你还可以进行其它操作,比如圆角处理,缩放,灰度等等,这些得根据需要自行编写相关代码。
接下来说说如何使用:
Glide.with(context)
            .load(url)
            .asBitmap()
            .transform(new GifIconTransformation(context, url))
            .dontAnimate()
            .placeholder(R.drawable.placeholder)
            .error(R.drawable.error)
            .into(imageview);
当然,如果你要居中处理,那么得这样:
Glide.with(context)
            .load(url)
            .asBitmap()
            .transform(new CenterCrop(context), new GifIconTransformation(context, url))
            .dontAnimate()
            .placeholder(R.drawable.placeholder)
            .error(R.drawable.error)
            .into(imageview);
.asBitmap() 必须要有,为了把所有图片都以 bitmap 形式进行处理(用于限制 GIF,此时 GIF 将只会显示第一帧)。其中 CenterCrop(context) 是 glide 提供的类。这里还要讲一点,如果你用了 CenterCrop,那么你的 imageview 就不应该再设置 android:scaleType="centerCrop" ,如果你同时用了两个,那么后面添加的 GIF 标识由于两次居中处理可能会造成显示不完整或看不到的问题。
好了,下面来讲讲坑。。。
关于 CenterCrop,上面的方案只适用于 imageview 宽度高度相对固定的情况下,如果你的图片是用在列表中,并且会根据图片张数不同而变换样式(不同 item 的 imageview 宽度、高度会变换),那么上面的方案就可能会出现问题(因为一开始 glide 拿到的高宽并不是最终的,所以居中就会出现问题,这时候就可能会造成第一次显示出错),当然你可以写个监听,当 imageview 绘制完了再进行图片加载(会造成加载慢的感觉),或者你如果有其它的解决方案也可以分享出来。
当然这里还提供了一个其它的解决方法,那就是通过重写 imageview 来实现这个功能(只限画标识):
【Android】重写 Imageview 实现添加标识(比如右下角添加 GIF 标识)
