Android实现切换主题颜色
最近看到网易云的换肤不错,就想自己来实现一下
- 效果图
- 使用到的相关小技术
效果图
使用到的相关小技术
1、PopWindow
2、RecyclerView
3、沉浸式状态栏
大概就这三个吧
首先说一下首页布局
<LinearLayout xmlns:android="http://schemas.android.com/apk/res/android"
    xmlns:tools="http://schemas.android.com/tools"
    android:id="@+id/activity_main"
    android:layout_width="match_parent"
    android:layout_height="match_parent"
    android:background="#FF9F38"
    android:fitsSystemWindows="true"
    android:orientation="vertical"
    tools:context="com.example.bxy.themecolordemo.MainActivity">

    <LinearLayout
        android:id="@+id/ll"
        android:layout_width="match_parent"
        android:layout_height="55dp"
        android:background="#FF9F38"
        android:orientation="horizontal">

        <TextView
            android:layout_width="match_parent"
            android:layout_height="match_parent"
            android:gravity="center"
            android:text="主 题 换 肤"
            android:textColor="@android:color/white"
            android:textSize="20dp" />
    LinearLayout>

    <LinearLayout
        android:layout_width="match_parent"
        android:layout_height="0dp"
        android:background="@color/white"
        android:layout_weight="1">

        <Button
            android:id="@+id/btn"
            android:layout_width="match_parent"
            android:layout_height="50dp"
            android:layout_margin="15dp"
            android:background="#FF9F38"
            android:text="选择颜色"
            android:textColor="@android:color/white" />
    LinearLayout>
LinearLayout>
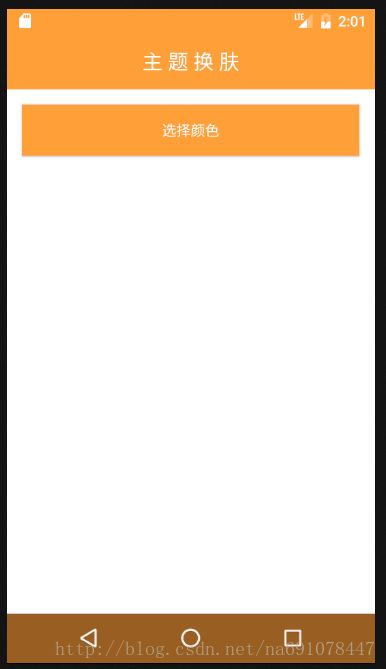
默认的界面效果就是这样的:
在Java代码里分别获取到控件
btn=(Button)findViewById(R.id.btn);
ll=(LinearLayout)findViewById(R.id.ll);
title=(LinearLayout)findViewById(R.id.activity_main);
接下来是自定义的popwindow:
<LinearLayout xmlns:android="http://schemas.android.com/apk/res/android"
    android:id="@+id/pop_layout"
    android:layout_width="match_parent"
    android:layout_height="wrap_content"
    android:background="@color/white"
    android:orientation="vertical">

    <android.support.v7.widget.RecyclerView
        android:id="@+id/recyclerview"
        android:layout_width="match_parent"
        android:layout_margin="8dp"
        android:overScrollMode="never"
        android:layout_height="wrap_content"/>

    <View
        android:layout_width="match_parent"
        android:layout_height="1dp"
        android:layout_marginLeft="15dp"
        android:background="@color/msg_split"
        android:layout_marginRight="15dp"/>

    <LinearLayout
        android:layout_width="match_parent"
        android:layout_height="wrap_content"
        android:orientation="horizontal">
        <TextView
            android:id="@+id/cancel"
            android:layout_width="0dp"
            android:layout_height="50dp"
            android:gravity="center"
            android:text="取消"
            android:layout_weight="1"/>
        <View
            android:layout_width="1dp"
            android:layout_height="match_parent"
            android:background="@color/msg_split"
            android:layout_marginRight="15dp"/>
        <TextView
            android:id="@+id/confirm"
            android:layout_width="0dp"
            android:layout_height="50dp"
            android:gravity="center"
            android:text="确认"
            android:layout_weight="1"/>
    LinearLayout>
LinearLayout>
上面是RecyclerView,用来放不同的颜色块,下面是两个按钮,用来记录用户选择的颜色。
package com.example.bxy.themecolordemo;

import android.content.Context;
import android.graphics.drawable.ColorDrawable;
import android.support.v7.widget.LinearLayoutManager;
import android.support.v7.widget.RecyclerView;
import android.view.LayoutInflater;
import android.view.MotionEvent;
import android.view.View;
import android.widget.PopupWindow;
import android.widget.RelativeLayout;
import android.widget.TextView;

import java.util.Map;


public class ColorPopWin extends PopupWindow {
    private View view;
    private RecyclerView mRecyclerView;
    private TextView mConfirm, mCancel;
    private OnOperationListener onOperationListener;

    private Map colors;//
    private int opt;
    private ColorAdapter mAdapter;
    private String newColor;


    public ColorPopWin(Context mContext,Map colors,int choose, final OnOperationListener onOperationListener) {
        this.colors=colors;
        this.opt=choose;
        this.onOperationListener=onOperationListener;
        this.view = LayoutInflater.from(mContext).inflate(R.layout.pop_color, null);
        if(colors!=null&&colors.size()>=1){
            newColor=colors.get(0);
        }

        mRecyclerView =(RecyclerView) view.findViewById(R.id.recyclerview);
        mConfirm =(TextView) view.findViewById(R.id.confirm);
        mCancel =(TextView) view.findViewById(R.id.cancel);
        // 取消按钮
        mConfirm.setOnClickListener(new View.OnClickListener() {

            public void onClick(View v) {
                onOperationListener.onConfirm(opt,newColor);
                dismiss();
            }
        });
        // 设置按钮监听
        mCancel.setOnClickListener(new View.OnClickListener() {
            @Override
            public void onClick(View view) {
                onOperationListener.onCancel();
                dismiss();
            }
        });

        initRecycler(mContext);
        // 设置外部可点击
        this.setOutsideTouchable(true);
        // mMenuView添加OnTouchListener监听判断获取触屏位置如果在选择框外面则销毁弹出框
        this.view.setOnTouchListener(new View.OnTouchListener() {

            public boolean onTouch(View v, MotionEvent event) {

                int height = view.findViewById(R.id.pop_layout).getTop();
                int y = (int) event.getY();
                if (event.getAction() == MotionEvent.ACTION_UP) {
                    if (y < height) {
                        dismiss();
                    }
                }
                return true;
            }
        });


        /* 设置弹出窗口特征 */
        // 设置视图
        this.setContentView(this.view);
        // 设置弹出窗体的宽和高
        this.setHeight(RelativeLayout.LayoutParams.WRAP_CONTENT);
        this.setWidth(RelativeLayout.LayoutParams.MATCH_PARENT);

        // 设置弹出窗体可点击
        this.setFocusable(true);

        // 实例化一个ColorDrawable颜色为半透明
        ColorDrawable dw = new ColorDrawable(0xb0ffffff);
        // 设置弹出窗体的背景
        this.setBackgroundDrawable(dw);

        // 设置弹出窗体显示时的动画,从底部向上弹出
        this.setAnimationStyle(R.style.take_photo_anim);
    }

    private void initRecycler(Context mContext) {
        mAdapter=new ColorAdapter(colors, opt, new ColorAdapter.OnClickListener() {
            @Override
            public void onClickListener(int position,String color) {
                onOperationListener.onColorOpt(position,color);
                newColor=color;
                opt=position;
            }
        });
        LinearLayoutManager manager=new LinearLayoutManager(mContext);
        manager.setOrientation(LinearLayoutManager.HORIZONTAL);
        //滚动定位
        manager.scrollToPositionWithOffset(opt,0);
        mRecyclerView.setLayoutManager(manager);
        mRecyclerView.setAdapter(mAdapter);
        mAdapter.notifyDataSetChanged();
    }
    //自定义的回调接口
    public interface OnOperationListener{
        void onConfirm(int opt,String color);
        void onCancel();
        void onColorOpt(int position,String color);
    }
}
为Recycler创建adapter
package com.example.bxy.themecolordemo;

import android.content.Context;
import android.graphics.Color;
import android.graphics.drawable.GradientDrawable;
import android.support.v4.content.ContextCompat;
import android.support.v7.widget.RecyclerView;
import android.view.LayoutInflater;
import android.view.View;
import android.view.ViewGroup;

import java.util.Map;

/**
 * Created by Bxy on 2017/5/8.
 */

public class ColorAdapter extends RecyclerView.Adapter<ColorAdapter.ViewHolder> {
    private Map colors;
    private Context mContext;
    private OnClickListener onClickListener;
    private int choose;//默认被选择的颜色

    public ColorAdapter(Map colors,int choose,OnClickListener onClickListener){
        this.colors=colors;
        this.choose=choose;
        this.onClickListener=onClickListener;
    }

    @Override
    public ColorAdapter.ViewHolder onCreateViewHolder(ViewGroup parent, int viewType) {
        if(mContext==null){
            mContext=parent.getContext();
        }
        View view= LayoutInflater.from(mContext).inflate(R.layout.item_color,parent,false);
        final ViewHolder viewHolder=new ViewHolder(view);
        view.setOnClickListener(new View.OnClickListener() {
            @Override
            public void onClick(View v) {
                int position=viewHolder.getAdapterPosition();
                String color=colors.get(position);
                choose=position;//每次选择颜色以后都要更新
                onClickListener.onClickListener(position,color);
                notifyDataSetChanged();
            }
        });

        return viewHolder;
    }

    @Override
    public void onBindViewHolder(ColorAdapter.ViewHolder holder, int position) {
        //根据是否被选中来添加不同的背景
        if(choose==position){
           holder.view.setBackgroundDrawable
           (ContextCompat.getDrawable(mContext,R.drawable.color_bg));
        }else{
           holder.view.setBackgroundDrawable
           (ContextCompat.getDrawable(mContext,R.drawable.color_bg_un));
        }
        String color=colors.get(position);
        //这里是为shape设置边框颜色
        GradientDrawable myGrad = (GradientDrawable)holder.view.getBackground();
        myGrad.setColor(Color.parseColor(color));
    }

    @Override
    public int getItemCount() {
        return colors.size();
    }

    class ViewHolder extends RecyclerView.ViewHolder {
        public View view;

        public ViewHolder(View itemView) {
            super(itemView);
            view=itemView.findViewById(R.id.view);
        }
    }

    public interface OnClickListener{
        void onClickListener(int position,String color);
    }
}
附上shape代码,这是被选中的,未被选中的将红色改为透明色就可以了
<shape xmlns:android="http://schemas.android.com/apk/res/android">
    <solid android:color="@android:color/transparent"/>
    <corners
        android:bottomLeftRadius="5dp"
        android:bottomRightRadius="5dp"
        android:topLeftRadius="5dp"
        android:topRightRadius="5dp" >
    corners>
    <stroke android:width="1dp"
        android:color="#FF0000"/>
shape>
回到MainActivity里,我们初始化一些颜色
//在刚进程序时初始化用户之前选择的颜色
private void initViewColor() {
        oldColor=getApplicationContext().getSharedPreferences("CORLORS",
                Context.MODE_PRIVATE).getString("USER_COLOR","#FF9F38");
        if(oldColor.equals("")){
            return;
        }
        ll.setBackgroundColor(Color.parseColor(oldColor));
        btn.setBackgroundColor(Color.parseColor(oldColor));
        title.setBackgroundColor(Color.parseColor(oldColor));
    }
//初始化用户的选择
private int initChoose() {
        int opt=getApplicationContext().getSharedPreferences("CORLORS",
                Context.MODE_PRIVATE).getInt("opt",0);
        return opt;
    }
//初始化颜色列表
private Map initColors() {
        Map colors=new HashMap<>();
        colors.put(0,"#FF9F38");
        colors.put(1,"#B16DE2");
        colors.put(2,"#4F97E9");
        colors.put(3,"#008080");
        colors.put(4,"#0878E8");
        colors.put(5,"#3dfc7a");
        colors.put(6,"#fcf02d");
        colors.put(7,"#e080ff");
        colors.put(8,"#17b9e7");
        colors.put(9,"#ffb294");
        String colorsJson=JsonTool.toJson(colors);

        SharedPreferences sp = getApplicationContext().getSharedPreferences("CORLORS",
                Context.MODE_PRIVATE);
        SharedPreferences.Editor editor = sp.edit();
        editor.putString("CORLORS", colorsJson);
        editor.commit();

        String newJson=getApplicationContext().getSharedPreferences("CORLORS",
                Context.MODE_PRIVATE).getString("CORLORS",JsonTool.toJson(new HashMap<>()));
        return JsonTool.getColors(newJson);
    }
然后就是对用户点击的每个颜色做处理了
/**
     * 显示popupWindow
     */
    public void showPopwindow() {
        ColorPopWin takePhotoPopWin = new ColorPopWin(this,colors,opt, new ColorPopWin.OnOperationListener(){
            @Override
            public void onConfirm(int opt,String color) {
            //点击确认,将颜色、位置 都保存
                if(color==null||color.equals("")){
                    return;
                }
                oldColor=color;
                oldOpt=opt;
                SharedPreferences sp = getApplicationContext().getSharedPreferences("CORLORS",
                        Context.MODE_PRIVATE);
                SharedPreferences.Editor editor = sp.edit();
                editor.putString("USER_COLOR", color);
                editor.commit();

                SharedPreferences sp1 = getApplicationContext().getSharedPreferences("CORLORS",
                        Context.MODE_PRIVATE);
                SharedPreferences.Editor editor1 = sp1.edit();
                editor1.putInt("opt", opt);
                editor1.commit();

            }

            @Override
            public void onCancel() {
            //点击取消,设置回上次点击确认的颜色
                if(oldColor==null||oldColor.equals("")){
                    return;
                }
                ll.setBackgroundColor(Color.parseColor(oldColor));
                btn.setBackgroundColor(Color.parseColor(oldColor));
                title.setBackgroundColor(Color.parseColor(oldColor));
            }

            @Override
            public void onColorOpt(int position, String color) {
            //每次选择某种颜色都进行设置
                if(color==null||color.equals("")){
                    return;
                }
                ll.setBackgroundColor(Color.parseColor(color));
                btn.setBackgroundColor(Color.parseColor(color));
                title.setBackgroundColor(Color.parseColor(color));
            }
        });
        takePhotoPopWin.showAtLocation(findViewById(R.id.btn), Gravity.BOTTOM, 0, 0);
    }
然后再设置一下沉浸式状态栏
在res目录下新建values-v21
新建styles
此时结构应该是这样的 
有两个styles文件
在第一个里加入代码:
<style name="TranslucentTheme" parent="Theme.AppCompat.Light.NoActionBar">
    style>
这是一个空的方法,因为低版本不支持沉浸式状态栏
在第二个里加入:
为这个Activity添加这个theme属性。
最后是在布局文件的跟布局中加入
android:fitsSystemWindows="true"我在上面已经加了。到这里,就可以实现这个功能了。


