NodeJS开发DApp整个流程以及自我心得
NodeJS开发DApp流程自我总结
1.我的系统Win10,开发软件Atom,Windows PowerShell
2.开发环境配置
1)打开一个你的工作文件夹
2)node,python官网下载,直接安装,记得设置环境变量,不详说
3)需要的node的module安装:ganache-cli,web3,solc
打开Win PowerShell,进入工作文件夹(我这里是D:/program/MySC)
执行命令:npm install ganache-cli
npm install solc
而web3的安装:
npm init
npm install ethereum/web3.js --save
3.合约代码开发
这个可以在很多的网站能看到,作为入门级的代码,这里以投票合约为例子--------Voting.sol
我这个代码是在Atom上开发的,保存在工作文件夹即可,代码如下:
pragma solidity ^0.4.18;
// We have to specify what version of compiler this code will compile with

contract Voting {
  /* mapping field below is equivalent to an associative array or hash.
  The key of the mapping is candidate name stored as type bytes32 and value is
  an unsigned integer to store the vote count
  */

  mapping (bytes32 => uint8) public votesReceived;

  /* Solidity doesn't let you pass in an array of strings in the constructor (yet).
  We will use an array of bytes32 instead to store the list of candidates
  */

  bytes32[] public candidateList;

  /* This is the constructor which will be called once when you
  deploy the contract to the blockchain. When we deploy the contract,
  we will pass an array of candidates who will be contesting in the election
  */
  function Voting(bytes32[] candidateNames) public {
    candidateList = candidateNames;
  }

  // This function returns the total votes a candidate has received so far
  function totalVotesFor(bytes32 candidate) view public returns (uint8) {
    require(validCandidate(candidate));
    return votesReceived[candidate];
  }

  // This function increments the vote count for the specified candidate. This
  // is equivalent to casting a vote
  function voteForCandidate(bytes32 candidate) public {
    require(validCandidate(candidate));
    votesReceived[candidate] += 1;
  }

  function validCandidate(bytes32 candidate) view public returns (bool) {
    for(uint i = 0; i < candidateList.length; i++) {
      if (candidateList[i] == candidate) {
        return true;
      }
    }
    return false;
  }
}
4.投票合约的代码编译以及部署
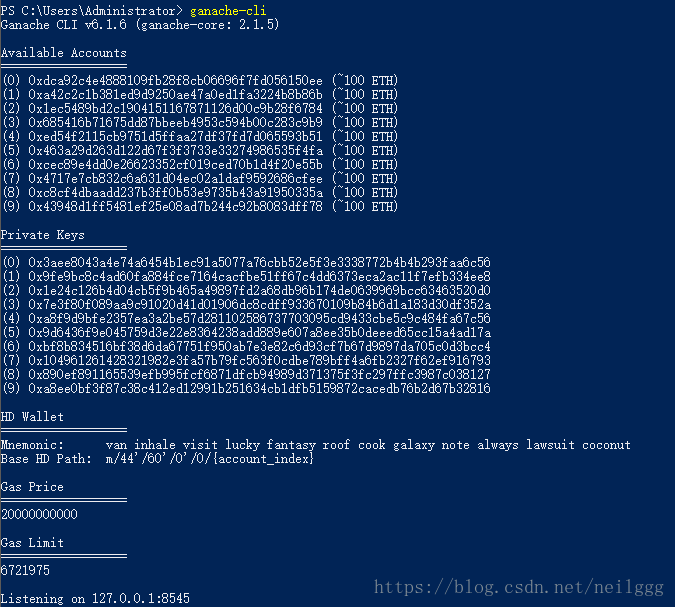
1)首先新建一个窗口,进入工作文件夹,输入ganacahe-cli,打开这个节点模拟器,接着放着就行。具体功能不说,百度吧。
2)然后新建另一个窗口,执行合约代码。网络上有两种方法,一种是一条一条命令的执行,另外一种是执行.js文件。我一开始是一条条输入,毕竟是第一次,可以看清楚每一步有没有出错,最后再打包成js文件。
3)如果你一条一条代码执行,输入node,就可以进入控制台,再一条条打就好了。
4)这里我用js文件执行的方法,直接输入node XXX.js即可,XXX.js自己命名,在Atom编辑。代码如下:
//初始化web3
web3 = require ('web3');
//web3链接节点获取账户
web3 = new web3 (new web3.providers.HttpProvider("http://localhost:8545"));
//显示账户
console.log(web3.eth.accounts);

fs = require('fs');
//代码输入
code = fs.readFileSync('voting.sol').toString()
//初始化编译器solc
solc = require('solc')
//用solc的compile()方法对合约代码进行编译
compiledCode = solc.compile(code)

abiDefinition = JSON.parse(compiledCode.contracts[':Voting'].interface)

VotingContract = web3.eth.contract(abiDefinition)

byteCode = compiledCode.contracts[':Voting'].bytecode

deployedContract = VotingContract.new(['Rama','Nick','Jose'],{data: byteCode, from: web3.eth.accounts[0], gas: 4700000})

deployedContract.address

contractInstance = VotingContract.at(deployedContract.address)
5)部署之后,显示ganache模拟节点账户的地址。如下图:
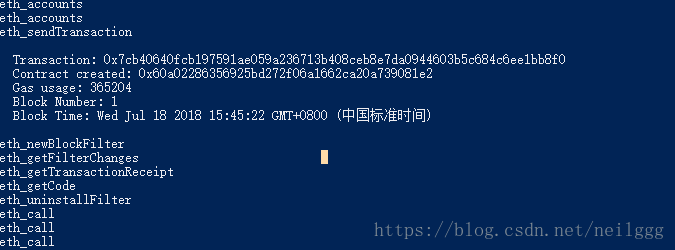
接着,返回打开ganache的窗口。我们可以看到如下图:
这里重点在于Contract created这个地址,与web网页交互的时候,要用到,记住这个地址(到时候复制就好)。
6)这里就部署完毕了
7.最后网页交互
1)网上可以找到两个已经编写好的index.html和index.js的文件。下载好,放到工作文件夹中。
2)接着,在执行之前,这里我们要改一些东西。
首先是交互的地址,因为每次部署都不一样,所以我们需要改,就我们刚刚说到的Contract created这个地址。
我们用Atom打开index.js,找到下面代码:
contractInstance = VotingContract.at('0x60a02286356925bd272f06a1662ca20a739081e2');绿色部分改成我们自己的地址就好了。
然后用Atom打开index.html,找到下面代码:
把第一行的内容改成你自己安装的web3.js(一开始没有改,发现直接打开index.html的时候,报错说找不到web3,后来改成自己的web3.js就可以)
3)改完以上两个,直接双击打开index.html既可以了。


