Spring Boot学习笔记:(三)Web开发(Thymeleaf)
Web开发是项目开发中至关重要的一部分,Web开发的核心内容主要包括内嵌Servlet容器和Spring MVC。
一、 Spring Boot的Web开发支持
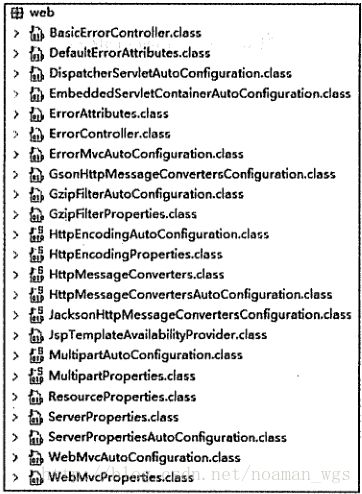
在上节中提到的Starter Poms中提到了spring-boot-starter-web,对于Web开发,这个starter pom提供了嵌入的Tomcat以及SpringMVC依赖。关于Web相关的自动配置存储在spring-boot-autoconfigure.jar 和 org.springframework.boot.autoconfigure.web下,如图所示:
从这些文件中可知:
- ServerPropertiesAutoConfiguration 和 ServerProperties自动配置内嵌Servlet容器;
- WebMvcAutoConfiguration 和 WebMvcProperties配置Spring MVC。
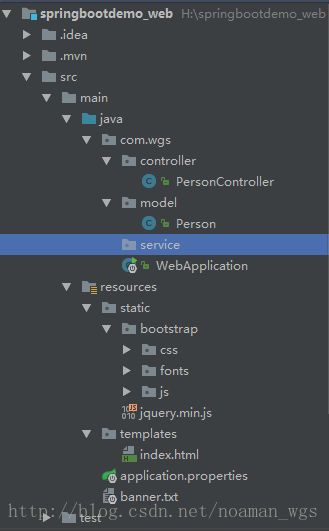
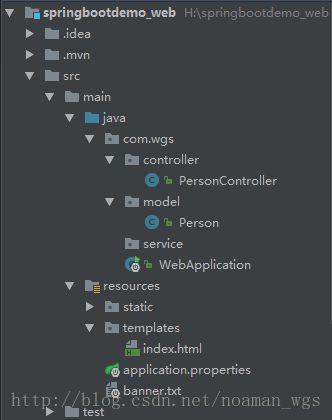
二、 Spring Boot Web开发常用项目结构
- root package :
com.wgs; Spring Boot的启动类Application.java 需要置于root
package下,这样Application.java启动的时候,就会默认扫描root package 下的类; - 实体:置于
com.wgs.model下; - 逻辑层:置于
com.wgs.service下; - 控制层:置于
com.wgs.controller下; - static:主要存放一些静态资源,如一些js文件,图片资源等;
- templates:用来存放默认的模板配置路径;
三、Thymeleaf模板引擎
1 什么是模板引擎
模板引擎(这里特指用于Web开发的模板引擎)是为了使用户界面与业务数据(内容)分离而产生的,它可以生成特定格式的文档,用于网站的模板引擎就会生成一个标准的HTML文档。
举个简单的例子,在应用Spring MVC框架做开发时,Controller可以将数据保存到Model中然后返回,而模板引擎就可以对Model中数据进行渲染再进行显示,可以做到前后端分离。
以前的后端开发中,使用JSP技术比较多。而Spring Boot不建议使用JSP,原因在于JSP在内嵌的Servlet容器上运行有问题:
- Tomcat只支持war打包的方式,不支持可执行的jar;
- 内嵌的Jetty不支持JSP;
- Undertow不支持JSP;
Spring Boot提供了大量的模板 引擎:
- FreeMarker
- Groovy
- Thymeleaf(推荐)
- Velocity
- Mustache
Spring Boot 推荐使用Thymeleaf 作为模板引擎,因为Thymeleaf 提供了完美的Spring MVC支持。
2 Thymeleaf 基础知识
Thymeleaf是一个Java类库,是一个XML/XHTML/HTML5的模板引擎,可以作为MVC的Web应用的View层。
Thymeleaf能够与SpringMVC集成,可代替JSP。
下面看看Thymeleaf 的基础语法:
(1)引入Thymeleaf
首先需要通过http://www.thymeleaf.org命名空间,将静态页面转为动态的视图;动态视图中处理元素时都需要加上th:前缀:
<html xmlns:th="http://www.thymeleaf.org">如果想引入静态资源,需要通过@{}来引用Web静态资源。
如想引入项目中src/main/resources/static/bootstrap资源:
<link rel="stylesheet" th:src="@{bootstrap/css/bootstrap.min.css}" />(2)访问model中数据
同JSP,通过${}访问model中数据。
姓名:<span th:text="${singleP.name}">span>singleP来自后端Model中数据:
model.addAttribute("singleP", singleP);(3)for循环:迭代访问model中数据
Thymeleaf 使用th:each="p:${list}"来迭代访问数据:
<li class="list-group-item" th:each="person:${personList}">
     姓名:<span th:text="${person.name}">span>
     年龄:<span th:text="${person.age}">span><br/>
li>
personList来自后端Model中数据:
model.addAttribute("personList", personList);(4)数据判断
可使用${not #lists.isEmpty(list)}判断集合是否为空。Thymeleaf 支持> , < , >=, <=, ==, !=等作比较条件:
th:if="${not #lists.isEmpty(personList)}"(5)在JavaScript中访问model中数据
要想在JavaScript中访问model中数据,首先需要通过th:inline="javascript"添加到script标签。
再通过[[${}]]格式获得实际的值。
四、 Spring Boot 集成 Thymeleaf 显示简单页面
下面来看看在 Spring Boot中如何使用Thymeleaf 来渲染页面。
(1)引入Thymeleaf 依赖:
<dependency>
    <groupId>org.springframework.bootgroupId>
    <artifactId>spring-boot-starter-thymeleafartifactId>
dependency>
spring-boot-starter-thymeleaf中包含spring-boot-starter-web,所以不需要再引入。
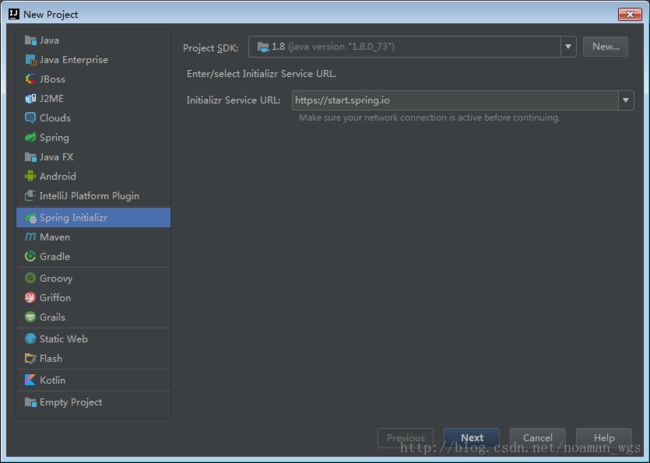
也可以在新建项目的时候,通过Spring Initializr方式去创建:
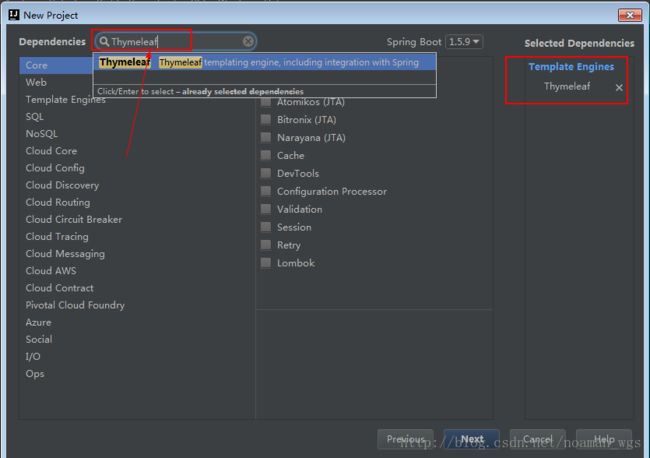
再下一步后选中所需要的技术Thymeleaf即可:
(2)JavaBean :
package com.wgs.model;

/**
 * @author GenshenWang.nomico
 * @date 2017/12/26.
 */
public class Person {
    private String name;
    private Integer age;

    public void setName(String name) {
        this.name = name;
    }

    public void setAge(Integer age) {
        this.age = age;
    }

    public String getName() {
        return name;
    }

    public Integer getAge() {
        return age;
    }

    public Person(String name, Integer age) {
        this.name = name;
        this.age = age;
    }

    public Person() {
    }
}
(3)通过Controller准备数据,并将数据保存到Model中:
package com.wgs.controller;

import com.wgs.model.Person;
import org.springframework.stereotype.Component;
import org.springframework.stereotype.Controller;
import org.springframework.ui.Model;
import org.springframework.web.bind.annotation.RequestMapping;

import java.util.ArrayList;
import java.util.List;

/**
 * @author GenshenWang.nomico
 * @date 2017/12/27.
 */
@Controller
public class PersonController {

    @RequestMapping("/getPersonData")
    public String getPersonData(Model model){
        Person singlePerson = new Person("SB", 22);
        List personList = new ArrayList<>();
        Person p1 = new Person("aa", 11);
        Person p2 = new Person("bb", 22);
        Person p3 = new Person("cc", 33);
        personList.add(p1);
        personList.add(p2);
        personList.add(p3);

        model.addAttribute("singlePerson", singlePerson);
        model.addAttribute("personList", personList);

        return "index";
    }
}
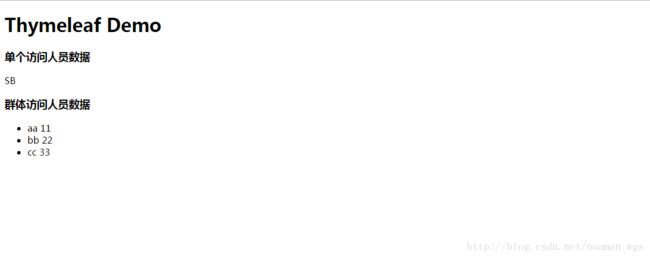
(4)在src/main/resources/templates建立模板页面:index.html。
<html xmlns:th="http://www.thymeleaf.org" lang="zh-CN">
<head>
    <meta content="text/html;charset=utf-8"/>
    <meta name="viewport" content="width=device-width, initial-scale=1"/>
    <meta http-equiv="Content-Type" content="IE=edge" />
    <title>Thymeleaf Demotitle>
head>
<body>
<h1>Thymeleaf Demoh1>
<div>
    <div >
        <h3 class="panel-title">单个访问人员数据h3>
    div>
    <div>
        <span th:text="${singlePerson.name}">span>
    div>
div>


<div th:if="${not #lists.isEmpty(personList)}">
    <div>
        <div>
            <h3 class="panel-title">群体访问人员数据h3>
        div>
        <div >
            <ul class="list-group">
                <li class="list-group-item" th:each="person:${personList}">
                    <span th:text="${person.name}">span>
                    <span th:text="${person.age}">span>
                li>
            ul>
        div>
    div>

div>

body>
html>【注】
(1)要用@Controller注解,不能用@RestController,因为@RestController返回的是JSON数据,而不是页面;
(2)IDEA创建的HTML页面 ,等标签是没有闭合的,执行的时候会报错,需要我们手动去闭合标签。
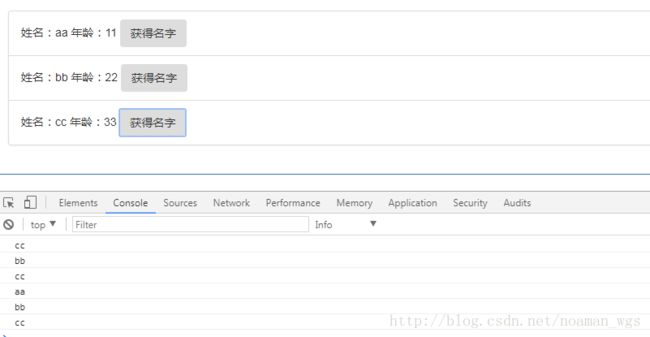
五、 Spring Boot +Thymeleaf + BootStrap显示简单页面
可以使用BootStrap对页面进一步进行加工:
<html xmlns:th="http://www.thymeleaf.org" lang="zh-CN">
<head>
    <meta charset="utf-8"/>
    <meta name="viewport" content="width=device-width, initial-scale=1"/>
    <meta http-equiv="Content-Type" content="text/html; charset=UTF-8" />

    <link rel="stylesheet" href="https://cdn.bootcss.com/bootstrap/3.3.7/css/bootstrap.min.css" integrity="sha384-BVYiiSIFeK1dGmJRAkycuHAHRg32OmUcww7on3RYdg4Va+PmSTsz/K68vbdEjh4u" crossorigin="anonymous"/>

    <link rel="stylesheet" href="https://cdn.bootcss.com/bootstrap/3.3.7/css/bootstrap-theme.min.css" integrity="sha384-rHyoN1iRsVXV4nD0JutlnGaslCJuC7uwjduW9SVrLvRYooPp2bWYgmgJQIXwl/Sp" crossorigin="anonymous"/>
    <script src="http://cdn.bootcss.com/jquery/1.11.1/jquery.min.js">script>

    <script src="https://cdn.bootcss.com/bootstrap/3.3.7/js/bootstrap.min.js" integrity="sha384-Tc5IQib027qvyjSMfHjOMaLkfuWVxZxUPnCJA7l2mCWNIpG9mGCD8wGNIcPD7Txa" crossorigin="anonymous">script>
    <title>Thymeleaf Demotitle>
head>
<body>

<div class="panel panel-primary">
    <div class="panel-heading">
        <h3 class="panel-title">单个访问人员数据h3>
    div>
    <div class="panel-body">
        姓名:<span  th:text="${singlePerson.name}">span>
        年龄:<span th:text="${singlePerson.age}">span>
    div>
div>


<div th:if="${not #lists.isEmpty(personList)}">
    <div class="panel panel-primary">
        <div class="panel-heading">
            <h3 class="panel-title">群体访问人员数据h3>
        div>
        <div class="panel-body">
            <ul class="list-group">
                <li class="list-group-item" th:each="person:${personList}">
                    姓名:<span th:text="${person.name}">span>
                    年龄:<span th:text="${person.age}">span>
                    <button class="btn" th:onclick="'getName(\''+ ${person.name}+'\');'">获得名字button>
                li>
            ul>
        div>
    div>

div>

<script th:inline="javascript">
    var single = [[${singlePerson}]];
    console.log(single.name + "/" + single.age);
    function getName(name) {
        console.log(name);
    }
script>
body>
html>
