python+unittest参数化+HTMLTestRunner+ssl验证做接口测试
文章目录
- 0 引言
- 1 requests模块
- 2 unittest框架及参数化
- 3 HTMLTestRunner
- 3.1 单接口测试
- 3.2 多接口测试
- 4 ssl验证
- 5 总结
0 引言
最近接触了API接口测试项目,一开始使用Postman测试,感觉还挺好用,但是时间一长,突然发现每次操作起来挺麻烦,特别是修改配置文件。于是乎打算写成自动化测试脚本,尝试了很多方法之后,最终选定python语言、unittest框架及其参数化、HTMLTestRunner测试报告框架、以及ssl验证过程(针对https验证),下面详细地介绍下整个学习过程及对应的代码实现。
1 requests模块
python中对于请求http协议,有很多模块,比如urllib、requests等模块,如果你只是用来请求http协议,测试一下接口的返回及内容的话,推荐使用requests模块。为什么这么说呢?因为简洁就是美,requests有一个返回状态码status_code,来验证请求是否成功,而且返回的内容可以用text,content或者json()格式表示,非常方便。下面简单介绍一下requests模块。直接上代码:
import requests

def Get(url, para, headers):
	try:
	    req = requests.get(url=url, params=para, headers=headers)
	    return req
	except requests.RequestException as e:
	    print(e)

if __name__=='__main__':
	url = "http://www.baidu.com"
	params = None
	headers = None
	req = Get(url, params, headers)
	print(req.status_code)
	print(req.text)
输出为:
200
这表明我们的请求成功了,状态码为200,内容为网页格式。这里我只是对requests.get()方法做了一个封装,当然你也可以不用这个封装,直接用下面这个代码进行测试。
import requests
if __name__=='__main__':
	url = "http://www.baidu.com"
	params = None
	headers = None
	req = requests.get(url, params, headers)
	print(req.status_code)
	print(req.text)
输出结果也是一样的。至于其他的方法如post,put,delete等也基本类似,这里不做过多说明。提醒大家注意,在实际的api接口测试中,像headers,data等值一定要根据实际的请求参数来,不可多加,但是也不能少加,很多时候请求结果不正确或者请求失败,就是由于请求体不全或者超过了规定的参数导致的;另外一点,大家要注意,如果你的headers中的请求方法是json格式,如application/json的,那么你的headers、data等参数的数据构成中,如果使用字典封装,一定要记得两边都用双引号括起来,否则无法识别,最一劳永逸的方法就是,养成用双引号封装字典的习惯。requests模块就先介绍到这里。更多详细的requests模块介绍,请参考官方文档Request2.18.1
2 unittest框架及参数化
unittest框架是python中做单元测试的框架,它的语法也非常简单,只要你是以test方法开头的函数,并且在运行的时候选择unittest运行,那么它就将运行结果详细的在运行框中描述出来。我们还是举一个例子吧:
import unittest

class APITest(unittest.TestCase):

    def setUp(self):
        pass

    def tearDown(self):
        pass

    def sub(self,a,b):
        c = a + b
        return c

    def test_sub(self):
        d = self.sub(4,5)
        self.assertEqual(d, 9)

if __name__=='__main__':
    unittest.main()
简单解释下这段代码,首先我们创建一个类APITest,这个类继承自unittest.TestCase类,也就是unittest框架中的测试集类。然后我们在这个类中创建了一个sub方法,它有两个参数a,b,返回值是a和b的和。接着我们在test_sub中,测试我们刚才的sub方法,设定a=4,b=5,然后断言sub方法的返回值是否与给定的9相等,这里assertEqual(m, n)是unittest中断言两个值相等的方法,上述这段代码的运行结果如下:
Ran 1 test in 0.000s
OK
以上就是最传统的unittest框架的应用,但是这个框架有一个缺陷,就是不能自己传入参数,如果针对一个接口,我们设计了很多测试用例,实际上就是改变了一下参数组合,那么就需要写很多这样的用例。这样做很麻烦,代码冗余度很高。那么,我们能不能给这个框架加上自己定义的参数呢?答案当然是肯定的,这需要我们对原先的unittest.TestCase重写构造函数,把参数加进去。下面是具体的代码实现过程:
class ParametrizedTestCase(unittest.TestCase):  #可参数化的类
    """ TestCase classes that want to be parametrized should
        inherit from this class.
    """

    def __init__(self, methodName='runTest', param=None):
        super(ParametrizedTestCase, self).__init__(methodName)
        self.param = param

    @staticmethod
    def parametrize(testcase_klass, defName=None, param=None):   #参数化方法
        """ Create a suite containing all tests taken from the given
            subclass, passing them the parameter 'param'
        """
        testLoader = unittest.TestLoader()
        testNames = testLoader.getTestCaseNames(testcase_klass)
        suite = unittest.TestSuite()
        if defName != None:
            for name in testNames:
                if name == defName:
                    suite.addTest(testcase_klass(name, param=param))
        else:
            for name in testNames:
                suite.addTest(testcase_klass(name, param=param))
        return suite
这里,param就是我们加入进去的自定义参数,这个参数可以是一组元组、列表的组合,下面我们使用这个类,重新写一下我们之前使用unittest框架写的代码。
class APITestNew(ParametrizedTestCase):
    def setUp(self):
        pass

    def tearDown(self):
        pass

    def sub(self, a, b):
        c = a + b
        return c

    def test_sub(self):
        a = self.param[0]
        b = self.param[1]
        expected = self.param[2]
        c = self.sub(a, b)
        print(c)
        self.assertEqual(c, expected)

if __name__=='__main__':
    testData = [
                (10, 9, 19),
                (12, 13, 25),
                (12, 10, 22),
                (2, 4, 6)
               ]
    suite = unittest.TestSuite()
    for i in testData:
        suite.addTest(ParametrizedTestCase.parametrize(APITestNew, 'test_sub', param=i))
    runner = unittest.TextTestRunner()
    runner.run(suite)
执行结果如下:
....
19
----------------------------------------------------------------------
25
Ran 4 tests in 0.000s
22

6
OK
通过上述的代码改进,我们就实现了将unittest框架参数化。尽管我们已经实现了参数化,但是这个执行结果依然不够直观,下面我们就来讲讲结合HTMLTestRunner框架,生成html测试报告。实现过程也比较简单。
3 HTMLTestRunner
HTMLTestRunner框架是专门用来生成html测试报告的,一般我们将它与unittest框架结合起来使用,不多说了,直接将我们上节中的代码修改一下即可。
if __name__=='__main__':
	from HTMLTestRunner import HTMLTestRunner
	testData = [
               (10, 9, 19),
               (12, 13, 25),
               (12, 10, 22),
               (2, 4, 6)
              ]
	suite = unittest.TestSuite()
	for i in testData:
	  suite.addTest(ParametrizedTestCase.parametrize(APITestNew, 'test_sub', param=i))
	now = time.strftime("%Y-%m-%d %H_%M_%S")
	path = '../Results'
	if not os.path.exists(path):
		os.makedirs(path)
	else:
		pass
	report_path = path + '/' + now + "_report.html"  # 将运行结果保存到report,名字为定义的路径和文件名,运行脚本
	reportTitle = '测试报告'
	desc = u'测试报告详情'
	fp = open(report_path, 'wb')
	runner = HTMLTestRunner(stream=fp, title=reportTitle, description=desc)
	runner.run(suite)
	fp.close()
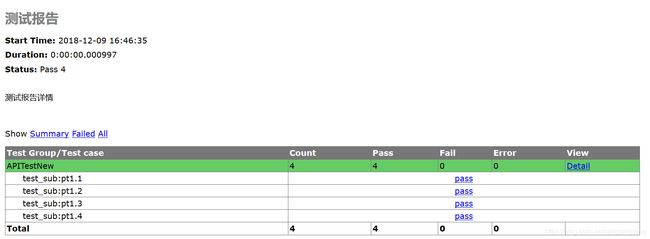
测试结果如下:

下面重点讲一下html的生成代码,
runner = HTMLTestRunner(stream=fp, title=reportTitle, description=desc)
stream=fp,是以写方式打开文件,title是测试报告的主题,description是测试报告描述。这里有几点需要注意:
HTMLTestRunner不是python自带模块,需要自己去官网安装,官网地址是HTMLTestRunner Python2 版本,如果使用python3,需要修改HTMLTestRunner.py脚本,具体请上网搜索。
如果需要生成xml格式,只需要将上面代码中的
	runner = HTMLTestRunner(stream=fp, title=reportTitle, description=desc)
	runner.run(suite)
修改为下面三行两行代码
	import xmlrunner
	runner = xmlrunner.XMLTestRunner(output='report')  # 指定报告放的目录
	runner.run(suite)
通过上述三个步骤,相信大家对于如何用pyhon语言,结合unittest框架和HTMLTestRunner框架去做自动化测试有了很深入的了解。讲到这里,好像还是跟接口测试没什么关系。接口测试与单元测试又有什么区别呢?单元测试只是对某个函数进行多组参数的测试。而接口测试就是就是针对一个具体的api进行多组参数测试。接口测试又分为两种,一种是单接口或独立接口测试,另一种是多接口或者接口间测试。对于单接口或独立接口测试,由于没有接口之间的测试,只需要针对某个接口做测试,我们可以根据接口文档设计测试用例,然后组合成参数进行测试;对于多接口或者接口间测试,首先要测试的是接口之间调用逻辑是否正确,然后根据设计的单接口测试用例,组合测试用例进行测试。下面就这两种情况实际用代码实现一下:
3.1 单接口测试
还是先来上一段代码
class APITestNew(ParametrizedTestCase):
    def setUp(self):
        pass

    def tearDown(self):
        pass

	def grant_register(self, ipAddress, appName, description):
	    url = 'http://%s/api/v1/reg' % ipAddress
	    headers = {"Content-Type": "application/x-www-form-urlencoded"}
	    para = {"app_name": appName, "description": description}
	    req = self.Post(url, para, headers)
	    return req

	def test_grant_register(self):
	    print('Test grant register parameters as follows.')
	    for index, value in enumerate(self.param):
	    	print('Test grant_request_refreshToken {0} parameter is {1}'.format(index, value))
	    self.ip_address = self.param[1]
	    self.app_name = self.param[2]
	    self.description = self.param[3]
	    self.expected = self.param[4]
	    req = self.grant_register(self.ip_address, self.app_name, self.description)
	    self.assertIn(req.status_code, self.expected, msg="reg failed.")

if __name__=='__main__':
    import random
    import string
    ipAddr = '172.36.17.108'
    testData = [
        (1, ipAddr, ''.join(random.sample(string.ascii_letters + string.digits, 7)), '', 200),
        (2, ipAddr, ''.join(random.sample(string.ascii_letters + string.digits, 7)), '', 200),
        (3, ipAddr, ''.join(random.sample(string.ascii_letters + string.digits, 7)), '',  200)
    ]
    suite = unittest.TestSuite()
    for i in testData:
        suite.addTest(ParametrizedTestCase.parametrize(APITestNew, 'test_grant_register', param=i))
    now = time.strftime("%Y-%m-%d %H_%M_%S")
    path = '../Results'
    if not os.path.exists(path):
        os.makedirs(path)
    else:
        pass
    report_path = path + '/' + now + "_report.html"
    reportTitle = '测试报告'
    desc = u'测试报告详情'
    fp = open(report_path, 'wb')
    runner = HTMLTestRunner(stream=fp, title=reportTitle, description=desc)
    runner.run(suite)
    fp.close()
这个就是一段完整的单接口测试代码。
3.2 多接口测试
也还是看一段代码吧
class APITestNew(ParametrizedTestCase):
    def setUp(self):
        pass

    def tearDown(self):
        pass

	def grant_register(self, ipAddress, appName, description):
	    url = 'https://%s/api/v1/reg' % ipAddress
	    headers = {"Content-Type": "application/x-www-form-urlencoded"}
	    para = {"app_name": appName, "description": description}
	    req = self.Post(url, para, headers)
	    return req

	def grant_oauth2_basic(self, ipAddress, appName, description):
        apps = self.grant_register(ipAddress, appName, description)
        apps = apps.json()
        url = 'http://%s/api/v1/basic' % ipAddress
        data = {"client_id":apps['appId'], "client_secret":apps['appKey']}
        headers = None
        req = requests.post(url, data, headers)
        basic = str(req.content, encoding='utf-8')
        return apps, basic, req

    def test_grant_oauth2_basic(self):
        print('Test grant_oauth2_basic parameters as follows.')
        count = 0
        for i in self.param:
            print('Test grant_oauth2_basic {0} parameter is {1}'.format(count, i))
            count += 1
        self.ipAddress = self.param[1]
        self.appName = self.param[2]
        self.description = self.param[3]
        self.expected = self.param[4]
        apps, basic, req = self.grant_oauth2_basic(self.ipAddress, self.appName, self.description)
        self.assertIn(req.status_code, self.expected, msg="grant failed.")
if __name__=='__main__':
    import random
    import string
    ipAddr = '172.36.17.108'
    testData = [
        (1, ipAddr, ''.join(random.sample(string.ascii_letters + string.digits, 7)), '', 200),
        (2, ipAddr, ''.join(random.sample(string.ascii_letters + string.digits, 7)), '', 200),
        (3, ipAddr, ''.join(random.sample(string.ascii_letters + string.digits, 7)), '',  200)
    ]
    suite = unittest.TestSuite()
    for i in testData:
        suite.addTest(ParametrizedTestCase.parametrize(APITestNew, 'test_grant_oauth2_basic', param=i))
    now = time.strftime("%Y-%m-%d %H_%M_%S")
    path = '../Results'
    if not os.path.exists(path):
        os.makedirs(path)
    else:
        pass
    report_path = path + '/' + now + "_report.html"
    reportTitle = '测试报告'
    desc = u'测试报告详情'
    fp = open(report_path, 'wb')
    runner = HTMLTestRunner(stream=fp, title=reportTitle, description=desc)
    runner.run(suite)
    fp.close()
对于多接口测试,且接口之间存在互相调用的情况,最好是对调用方法时,将上一个借口的方法封装进下一个接口,实现接口逻辑调用的一致性。
4 ssl验证
前面我们所讲的代码,都是关于访问http协议的,那么大家知道,目前很多公司都已经转到https协议上去,https协议是的信息的传输更加安全。因此在https的访问中,可以采用以下几种策略进行处理:
- 对于一般的网站访问,无法获得其证书信息,只能选择忽略ssl校验;
- 对于知道ssl证书的校验,则需要进行ssl证书校验;
关于如何忽略ssl证书的校验,网上有很多资料,这里不做赘述,重点讲一下关于ssl证书的校验。在python的ssl包中,提供了验证ssl证书的方法,如下代码所示:
if __name__=='__main__':
	import ssl
	context = ssl.SSLContext(ssl.PROTOCOL_SSLv23)
    context.check_hostname = False
    context.load_cert_chain(certfile=pub_key_cert_file, keyfile=pri_key_pem_file)
    context.verify_mode = 2
    context.load_verify_locations(ca_file)
首先,context生成一个ssl上下文,用于接下来的域名校验、证书导入、验证模式及ca证书验证。context.check_hostname = False这行代码,用于域名校验,值为True表示开启域名校验,值为False表示关闭域名校验。context.load_cert_chain(certfile=pub_key_cert_file, keyfile=pri_key_pem_file),certfile表示导入公钥证书,keyfile表示私钥证书,一般情况下,python支持的certfile证书文件后缀为.crt,keyfile证书文件后缀为.pem。context.verify_mode = 2表示验证模式,0代表不做任何验证,1代表可选,2代表必须验证,context.load_verify_locations(ca_file)代表导入CA证书,经过上面几个步骤,此时ssl证书的基本配置已经完成。接下来就是在请求时加入ssl证书验证,比如:
req = request.Request(url=url, data=para, headers=headers, method='GET')
response = request.urlopen(req, context=self.context)
整个完整的ssl证书验证代码如下:
if __name__=='__main__':
	from urllib import parse, request
	import ssl
	context = ssl.SSLContext(ssl.PROTOCOL_SSLv23)
    context.check_hostname = False
    context.load_cert_chain(certfile=pub_key_cert_file, keyfile=pri_key_pem_file)
    context.verify_mode = 2
    context.load_verify_locations(ca_file)
    req = request.Request(url=url, data=para, headers=headers, method='GET')
	response = request.urlopen(req, context=self.context)
关于更多python的ssl模块的信息,请参考ssl官方文档
5 总结
一路走来,从项目需求出发,一步一步完善脚本,期间入了很多坑,也从很多博客种得到了启发。总结起来就一句话,遇到问题,解决问题,能力才会得到快速的提升。