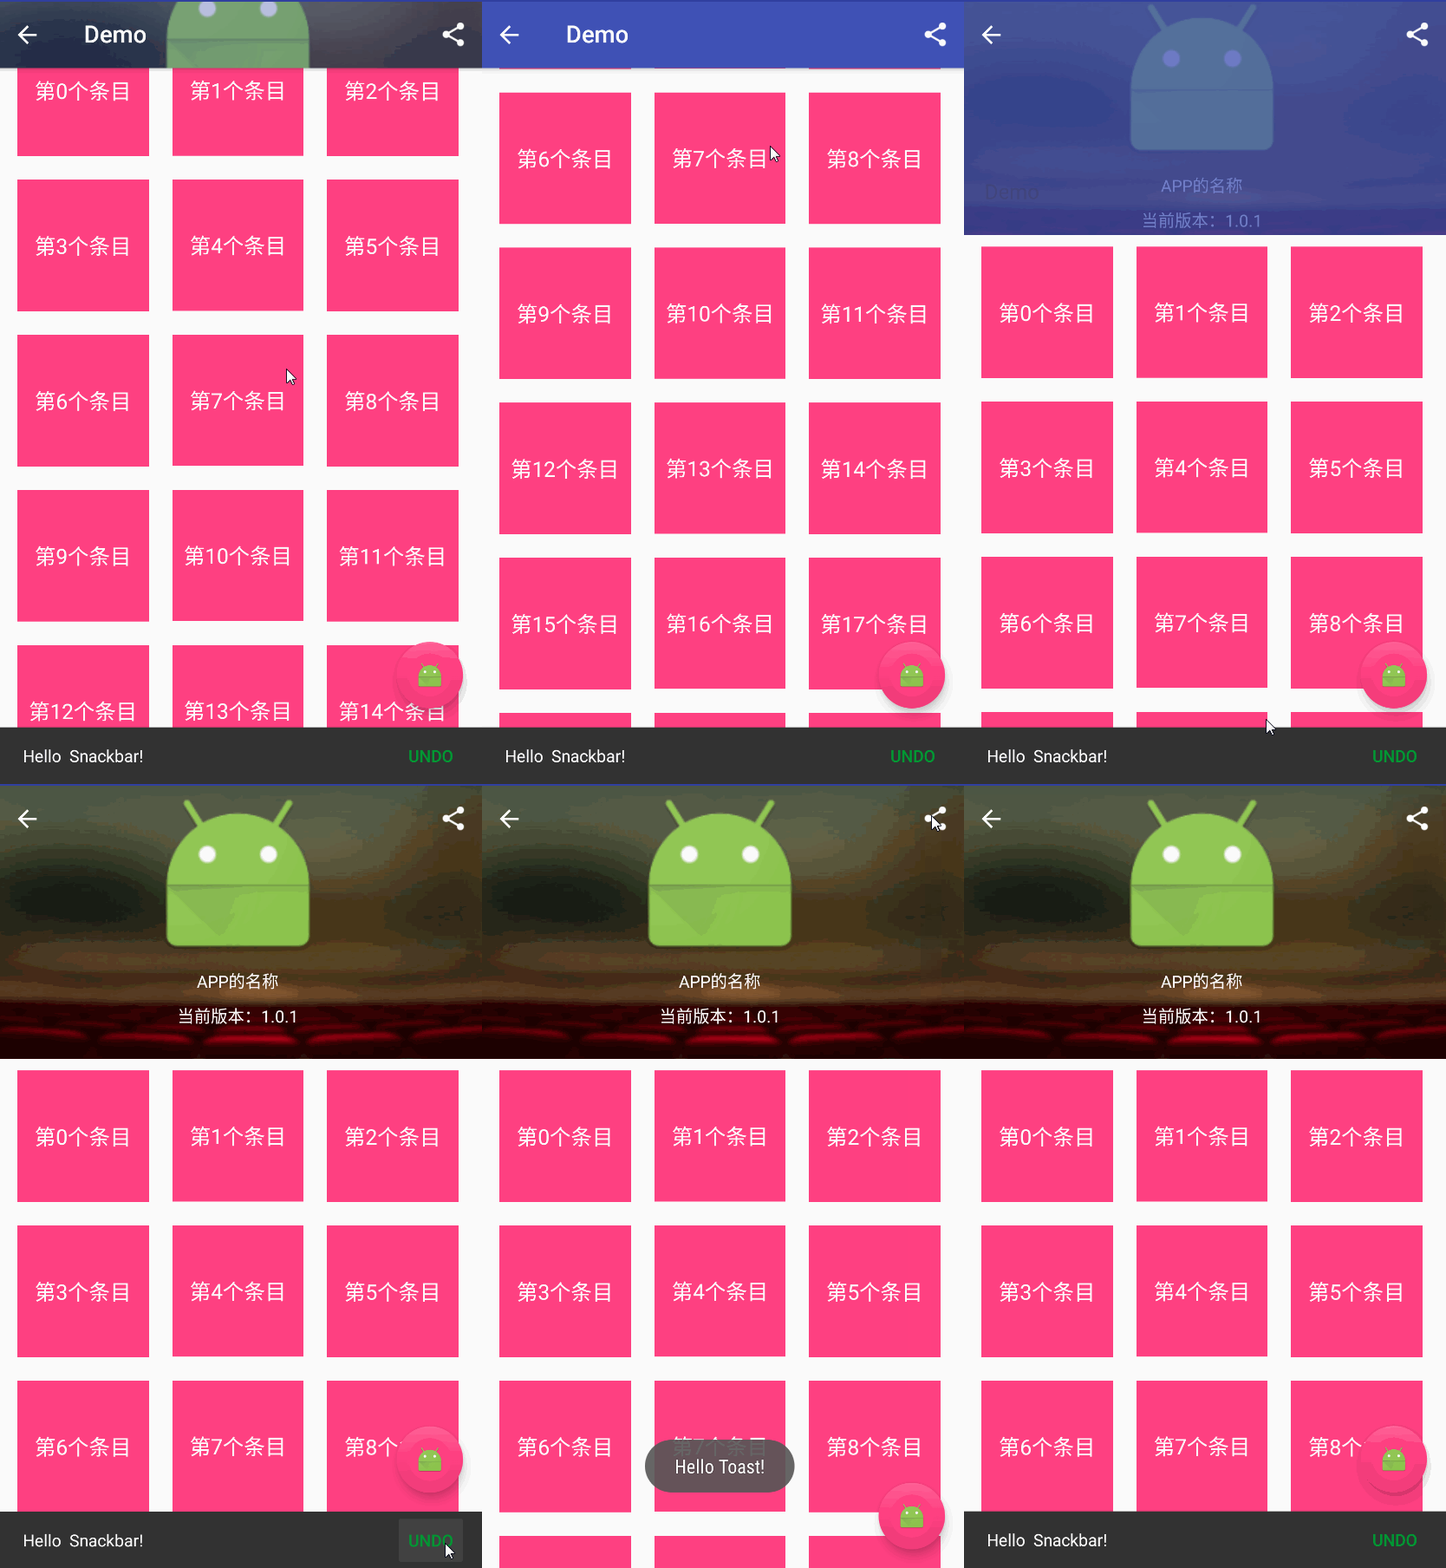
Material design学习笔记-CoordinatorLayout,NestedScrollView,AppBarLayout,CollapsingToolbarLayout学习
下面具体来看一下吧~
CoordinatorLayout
CoordinatorLayout 实现了多种Material Design中提到的滚动效果,用layout_gravity设置内部
相关控件的位置。一般会和AppBarLayout、NestedScrollView等一起使用。
可以实现的效果:
- 让浮动操作按钮上下滑动,为Snackbar留出空间。
- 扩展或者缩小Toolbar或者头部,让主内容区域有更多的空间。
- 控制哪个view应该扩展还是收缩,以及其显示大小比例,包括视差滚动效果动画。
.support.design.widget.CoordinatorLayout
    xmlns:android="http://schemas.android.com/apk/res/android"
    xmlns:app="http://schemas.android.com/apk/res-auto"
    xmlns:tools="http://schemas.android.com/tools"
    android:id="@+id/parentView"
    android:layout_width="match_parent"
    android:layout_height="match_parent">
.support.design.widget.CoordinatorLayout>
CollapsingToolbarLayout
CollapsingToolbarLayout包裹 Toolbar 的时候提供一个可折叠的
Toolbar,一般作为AppbarLayout的子视图使用,CollapsingToolbarLayout的子视图类似与LinearLayout垂直方向排放。
    .support.design.widget.AppBarLayout
        android:layout_width="match_parent"
        android:layout_height="230dp"
        android:theme="@style/ThemeOverlay.AppCompat.Dark.ActionBar">

        .support.design.widget.CollapsingToolbarLayout
            android:id="@+id/collapsing_toolbar"
            android:layout_width="match_parent"
            android:layout_height="230dp"
            app:contentScrim="@color/colorPrimary"
            app:expandedTitleMarginStart="10dp"
            app:expandedTitleTextAppearance="@style/CollapsingToolbarLayoutStyle"
            app:layout_scrollFlags="scroll|exitUntilCollapsed">


            "match_parent"
                android:layout_height="230dp"
                android:background="@mipmap/header"
                android:orientation="vertical"
                app:layout_collapseMode="parallax"
                app:layout_collapseParallaxMultiplier="0.7">


            .support.v7.widget.Toolbar
                android:id="@+id/toolbar"
                android:layout_width="match_parent"
                android:layout_height="?attr/actionBarSize"
                android:background="@android:color/transparent"
                app:layout_collapseMode="pin" />

        .support.design.widget.CollapsingToolbarLayout>
    .support.design.widget.AppBarLayout>
使用CollapsingToolbarLayout实现折叠效果,需要注意3点
- AppBarLayout的高度固定
- CollapsingToolbarLayout的子视图设置layout_collapseMode属性
关联悬浮视图设置app:layout_anchor,app:layout_anchorGravity属性
比较重要的一些属性:
layout_scrollFlags:- scroll - 想滚动就必须设置这个。
- enterAlways - 实现quick return效果, 当向下移动时,立即显示View(比如Toolbar)。
- exitUntilCollapsed - 向上滚动时收缩View,但可以固定Toolbar一直在上面。
- enterAlwaysCollapsed - 当你的View已经设置minHeight属性又使用此标志时,你的View只能以最小高度进入,只有当滚动视图到达顶部时才扩大到完整高度。
其中还设置了一些属性,简要说明一下:
- contentScrim - 设置当完全CollapsingToolbarLayout折叠(收缩)后的背景颜色。
- expandedTitleMarginStart - 设置扩张时候(还没有收缩时)title向左填充的距离。
- layout_collapseMode (折叠模式) - 有两个值:
· pin - 设置为这个模式时,当CollapsingToolbarLayout完全收缩后,Toolbar还可以保留在屏幕上。
· parallax - 设置为这个模式时,在内容滚动时,CollapsingToolbarLayout中的View(比如ImageView)也可以同时滚动,实现视差滚动效果,通常和layout_collapseParallaxMultiplier(设置视差因子)搭配使用。
layout_collapseParallaxMultiplier(视差因子) - 设置视差滚动因子,值为:0~1。
或者如果你想要在折叠和展开状态时改变文本的显示。你可以这样来简单的实现:设置 TextAppearance,分别通过 app:collapsedTitleTextAppearance 和app:expandedTitleTextAppearance 来设置。
expandedTitleTextAppearance:这个可以设置样式,开始的时候为透明这样toolbar中的text会有有种渐变显示的效果

这里我们看到我们是在CollapsingToolbarLayout区域使得Toorbar可以滚动,但是一般情况下我们都是下面内容滑动同时带动Toorbar的滚动。这个就是下面要说的。
NestedScrollView
为了使得Toolbar可以根据下面内容的滑动的相应的滑动,我们必须还得有个条件,就是CoordinatorLayout布局下包裹一个可以滑动的布局,比如 RecyclerView,NestedScrollView(经过测试,ListView,ScrollView不支持)具有滑动效果的组件。并且给这些组件设置如下属性来告诉CoordinatorLayout,该组件是带有滑动行为的组件,然后CoordinatorLayout在接受到滑动时会通知AppBarLayout 中可滑动的Toolbar可以滑出屏幕了。记得要给 RecyclerView,NestedScrollView设置app:layout_behavior=@string/appbar_scrolling_view_behavior,这样才会在appBarLayout的下方。
这里还有一个属性,可以移动位置,稍微做偏移:
- behavior_overlapTop:30dp 盖住上方控件30dp
.support.design.widget.CoordinatorLayout
 ......
   >

    .support.design.widget.AppBarLayout
        android:layout_width="match_parent"
        android:layout_height="230dp"
        android:theme="@style/ThemeOverlay.AppCompat.Dark.ActionBar">
        ......
    .support.design.widget.AppBarLayout>

    .support.v4.widget.NestedScrollView
        android:layout_width="match_parent"
        android:layout_height="match_parent"
        android:layout_marginLeft="10dp"
        android:layout_marginRight="10dp"
        android:visibility="gone"
        app:layout_behavior="@string/appbar_scrolling_view_behavior">
     .support.v7.widget.RecyclerView
        android:id="@+id/recycleView"
        android:layout_width="wrap_content"
        android:layout_height="wrap_content"
   />
    .support.v4.widget.NestedScrollView>
    .support.design.widget.FloatingActionButton
        ......
       />

.support.design.widget.CoordinatorLayout>
当然你写成这样也是可以的:
.support.design.widget.CoordinatorLayout
 ......
   >

    .support.design.widget.AppBarLayout
        android:layout_width="match_parent"
        android:layout_height="230dp"
        android:theme="@style/ThemeOverlay.AppCompat.Dark.ActionBar">
        ......
    .support.design.widget.AppBarLayout>
    .support.v7.widget.RecyclerView
        android:id="@+id/recycleView"
        android:layout_width="wrap_content"
        android:layout_height="wrap_content"
        app:layout_behavior="@string/appbar_scrolling_view_behavior"/>
    .support.design.widget.FloatingActionButton
        ......
       />

.support.design.widget.CoordinatorLayout> Snackbar
Snackbar是design support library中另一个组件,使用Snackbar我们可以在屏幕底部(大多时候)快速弹出消息,它和Toast非常相似,但是它更灵活一些。它显示一段时间后或用户与屏幕交互时它会自动消失。
- 可以自定义action-可选操作。
- swiping it off the screen可以让FAB消失
- 它是context sensitive message(自己理解吧),所以这些消息是UI screen的一部分并且它是显示在所有屏幕其它元素之上(屏幕最顶层),并不是像Toast一样覆盖在屏幕上。
同一时间只能显示一个snackbar。
Snackbar基本上继承了和Toast一样的方法和属性,例如LENGTH_LONG 和 LENGTH_SHORT用于设置显示时长。
- make() – 生成Snackbar消息
- setAction() – 设置action
- make() – 显示Snackbar消息
- setActionTextColor -设置action的字体颜色
make()方法的第一个参数是一个view, snackbar会试着寻找一个父view来hold这个view. Snackbar将遍历整个view tree 来寻找一个合适的父view,它可能是一个coordinatorLayout也可能是window decor’s content view,随便哪一个都行。
正如上面所提到,duration参数和Toast中的duration参数类似,只能是LENGTH_SHORT 或 LENGTH_LONG,不能是其它任何随机数。
 Snackbar.make(parentView, "Hello  Snackbar!", Snackbar.LENGTH_INDEFINITE).setActionTextColor(Color.parseColor("#009933")).setAction("Undo", new View.OnClickListener() {
                    @Override
                    public void onClick(View view) {
                        Toast.makeText(MainActivity.this,"Hello Toast!",Toast.LENGTH_LONG).show();

                    }
                }).show();
效果:
FloatingActionButton
<RelativeLayout xmlns:android="http://schemas.android.com/apk/res/android"
    xmlns:tools="http://schemas.android.com/tools"
    android:layout_width="match_parent"
    android:layout_height="match_parent"
    android:id="@+id/parentView"
    xmlns:app="http://schemas.android.com/apk/res-auto"
    tools:context="androidviewdemo.example.com.demo.MainActivity2">


RelativeLayout>
.support.design.widget.CoordinatorLayout xmlns:android="http://schemas.android.com/apk/res/android"
    xmlns:tools="http://schemas.android.com/tools"
    android:layout_width="match_parent"
    android:layout_height="match_parent"
    android:id="@+id/parentView"
    xmlns:app="http://schemas.android.com/apk/res-auto"
    tools:context="androidviewdemo.example.com.demo.MainActivity2">


.support.design.widget.CoordinatorLayout>
这个就是上面说的让浮动操作按钮上下滑动,为Snackbar留出空间。在CoordinatorLayout中才会用效果。
FloatingActionButton正常显示的情况下有个填充的颜色,有个阴影;点击的时候会有一个rippleColor,并且阴影的范围可以增大(图显示的有点卡T ——T)

根据上图我们来看一下FloatingActionButton中使用到的几个属性:
borderWidth:边框宽度,通常设置为0 ,用于解决Android 5.X设备上阴影无法正常显示的问题
当我们设置10dp的时候样式是:

也是有立体感的。但是当设置的值特别大的时候比如50,就会是下面这个效果:

backgroundTint:按钮的背景颜色,不设置,默认使用theme中colorAccent的颜色
app:rippleColor=:点击的边缘阴影颜色,比如我们设置的是红色,点击的时候就会显示
app:elevation:边缘阴影的宽度,就是一般状态下的阴影大小
app:pressedTranslationZ:点击按钮时,按钮边缘阴影的宽度,通常设置比elevation的数值大
app:layout_anchor 设置FAB的锚点,即以哪个控件为参照点设置位置。
要是想自己定义阴影的话可以参考鸿样大大的这个FloatingActionButton 完全解析[Design Support Library(2)]
DrawerLayout
这个不是design的包了,这是android.support.v4.widget里的控件。用的最多的就是现实抽屉效果导航菜单。
既然要有导航效果,这里就得先说一下这个控件:NavigationView
NavigationView
先看一下粗糙的效果(配色啥的请轻喷T_T):
<android.support.v4.widget.DrawerLayout xmlns:android="http://schemas.android.com/apk/res/android"
    xmlns:app="http://schemas.android.com/apk/res-auto"
    xmlns:tools="http://schemas.android.com/tools"
    android:id="@+id/parentView"
    android:layout_width="match_parent"
    android:layout_height="match_parent"
    tools:context="androidviewdemo.example.com.demo.MainActivity2">


    <android.support.v7.widget.RecyclerView
        android:id="@+id/recycleView"
        android:layout_width="wrap_content"
        android:layout_height="wrap_content" />


    <android.support.design.widget.NavigationView
        android:id="@+id/navigation"
        android:background="#093"
        android:layout_width="match_parent"
        android:layout_height="match_parent"
        android:layout_gravity="start"
        app:headerLayout="@layout/nav_hear"
        app:itemIconTint="@color/white"
        app:itemTextColor="@color/white"
        app:menu="@menu/navigation_drawer_items">

    android.support.design.widget.NavigationView>

android.support.v4.widget.DrawerLayout>
注意这个view的两个属性 app:headerLayout=”@layout/activity_main”
和 app:menu=”@menu/navigation_drawer_items”,
分别代表drawer布局中的header和menuitem区域,当然你可以根据自己的情况使用。
比如我们这里的我的headerLayout用的是nav_hear.xml
<RelativeLayout xmlns:android="http://schemas.android.com/apk/res/android"
    xmlns:tools="http://schemas.android.com/tools"
    android:layout_width="match_parent"
    android:layout_height="match_parent"
>

    <RelativeLayout
        android:layout_width="match_parent"
        android:layout_height="250dp"
        android:background="@color/colorPrimary"
        >

        <ImageView
            android:id="@+id/userImg"
            android:layout_width="160dp"
            android:layout_height="160dp"
            android:layout_centerInParent="true"
            android:src="@mipmap/avatar_circle"
        />
        <TextView
            android:id="@+id/setting"
            android:layout_width="wrap_content"
            android:layout_height="wrap_content"
            android:text="NavgationView的Header布局"
            android:textColor="@color/white"
            android:layout_below="@+id/userImg"
            android:layout_marginTop="10dp"
            android:layout_centerHorizontal="true"
            />
    RelativeLayout>

RelativeLayout>
navigation_drawer_items.xml:
<menu xmlns:android="http://schemas.android.com/apk/res/android">
    <group android:checkableBehavior="all">
        <item
            android:id="@+id/navItem1"
            android:icon="@mipmap/ic_launcher"
            android:title="用户信息"/>
        <item
            android:id="@+id/navItem2"
            android:icon="@mipmap/ic_launcher"
            android:title="充值记录"/>
        <item
            android:id="@+id/navItem3"
            android:icon="@mipmap/ic_launcher"
            android:title="我的收藏"/>
        <item
            android:id="@+id/navItem4"
            android:icon="@mipmap/ic_launcher"
            android:title="浏览记录"/>
    group>
menu>
效果:

我们发现这里item的图标是实心的并不是显示我们想要的效果这个需要在代码中添加:
navigationView.setItemTextColor(null);
navigationView.setItemIconTintList(null);
这里的字体由于上面两句话最终显示黑色,那我们要实现点击更换颜色怎么破?可以用一个selector
nav_menu_text_color.xml:
<selector xmlns:android="http://schemas.android.com/apk/res/android">
    <item android:state_checked="true" android:color="@color/colorPrimary"/>
    <item android:state_checked="false" android:color="@color/white"/>
selector>
代码中更改将null修改成nav_menu_text_color.xml:
navigationView.setItemTextColor(getResources().getColorStateList(R.drawable.nav_menu_text_color, null));View view = navigationView.getHeaderView(0);这里就实现最开始的效果了。
demo下载
参考:感谢感谢
CoordinatorLayout与滚动的处理
MD中文版1
MD中文版2
android CoordinatorLayout使用
Snackbar的使用
Android 嵌套滑动机制(NestedScrolling)这个还没有看,先攒着


