Android常用UI界面设计及国际化
1.线性布局
线性布局分为水平线性布局和垂直线性布局两种形式。
水平:android:orientation=”horizontal”
垂直:android:orientation=”vertical”
例:用线性布局显示一个“你好世界”的界面
android:layout_width="wrap_content"     android:layout_height="wrap_content"
android:orientation="horizontal"
<LinearLayout>
    <Button
        android:layout_width="wrap_content"
        android:layout_height="wrap_content"
        android:text="你"
        />
    <Button
        android:layout_width="wrap_content"
        android:layout_height="wrap_content"
        android:text="好"
        />
LinearLayout>
    <LinearLayout
        android:layout_width="wrap_content"
        android:layout_height="wrap_content"
        android:orientation="vertical">
      <Button
            android:layout_width="wrap_content"
            android:layout_height="wrap_content"
            android:text="世"
            />
        <Button
            android:layout_width="wrap_content"
            android:layout_height="wrap_content"
            android:text="界"
            />
2.相对布局
相对布局分为两种,一种为子类控件与子类控件的相对,另一种为子类控件的相对。前者的值为控件id,后者为true 或者 false。
子类对子类:
android:layout_above————-位于给定DI控件之上
android:layout_below ————位于给定DI控件之下
android:layout_toLeftOf ———位于给定控件左边
android:layout_toRightOf ——-位于给定控件右边
android:layout_alignLeft ———左边与给定ID控件的左边对齐
android:layout_alignRight ——–右边与给定ID控件的右边对齐
android:layout_alignTop ———上边与给定ID控件的上边对齐
android:layout_alignBottom —–底边与给定ID控件的底边对齐
android:layout_alignBaseline—-对齐到控件基准线
子类对父类:
android:layout_alignParentLeft —————相对于父靠左
android:layout_alignParentTop—————-相对于父靠上
android:layout_alignParentRight————–相对于父靠右
android:layout_alignParentBottom ———–相对于父靠下
android:layout_centerInParent=”true” ——-相对于父即垂直又水平居中
android:layout_centerHorizontal=”true” —–相对于父即水平居中
android:layout_centerVertical=”true” ——–相对于父即处置居中
对于父容器位置,用数值来调整位置(以10dp为例)
android:layout_margin=”10dp”
android:layout_marginLeft=”10dp”
android:layout_marginRight=”10dp”
android:layout_marginTop=”10dp”
android:layout_marginBottom=”10dp”
例:用相对布局实现有位置的九宫格控件布局
3.表格布局
表格布局是让控件以表格的形式来排列,只要将控件放在单元格中,控件就能整齐的排列。
tablerow /atblerow———–将控件放在tableRow里排列成一行
android:stretchColumns———-使某一列的按钮填充
android:layout_columns ———让此按钮本行的某一列显示
例:用表格布局实现位置九宫格界面
<TableLayout xmlns:android="http://schemas.android.com/apk/res/android"
    android:layout_width="wrap_content"
    android:layout_height="wrap_content"
    android:layout_gravity="center">
    <TableRow>
        <Button
            android:layout_width="wrap_content"
            android:layout_height="wrap_content"
            android:text="左上"

            />
        <Button
            android:layout_width="wrap_content"
            android:layout_height="wrap_content"
            android:text="上"
            />
        <Button
            android:layout_width="wrap_content"
            android:layout_height="wrap_content"
            android:text="右上"
            />
    TableRow>
    <TableRow>
        <Button
            android:layout_width="wrap_content"
            android:layout_height="wrap_content"
            android:text="左"
        />
        <Button
            android:layout_width="wrap_content"
            android:layout_height="wrap_content"
            android:text="中"
            />
        <Button
            android:layout_width="wrap_content"
            android:layout_height="wrap_content"
            android:text="右"
            />
    TableRow>
<TableRow>
    <Button
        android:layout_width="wrap_content"
        android:layout_height="wrap_content"
        android:text="左下"
        />
    <Button
        android:layout_width="wrap_content"
        android:layout_height="wrap_content"
        android:text="下"
        />
    <Button
        android:layout_width="wrap_content"
        android:layout_height="wrap_content"
        android:text="右下"
        />
TableRow>
4.网格布局
网格布局实现了控件的交错显示,能够避免因布局嵌套对设备性能的影响,利于自由布局的开发。
例:运用网格布局实现一个计算器界面
 <GridLayout xmlns:android="http://schemas.android.com/apk/res/android"
        android:layout_width="wrap_content"
        android:layout_height="wrap_content"
        android:layout_gravity="center"
        android:columnCount="4"
        >
        <Button
    android:layout_width="wrap_content"
    android:layout_height="wrap_content"
    android:text="/"
    android:layout_column="3"
    />
    <Button
        android:layout_width="wrap_content"
        android:layout_height="wrap_content"
        android:text="1"
        />
    <Button
        android:layout_width="wrap_content"
        android:layout_height="wrap_content"
        android:text="2"
        />
    <Button
        android:layout_width="wrap_content"
        android:layout_height="wrap_content"
        android:text="3"
        />
    <Button
        android:layout_width="wrap_content"
        android:layout_height="wrap_content"
        android:text="*"
        />
    <Button
        android:layout_width="wrap_content"
        android:layout_height="wrap_content"
        android:text="4"
        />
    <Button
        android:layout_width="wrap_content"
        android:layout_height="wrap_content"
        android:text="5"
        />
    <Button
        android:layout_width="wrap_content"
        android:layout_height="wrap_content"
        android:text="6"
        />
    <Button
        android:layout_width="wrap_content"
        android:layout_height="wrap_content"
        android:text="-"
        />
    <Button
        android:layout_width="wrap_content"
        android:layout_height="wrap_content"
        android:text="7"
        />
    <Button
        android:layout_width="wrap_content"
        android:layout_height="wrap_content"
        android:text="8"
        />
    <Button
        android:layout_width="wrap_content"
        android:layout_height="wrap_content"
        android:text="9"
        />
    <Button
        android:layout_width="wrap_content"
        android:layout_height="wrap_content"
        android:text="+"
        android:layout_rowSpan="3"
        android:layout_gravity="fill"
        />
    <Button
        android:layout_width="wrap_content"
        android:layout_height="wrap_content"
        android:text="0"
        android:layout_columnSpan="2"
        android:layout_gravity="fill"
        />
    <Button
        android:layout_width="wrap_content"
        android:layout_height="wrap_content"
        android:text="00"
        />
    <Button
        android:layout_width="wrap_content"
        android:layout_height="wrap_content"
        android:text="="
        android:layout_columnSpan="3"
        android:layout_gravity="fill"
        />
GridLayout>
5、帧布局
帧布局是Android布局中最简单的一种,帧布局为每个加入其中的控件创建一个空白区域(称为一帧,每个控件占据一帧
6、绝对布局
通过指定x、y坐标来控制每一个控件的位置,由于不能适应各种屏幕的设备,所以被弃用。
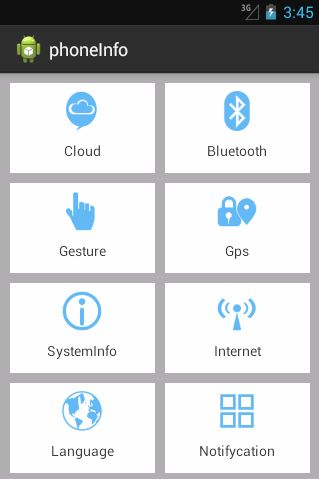
基本Android UI界面布局以及示例代码介绍完了,接下来是界面国际化问题。由于软件的普及性,app上的文本同样需要进行国际化处理。下面以一个实例来展示Android UI布局和国际化问题。
效果图:


1.将准备好的八个图标复制到res/drawable文件夹下
2.创建一个垂直的线性布局,并在线性布局中创建4个相对布局
3.在相对布局中添加相应的TextView
"http://schemas.android.com/apk/res/android"
xmlns:tools="http://schemas.android.com/tools"
android:layout_width="match_parent"
android:layout_height="match_parent"
android:background="@android:color/darker_gray"
android:orientation="vertical"
tools:context=".MainActivity" >
"@style/h_wrap_content"
android:layout_marginTop="10dp">
"@style/tv_style"
android:layout_alignParentLeft="true"
android:layout_marginLeft="10dp"
android:drawableTop="@drawable/clound"
android:text="@string/_cloud" />
"@style/tv_style"
android:layout_alignParentRight="true"
android:layout_marginRight="10dp"
android:drawableTop="@drawable/bluetooth"
android:text="@string/_bluetooth" />
</RelativeLayout>
"
android:layout_marginTop=" 10dp">
@style /tv_style"
android:layout_alignParentLeft="true"
android:layout_marginLeft="10dp"
android:drawableTop="@drawable/gesture"
android:text="@string/_gesture" />
@style /tv_style"
android:layout_alignParentRight="true"
android:layout_marginRight="10dp"
android:drawableTop="@drawable/gps"
android:text="@string/_gps" />
@style/h_wrap_content"
android:layout_marginTop="10dp">
@style /tv_style"
android:layout_alignParentLeft="true"
android:layout_marginLeft="10dp"
android:drawableTop="@drawable/info"
android:text="@string/_system_info" />
@style /tv_style"
android:layout_alignParentRight="true"
android:layout_marginRight="10dp"
android:drawableTop="@drawable/internet"
android:text="@string/_internet" />
@style/h_wrap_content"
android:layout_marginTop="10dp">
@style /tv_style"
android:layout_alignParentLeft="true"
android:layout_marginLeft="10dp"
android:drawableTop="@drawable/language"
android:text="@string/_language" />
@style /tv_style"
android:layout_alignParentRight="true"
android:layout_marginRight="10dp"
android:drawableTop="@drawable/notifycation"
android:text="@string/_set_notifycation" />
4.在values文件下的style.xml文件中存放抽取出来的样式
由于编写布局文件时,相同控件之间的外边距和宽高都是固定的。因此会产生大量重复的布局代码,为了代码简洁和重复使用可以将相同代码抽取为样式单独放在一个style.xml文件中。style.xml文件如下所示:
<resources>
    <style name="AppBaseTheme" parent="android:Theme.Light">
    style>
    <style name="AppTheme" parent="AppBaseTheme">
    style>

    <style name="h_wrap_content">
        <item name="android:layout_width">match_parentitem>
        <item name="android:layout_height">wrap_contentitem>
    style>

    <style name="tv_style">
        <item name="android:layout_width">145dpitem>
        <item name="android:layout_height">90dpitem>
        <item name="android:gravity">centeritem>
        <item name="android:paddingTop">8dpitem>
        <item name="android:paddingBottom">8dpitem>
        <item name="android:drawablePadding">5dpitem>
        <item name="android:background">@android:color/white
    style>
resources>
5.创建values-zh-rCN、values-en-rUS文件夹,并在文件夹中创建strings.xml文件
在res目录下创建values-zh-rCN、values-en-rUS文件夹,并在这两个文件夹下创建相应的strings.xml文件。
    values-zh-rCN文件夹下的strings.xml文件如下所示:
version="1.0" encoding="utf-8"?>

    <string name="app_name">手机信息页面string>
    <string name="menu_settings">设置string>
    <string name="hello_world">你好,世界!string>
    <string name="_cloud">云通信string>
    <string name="_bluetooth">蓝牙string>
    <string name="_gesture">自定义手势string>
    <string name="_gps">定位string>
    <string name="_system_info">系统信息string>
    <string name="_internet">网络string>
    <string name="_language">语言设置string>
    <string name="_set_notifycation">通知栏设置string>

values-en-rUS文件夹下的strings.xml文件如下所示:
version="1.0" encoding="utf-8"?>

    <string name="app_name">phoneInfostring>
    <string name="menu_settings">Settingsstring>
    <string name="hello_world">Hello world!string>
    <string name="_cloud">Cloudstring>
    <string name="_bluetooth">Bluetoothstring>
    <string name="_gesture">Gesturestring>
    <string name="_gps">Gpsstring>
    <string name="_system_info">SystemInfostring>
    <string name="_internet">Internetstring>
    <string name="_language">Languagestring>
    <string name="_set_notifycation">Notifycationstring>
(4)编写与界面交互的代码
接下来需要在MainActivity中编写与用户交互的逻辑代码,MainActivity对应的代码如下所示:
public class MainActivity extends Activity {
    @Override
    protected void onCreate(Bundle savedInstanceState) {
        super.onCreate(savedInstanceState);
        setContentView(R.layout.activity_main);
    }
}