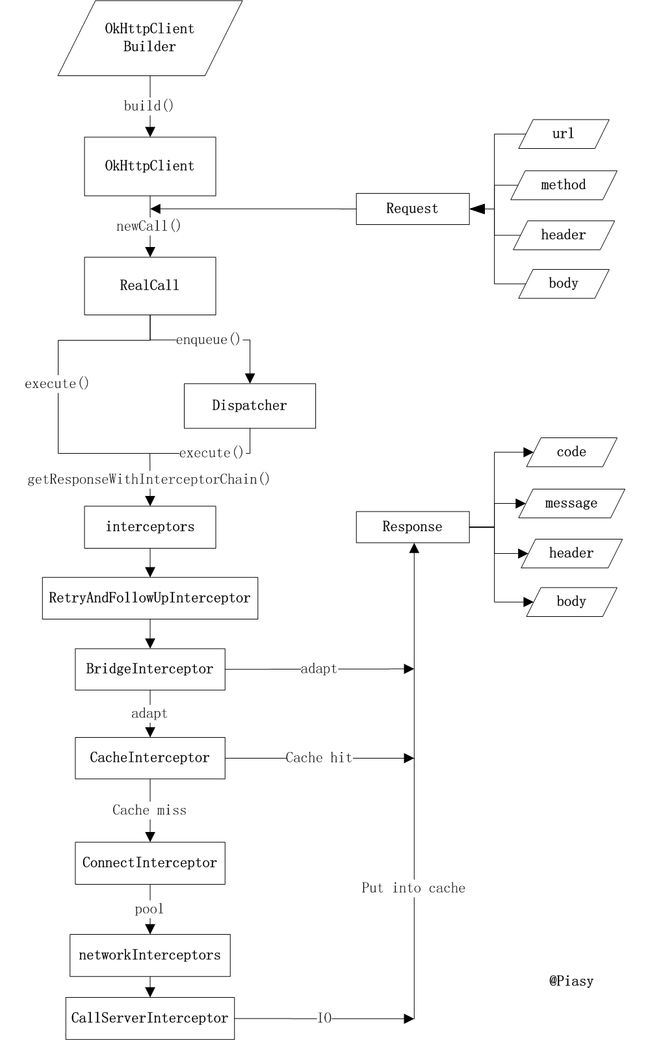
首先大概看一下整个流程图:接下来讲解的思路将根据这个流程来。
一、创建一个OkHttpClient对象:
OkHttpClient client = new OkHttpClient();
二、怎么不见Builder呢?
看下OkHttpClient的构造函数,其中new Builder(),这里采用了默认配置。OkHttpClient.Builder成员有很多
public OkHttpClient() {
  this(new Builder());
}
public Builder() {
  dispatcher = new Dispatcher();
  protocols = DEFAULT_PROTOCOLS;
  connectionSpecs = DEFAULT_CONNECTION_SPECS;
  proxySelector = ProxySelector.getDefault();
  cookieJar = CookieJar.NO_COOKIES;
  socketFactory = SocketFactory.getDefault();
  hostnameVerifier = OkHostnameVerifier.INSTANCE;
  certificatePinner = CertificatePinner.DEFAULT;
  proxyAuthenticator = Authenticator.NONE;
  authenticator = Authenticator.NONE;
  connectionPool = new ConnectionPool();
  dns = Dns.SYSTEM;
  followSslRedirects = true;
  followRedirects = true;
  retryOnConnectionFailure = true;
  connectTimeout = 10_000;
  readTimeout = 10_000;
  writeTimeout = 10_000;
}
三、发起Http请求:
3.1先看一下HTTP的同步请求:
String run(String url) throws IOException {
  Request request = new Request.Builder()
      .url(url)
      .build();

  Response response = client.newCall(request).execute();
  return response.body().string();
OkHttpClient实现了Call.Factory,负责为Request创建新的Call。
现在来看一下它是如何创建一个 new Call的:
/** * Prepares the {@code request} to be executed at some point in the future. */
@Override public Call newCall(Request request) {
  return new RealCall(this, request);
查看它的源码知它最后调用了RealCall();
网络同步请求:RealCall.execute()源码:
@Override public Response execute() throws IOException {
  synchronized (this) {
    if (executed) throw new IllegalStateException("Already Executed");  // (1)
    executed = true;
  }
  try {
    client.dispatcher().executed(this);                                 // (2)
    Response result = getResponseWithInterceptorChain();                // (3)
    if (result == null) throw new IOException("Canceled");
    return result;
  } finally {
    client.dispatcher().finished(this);                                 // (4)
  }
}
这里面做了4件事情
1)首先if检查这个call是否已经完全执行了,每个call只能执行一次,如果想要一个的完全一样的call,可以利用call.clone方法进行克隆。
2)利用client.dispatcher().executed(this) 来进行实际执行。这里出现了dispatcher,它也是OkHttpClient.Builder的成员之一。在同步的流程中,它的作用只是告知OkHttpClient的执行状态,比如是开始执行了(调用executed),比如执行完毕了(调用了finished)。
3)掉用getResponseWithInterceptorChain()函数来获取HTTP返回结果。
4)最后还要通知dispatcher自己已经执行完毕。
3.1.1 getResponseWithInterceptorChain()
然后先重点看一下getResponseWithInterceptorChain()的源码:
    private Response getResponseWithInterceptorChain() throws IOException {
      // Build a full stack of interceptors.
      List interceptors = new ArrayList<>();
      interceptors.addAll(client.interceptors());
      interceptors.add(retryAndFollowUpInterceptor);
      interceptors.add(new BridgeInterceptor(client.cookieJar()));
      interceptors.add(new CacheInterceptor(client.internalCache()));
      interceptors.add(new ConnectInterceptor(client));
      if (!retryAndFollowUpInterceptor.isForWebSocket()) {
        interceptors.addAll(client.networkInterceptors());
      }
      interceptors.add(new CallServerInterceptor(
          retryAndFollowUpInterceptor.isForWebSocket()));

      Interceptor.Chain chain = new RealInterceptorChain(
          interceptors, null, null, null, 0, originalRequest);
      return chain.proceed(originalRequest);
    }
可以看到在getResponseWithInterceptorChain()函数中new List
从 getResponseWithInterceptorChain 函数我们可以看到,Interceptor.Chain 的分布依次是:

- 在配置 OkHttpClient 时设置的 interceptors;
- 负责失败重试以及重定向的 RetryAndFollowUpInterceptor;
- 负责把用户构造的请求转换为发送到服务器的请求、把服务器返回的响应转换为用户友好的响应的 BridgeInterceptor;
- 负责读取缓存直接返回、更新缓存的 CacheInterceptor;
- 负责和服务器建立连接的 ConnectInterceptor;
- 配置 OkHttpClient 时设置的 networkInterceptors;
- 负责向服务器发送请求数据、从服务器读取响应数据的 CallServerInterceptor。
责任链模式在这个 Interceptor 链条中得到了很好的实践。对于把 Request 变成 Response 这件事来说,每个 Interceptor 都可能完成这件事,所以我们循着链条让每个 Interceptor 自行决定能否完成任务以及怎么完成任务(自力更生或者交给下一个 Interceptor)。这样一来,完成网络请求这件事就彻底从RealCall 类中剥离了出来,简化了各自的责任和逻辑。
再简单分析一下ConnectIntercetor和CallServerInterceptor,看看OkHttp是怎么进行和服务器的实际通信的。
3.1.2 ConnectInterceptor.intercept():
@Override public Response intercept(Chain chain) throws IOException {
RealInterceptorChain realChain = (RealInterceptorChain) chain;
Request request = realChain.request();
StreamAllocation streamAllocation = realChain.streamAllocation();

// We need the network to satisfy this request. Possibly for validating a conditional GET.
boolean doExtensiveHealthChecks = !request.method().equals("GET");
HttpCodec httpCodec = streamAllocation.newStream(client, doExtensiveHealthChecks);
RealConnection connection = streamAllocation.connection();

return realChain.proceed(request, streamAllocation, httpCodec, connection);
}
它实际上就是创建一个HttpCodec对象,它是对Http协议的操作的抽象,有两个实现Http1Codec和Http2Codec,分别对应HTTP/1和HTTP/2的版本实现。
在Http1Codec中,它利用Okio对socket的读写操作进行封装。Okio简单理解就是:对java.io和java.nio进行了封装,让我们更便捷高效的进行IO操作。这个HttpCodec供后续步骤使用。
3.1.3 CallServerInterceptor.intercept():
    @Override public Response intercept(Chain chain) throws IOException {
      HttpCodec httpCodec = ((RealInterceptorChain) chain).httpStream();
      StreamAllocation streamAllocation = ((RealInterceptorChain) chain).streamAllocation();
      Request request = chain.request();

      long sentRequestMillis = System.currentTimeMillis();
      httpCodec.writeRequestHeaders(request);

      if (HttpMethod.permitsRequestBody(request.method()) && request.body() != null) {
        Sink requestBodyOut = httpCodec.createRequestBody(request, request.body().contentLength());
        BufferedSink bufferedRequestBody = Okio.buffer(requestBodyOut);
        request.body().writeTo(bufferedRequestBody);
        bufferedRequestBody.close();
      }

      httpCodec.finishRequest();

      Response response = httpCodec.readResponseHeaders()
          .request(request)
          .handshake(streamAllocation.connection().handshake())
          .sentRequestAtMillis(sentRequestMillis)
          .receivedResponseAtMillis(System.currentTimeMillis())
          .build();

      if (!forWebSocket || response.code() != 101) {
        response = response.newBuilder()
            .body(httpCodec.openResponseBody(response))
            .build();
      }

      if ("close".equalsIgnoreCase(response.request().header("Connection"))
          || "close".equalsIgnoreCase(response.header("Connection"))) {
        streamAllocation.noNewStreams();
      }

      // 省略部分检查代码

      return response;
    }
该部分源码 抓住主干分为4个部分:
1)向服务器发送request header;
2)如果有request body,就向服务器发送;
3)读取response header,先构造一个response对象;(这一步用到httpCodec)
4)如果有response body,就在3的基础上加上body构造一个新的response对象。
Ok,到这里我们可以看出,客户端和服务器的实际通信,核心工作都由HttpCodec对象完成的,而HttpCodec实际上利用的是Okio,而Okio实际上还是用的socket。
3.2 发起异步网络请求:
client.newCall(request).enqueue(new CallBack(...))
    client.newCall(request).enqueue(new Callback() {
        @Override
        public void onFailure(Call call, IOException e) {
        }

        @Override
        public void onResponse(Call call, Response response) throws IOException {
            System.out.println(response.body().string());
        }
    });

    // RealCall#enqueue
    @Override public void enqueue(Callback responseCallback) {
      synchronized (this) {
        if (executed) throw new IllegalStateException("Already Executed");
        executed = true;
      }
      client.dispatcher().enqueue(new AsyncCall(responseCallback));
    }

    // Dispatcher#enqueue
    synchronized void enqueue(AsyncCall call) {
      if (runningAsyncCalls.size() < maxRequests && runningCallsForHost(call) < maxRequestsPerHost) {
        runningAsyncCalls.add(call);
        executorService().execute(call);
      } else {
        readyAsyncCalls.add(call);
      }
    }
在enqueue的源码中也能够看到dispatch,它的作用:如果当前还能执行一个并发请求,那就立即执行;否则加入readyAsyncCalls队列中,而正在执行的请求执行完毕之后会调用promoteCalls()函数,会将队列中等待的AsyncCall提升为runningAsyncCalls,并开始执行。
这里的AsyncCall是realCall的一个内部类,它实现了Runnable,所以它可以被提交到ExecutorService上执行,而它的执行时会调用getResponseWithInterceptorChain()函数,并把结果通过responseCallback传递给上层使用者。
异步同步请求大总结:RealCall 为具体的 Call 实现,其 enqueue() 异步接口通过 Dispatcher 利用ExecutorService 实现,而最终进行网络请求时和同步 execute() 接口一致,都是通过getResponseWithInterceptorChain() 函数实现。
而getResponseWithInterceptorChain() 中利用 Interceptor 链条,分层实现缓存、透明压缩、网络IO等功能。
四、返回数据的获取:
在同步或者异步回调请求完成之后,我们就可以从response对象中获取响应数据了,包括HTTP status code , status message , response header , reponse body等。这里body部分最为特殊,因为服务器返回的数据可能非常大,所以必须通过数据流的方式来进行访问,而响应中其他部分则可以随意获取。
响应body被封装到responseBody类中,该类需要注意的两点:
1)每个body只能被消费一次,多次消费会抛出异常;
2)Body必须被关闭,否则会发送资源泄露。
在从服务器读取响应数据的 CallServerInterceptor中的源码中,我们可以看到body相关代码:
if (!forWebSocket || response.code() != 101) {
  response = response.newBuilder()
      .body(httpCodec.openResponseBody(response))
      .build();
由 HttpCodec # openResponseBody 提供具体HTTP协议版本的响应body,而 HttpCodec 则是利用Okio实现具体的数据IO操作.
五、HTTP缓存
在网络请求的小节中,我们已经看到了Interceptor的布局,在负责和服务器建立连接的ConnectInterceptor之前,就是CacheInterceptor。他们执行过程就是:在建立连接之前,我们检查响应是否已经被缓存、缓存是否可用,如果可用则直接返回缓存的数据,否则就进行后面的流程,并在返回之前把网络的数据写入缓存。
缓存主要涉及HTTP协议缓存细节的实现,而具体的缓存逻辑OKHttp内置封装了一个Cache;类,它利用DiskLruCache。用磁盘上有限大小的空间进行缓存,按照LRU算法进行缓存淘汰。
如果觉得有用的话就点个赞吧,哈哈~~~~
参考博客:https://blog.piasy.com/2016/07/11/Understand-OkHttp/