Android性能优化:Volley使用及其原理解析
前言
在现在的Android开发之中,已经比较少人使用volley进行网络请求了,之所以现在还写这篇关于Volley的文章,是因为volley是一个优秀的框架,其设计严格遵循了面向对象的设计原则,学习volley的设计原则,对自己的项目开发有比较好的提示作用。
使用方式
1. 导入
在AndroidStudio里面,只需要在Projrct structure里面添加依赖,在搜索框里输入“volley”,直接搜索v,然后点击添加即可。

2. 使用
使用相对来说比较简单,首先需要创建一个RequestQueue,然后添加Request即可
        RequestQueue queue = Volley.newRequestQueue(this);
        queue.add(new StringRequest(Request.Method.POST, "URL", new Response.Listener() {
            @Override
            public void onResponse(String response) {

            }
        }, new Response.ErrorListener() {
            @Override
            public void onErrorResponse(VolleyError error) {

            }
        }));
对于添加的Request,官方默认实现的有以下几种请求方式,当然可以自定制Request,后续会讲到。
原理解析
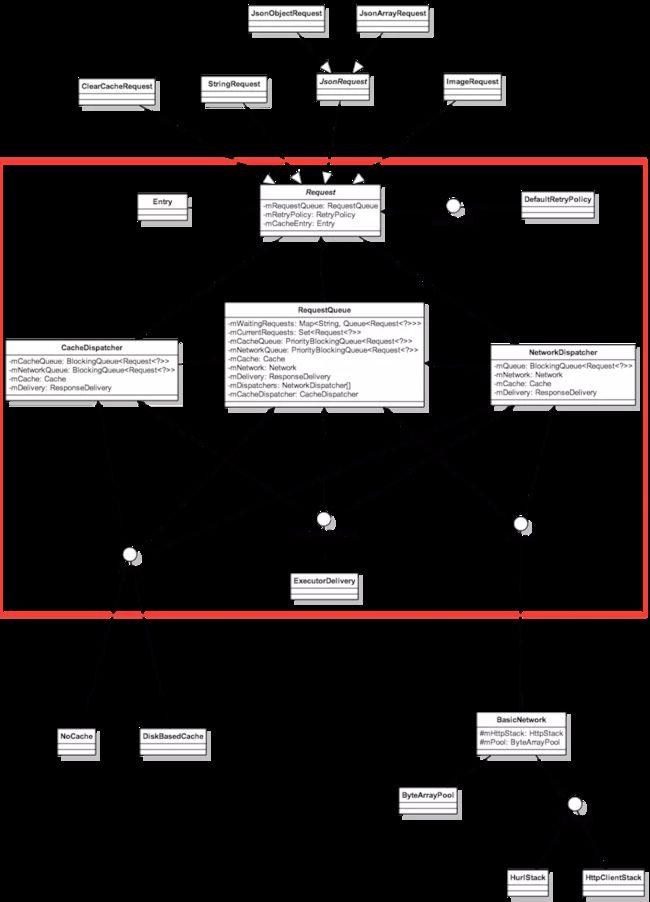
在详细解释每个步骤的原理之前,先看一下volley的整个UML图
如图,红框部分是整个Volley主要部分,可以看到,最中间的RequestQueue是把所有功能组合起来的类,而整个Volley设计是遵守了依赖倒转原则,即针对接口编程,而不是针对实现编程,由此对于功能的拓展将很容易实现。接下来讲述整个Volley的运作过程。
1. 创建
在详细解释之前,先看一下创建的整体流程,当熟悉整个流程之后,对源码的理解会容易很多。
[外链图片转存失败(img-iAkr8qXk-1563526416241)(//upload-images.jianshu.io/upload_images/6003203-63fb0652f041774b.png?imageMogr2/auto-orient/strip|imageView2/2/w/986/format/webp)]
对于Volley而言,创建是由Volley.newRequestQueue()开始的,返回一个RequestQueue实例,该静态方法有两个重载,如下
RequestQueue newRequestQueue(Context context);
RequestQueue newRequestQueue(Context context, HttpStack stack);
当使用第一个重载方法时,其实也是调用到第二个方法。
 public static RequestQueue newRequestQueue(Context context) {
        return newRequestQueue(context, null);
    }
第二个参数HttpStack,是用来进行网路请求的,由Volley的整体框架图,可以看出其有两个实现子类,选择哪个子类是有SDK的版本决定的,源码如下:
    public static RequestQueue newRequestQueue(Context context, HttpStack stack) {
//放置缓存的地方
        File cacheDir = new File(context.getCacheDir(), DEFAULT_CACHE_DIR);
        String userAgent = "volley/0";
        if (stack == null) {
               //如果版本号大于9(V2.3)
            if (Build.VERSION.SDK_INT >= 9) {
                //创建基于HttpURLConnection的HttpStack
                stack = new HurlStack();
            } else {
                //创建基于HttpClient的HttpStack
                stack = new HttpClientStack(AndroidHttpClient.newInstance(userAgent));
            }
        }
        //创建网络请求和queue
        Network network = new BasicNetwork(stack);
        RequestQueue queue = new RequestQueue(new DiskBasedCache(cacheDir), network);
        queue.start();

        return queue;
    }
由代码可以看出,完全可以自定义实现HttpStack,这样就可以和其它的网络请求框架结合起来或者是自定义的网络请求结合起来了。
对于RequestQueue的构造方法,最终都会调用到一下方法
    /**
     * Creates the worker pool. Processing will not begin until {@link #start()} is called.
     *
     * @param cache A Cache to use for persisting responses to disk
     * @param network A Network interface for performing HTTP requests
     * @param threadPoolSize Number of network dispatcher threads to create
     * @param delivery A ResponseDelivery interface for posting responses and errors
     */
    public RequestQueue(Cache cache, Network network, int threadPoolSize,
            ResponseDelivery delivery) {
        mCache = cache;
        mNetwork = network;
        mDispatchers = new NetworkDispatcher[threadPoolSize];
        mDelivery = delivery;
    }
可以看第三个参数,网络请求的线程数,默认是4,当然也可以自己完全定制一个自己想要的线程数。
RequestQueue#start方法,主要是创建缓存分发线程和网络访问分发线程,一个queue只有一条缓存线程,有threadPoolSize数量的网络访问线程,默认是4,因此不适用于数据量大、通讯频繁的网络操作,因为会占用网络请求的访问线程。
    public void start() {
        stop();  // 确定当前线程已经停下来了
        // 只创建一条缓存分发线程并且启动,注入mNetWorkQueue,用于缓存获取失
        // 败时进行网络请求
        mCacheDispatcher = new CacheDispatcher(mCacheQueue, mNetworkQueue, mCache, mDelivery);
        mCacheDispatcher.start();

        //创建多条网络请求线程并启动,在创建时注入mCache,用于缓存
        for (int i = 0; i < mDispatchers.length; i++) {
            NetworkDispatcher networkDispatcher = new NetworkDispatcher(mNetworkQueue, mNetwork,
                    mCache, mDelivery);
            mDispatchers[i] = networkDispatcher;
            networkDispatcher.start();
        }
    }
2. 添加Request
对于请求的添加,整体流程图如下所示:
[外链图片转存失败(img-MTYQ8IOA-1563526416242)(//upload-images.jianshu.io/upload_images/6003203-9094cb57104984cb.png?imageMogr2/auto-orient/strip|imageView2/2/w/751/format/webp)]
RequestQueue.add()方法源码如下:
public  Request add(Request request) {
        // Tag the request as belonging to this queue and add it to the set of current requests.
        request.setRequestQueue(this);
        synchronized (mCurrentRequests) {
            mCurrentRequests.add(request);
        }

        // Process requests in the order they are added.
        request.setSequence(getSequenceNumber());
        request.addMarker("add-to-queue");

        // 判断是否可缓存,如果不可缓存,直接添加到网络请求队列
        if (!request.shouldCache()) {
            mNetworkQueue.add(request);
            return request;
        }

        // Insert request into stage if there's already a request with the same cache key in flight.
        synchronized (mWaitingRequests) {
            String cacheKey = request.getCacheKey();
        //如果已经存在当前Request,那么只需要在等待队列里面插入当前请求即可,防止多次网络访问
            if (mWaitingRequests.containsKey(cacheKey)) {
                // There is already a request in flight. Queue up.
                Queue> stagedRequests = mWaitingRequests.get(cacheKey);
                if (stagedRequests == null) {
                    stagedRequests = new LinkedList>();
                }
                stagedRequests.add(request);
                mWaitingRequests.put(cacheKey, stagedRequests);
            } else {
                // Insert 'null' queue for this cacheKey, indicating there is now a request in
                // flight.
                mWaitingRequests.put(cacheKey, null);
                mCacheQueue.add(request);
            }
            return request;
        }
    }
3. 对Request进行处理
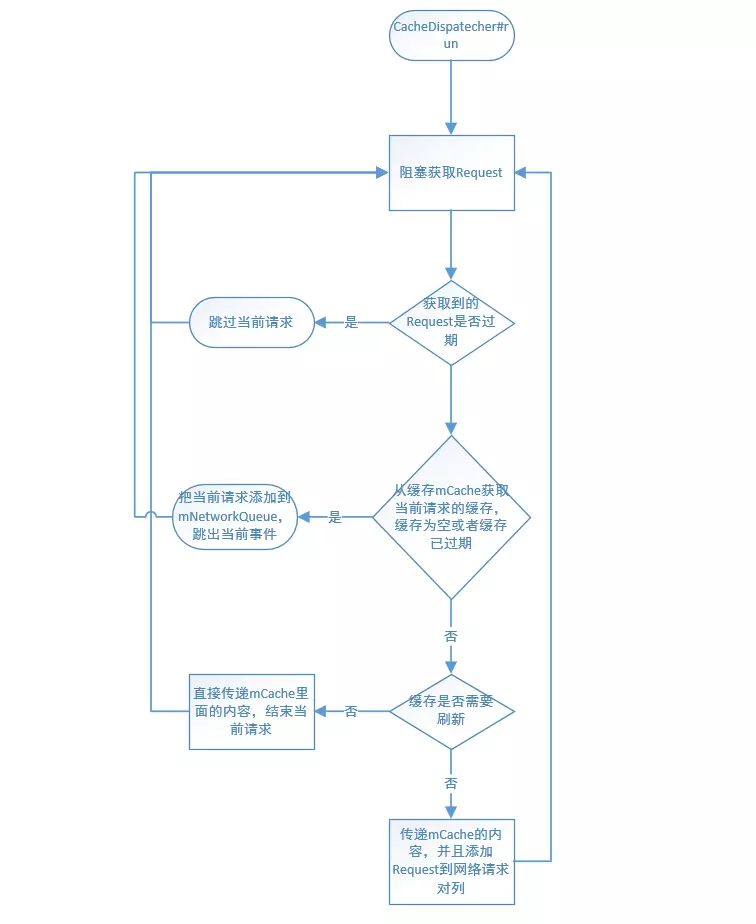
在上部分代码中,可以看到add()方法只是简单的把请求插入到了网络请求对列或者缓存请求对列,按照插入请求之后就会进行网络请求,可以猜测这两个线程都是在不断的进行着轮询,先来看一下CacheDispatcher的处理流程
流程图
CacheDispatcher的run()源码如下
    @Override
    public void run() {
        Process.setThreadPriority(Process.THREAD_PRIORITY_BACKGROUND);
        // Make a blocking call to initialize the cache.
        mCache.initialize();

        while (true) {
            try {
                // 阻塞获取一个Request,queue原型为BlockingQueue
                final Request request = mCacheQueue.take();
                request.addMarker("cache-queue-take");
                // 如果请求已经取消,则跳过该请求
                if (request.isCanceled()) {
                    request.finish("cache-discard-canceled");
                    continue;
                }
                // 尝试从缓存里面获取数据
                Cache.Entry entry = mCache.get(request.getCacheKey());
                //如果为空,表示没有缓存,添加请求到网络队列
                if (entry == null) {
                    request.addMarker("cache-miss");
                    // Cache miss; send off to the network dispatcher.
                    mNetworkQueue.put(request);
                    continue;
                }
                // 如果缓存过期了,添加到网络请求对列
                if (entry.isExpired()) {
                    request.addMarker("cache-hit-expired");
                    request.setCacheEntry(entry);
                    mNetworkQueue.put(request);
                    continue;
                }

                // We have a cache hit; parse its data for delivery back to the request.
                request.addMarker("cache-hit");
                Response response = request.parseNetworkResponse(
                        new NetworkResponse(entry.data, entry.responseHeaders));
                request.addMarker("cache-hit-parsed");

                if (!entry.refreshNeeded()) {
                    // 不需要刷新缓存,直接进行结果传递
                    mDelivery.postResponse(request, response);
                } else {
                    // 需要刷新的缓存,在把缓存结果传递时,同时应该进行缓存的刷新
                    request.addMarker("cache-hit-refresh-needed");
                    request.setCacheEntry(entry);
                    response.intermediate = true;
                    // Post the intermediate response back to the user and have
                    // the delivery then forward the request along to the network.
                    mDelivery.postResponse(request, response, new Runnable() {
                        @Override
                        public void run() {
                            try {
                                mNetworkQueue.put(request);
                            } catch (InterruptedException e) {
                                // Not much we can do about this.
                            }
                        }
                    });
                }
            } catch (InterruptedException e) {
                // We may have been interrupted because it was time to quit.
                if (mQuit) {
                    return;
                }
                continue;
            }
        }
    }
可以看出run()是一直在循环中的,并且阻塞获取Request,当获取到Request后分情况处理
对于NetWorkDIspatcher,主要是进行网络请求以及对请求结果的缓存,处理流程图如下所示
[外链图片转存失败(img-cmsvk09M-1563526416250)(//upload-images.jianshu.io/upload_images/6003203-65be4d3043ded521.png?imageMogr2/auto-orient/strip|imageView2/2/w/874/format/webp)]
run()的源代码如下
    @Override
    public void run() {
        Process.setThreadPriority(Process.THREAD_PRIORITY_BACKGROUND);
        while (true) {
            long startTimeMs = SystemClock.elapsedRealtime();
            Request request;
            try {
                // Take a request from the queue.
                request = mQueue.take();
            } catch (InterruptedException e) {
                // We may have been interrupted because it was time to quit.
                if (mQuit) {
                    return;
                }
                continue;
            }
            try {
                request.addMarker("network-queue-take");
                // If the request was cancelled already, do not perform the
                // network request.
                if (request.isCanceled()) {
                    request.finish("network-discard-cancelled");
                    continue;
                }
                addTrafficStatsTag(request);

                // 此处进行网络请求,由mNetWork处理
                NetworkResponse networkResponse = mNetwork.performRequest(request);
                request.addMarker("network-http-complete");

                // If the server returned 304 AND we delivered a response already,
                // we're done -- don't deliver a second identical response.
                if (networkResponse.notModified && request.hasHadResponseDelivered()) {
                    request.finish("not-modified");
                    continue;
                }

                // 对response解析,由Request解析
                Response response = request.parseNetworkResponse(networkResponse);
                request.addMarker("network-parse-complete");

                // Write to cache if applicable.
                // TODO: Only update cache metadata instead of entire record for 304s.
                if (request.shouldCache() && response.cacheEntry != null) {
                    mCache.put(request.getCacheKey(), response.cacheEntry);
                    request.addMarker("network-cache-written");
                }

                // Post the response back.
                request.markDelivered();
                mDelivery.postResponse(request, response);
            } catch (VolleyError volleyError) {
                volleyError.setNetworkTimeMs(SystemClock.elapsedRealtime() - startTimeMs);
                parseAndDeliverNetworkError(request, volleyError);
            } catch (Exception e) {
                VolleyLog.e(e, "Unhandled exception %s", e.toString());
                VolleyError volleyError = new VolleyError(e);
                volleyError.setNetworkTimeMs(SystemClock.elapsedRealtime() - startTimeMs);
                mDelivery.postError(request, volleyError);
            }
        }
    }
可以看出请求是通过创建RequestQuesu传入的Network进行处理的, 然后对请求返回的结果,是通过我们的Request.parseNetworkResponse(NetworkResponse response)处理的,也就是说,如果是StringRequest,那么这个方法就是把请求结果转换为String,所以我们自定义Request的时候,需要实现这个方法。
总结
这篇文章就写到这里,虽然不一定会使用Volley来进行网络请求了(效率比较低),但是了解一下这个优秀的框架,个人觉得还是很有必要的。现在进行网络请求,推荐使用RxJava + Retrofit的方式,其中Retrofit的网络请求是通过okHttp实现的,在这里就不细说了。
最后
漫漫Android开发之路,你我只是其中的一小部分……只有不断的学习、进阶,才是我们的出路!才跟得上时代的进步!
这边我整理了一些资料,把它拿出来分享给大家,一方面是希望能够帮助大家提高,一方面也是警醒自己,要不断学习、不断提升,进阶才是王道!
分享给大家的资料包括高级架构技术进阶脑图、Android开发面试专题资料,还有高级进阶架构资料包括但不限于【高级UI、性能优化、移动架构师、NDK、混合式开发(ReactNative+Weex)微信小程序、Flutter等全方面的Android进阶实践技术】希望能帮助大家学习提升进阶,也节省大家在网上搜索资料的时间来学习,也是可以分享给身边好友一起学习的!
关注微信公众号【Android开发之家】获取小编为大家收录整理的资料
![]()
![]()
![]()


