THREE.ShaderMaterial
THREE.ShaderMaterial
THREE.ShaderMaterial是three.js中最通用、最复杂的材质之一。通过它可以使用自己的定义的着色器,直接在webgl环境中运行。
着色器材料(ShaderMaterial )
使用自定义着色器渲染的材料。着色器(shader)是一段使用 GLSL 语言编写的可在GPU上直接运行的程序。
案例
var material = new THREE.ShaderMaterial( {
	uniforms: {
		time: { value: 1.0 },
		resolution: { value: new THREE.Vector2() }
	},
	attributes: {
		vertexOpacity: { value: [] }
	},
	vertexShader: document.getElementById( 'vertexShader' ).textContent,
	fragmentShader: document.getElementById( 'fragmentShader' ).textContent
} );
顶点和片段着色器
您可以为每个材料指定两个不同类型的着色器:
*顶点着色器*先运行;它接收 attributes,计算和操作每个顶点的位置,并传递额外的数据(varyings)给片段着色器。
*片段着色器*后运行;它设置绘制到屏幕上的每个单独的片段(像素)颜色。
着色器中有三种类型的变量:uniforms,attributes,和varyings:
Uniforms 是所有顶点都具有相同的值的变量。比如灯光,雾,和阴影贴图就是被储存在uniforms中的数据。uniforms可以通过顶点着色器和片段着色器来访问。
Attributes 与每个顶点关联的变量。例如,顶点位置,法线和顶点颜色都是存储在attributes中的数据。attributes只可以在顶点着色器重访问。
Varyings 是从顶点着色器传递到片段着色器的变量。对于每一个片段,每一个varying的值将是相邻顶点值的平滑插值。
注意:在着色器内部,uniforms和attributes就像常量;你只能使用JavaScript代码通过缓冲区来修改它们的值。
内置attributes 和 uniforms
WebGL渲染器(WebGLRenderer) 默认情况下为着色器提供了许多attributes和uniforms;这些变量定义在着色器程序编译时被自动添加到片段着色器和顶点着色器代码的前面,你不需要自己声明它们。这些变量在 WebGL程序(WebGLProgram) 中描述。
这些uniforms或attributes(例如,那些和照明,雾等相关的)要求属性设置在材料上,以便 WebGL渲染器(WebGLRenderer) 来拷贝合适的值到GPU中。如果你想在自己的材质中使用这些功能,请确保设置这些标志。
如果你不希望 WebGL程序(WebGLProgram) 向你的着色器代码中添加任何东西,你可以使用 原始着色器材料(RawShaderMaterial) 而不是这个类。
RawShaderMaterial
由于RawShaderMaterial的存在,我才发现ShaderMaterial的不同。ShaderMaterial提供了许多内置的attributes和uniforms变量。所以导致我看起来和GLSL代码不太一样,比如下面的两行代码:
 normal = normalize(gl_NormalMatrix * gl_Normal);  //标准的GLSL
 vVertexNormal	= normalize(normalMatrix * normal) //three.js中
WebGLProgram
内置 uniforms 和 attributes
顶点着色(无条件):
// = object.matrixWorld
uniform mat4 modelMatrix;

// = camera.matrixWorldInverse * object.matrixWorld
uniform mat4 modelViewMatrix;

// = camera.projectionMatrix
uniform mat4 projectionMatrix;

// = camera.matrixWorldInverse
uniform mat4 viewMatrix;

// = inverse transpose of modelViewMatrix
uniform mat3 normalMatrix;

// = camera position in world space
uniform vec3 cameraPosition;
// 由 Geometry 和 BufferGeometry提供的缺省顶点属性
attribute vec3 position;
attribute vec3 normal;
attribute vec2 uv;
attribute vec2 uv2;
请注意,你可以通过如下公式来计算顶点着色器中顶点的位置:
gl_Position = projectionMatrix * modelViewMatrix * vec4( position, 1.0 );
或者可选的:
gl_Position = projectionMatrix * viewMatrix * modelMatrix * vec4( position, 1.0 );
程序每个顶点都要计算视图矩阵 X 模型矩阵,而且结果都i一样,所以用modelViewMatrix 代替viewMatrix x modelMatrix是比较好的方式。对于顶多多的情况下可以节省开销。
顶点着色(有条件):
#ifdef USE_COLOR
	// 顶点的颜色属性
	attribute vec3 color;
#endif
#ifdef USE_MORPHTARGETS

	attribute vec3 morphTarget0;
	attribute vec3 morphTarget1;
	attribute vec3 morphTarget2;
	attribute vec3 morphTarget3;

	#ifdef USE_MORPHNORMALS

		attribute vec3 morphNormal0;
		attribute vec3 morphNormal1;
		attribute vec3 morphNormal2;
		attribute vec3 morphNormal3;

	#else

		attribute vec3 morphTarget4;
		attribute vec3 morphTarget5;
		attribute vec3 morphTarget6;
		attribute vec3 morphTarget7;

	#endif
#endif
#ifdef USE_SKINNING
	attribute vec4 skinIndex;
	attribute vec4 skinWeight;
#endif
片段着色器:
uniform mat4 viewMatrix;
uniform vec3 cameraPosition;
废话完毕,开始实战。
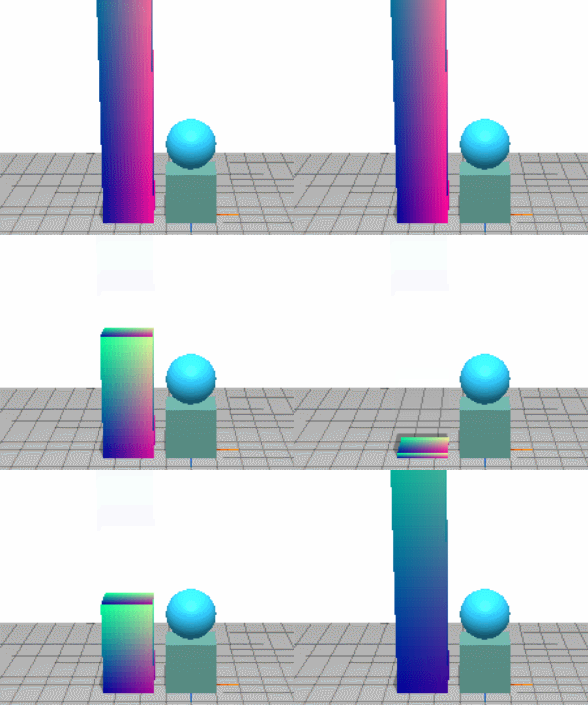
下面我来写一个简单的着色器程序,程序运行之后会改变立方体的高度和颜色。就是下图中左边的立方体。看起来通过模型 缩放就可以实现,但是这和shader是有区别的,一个运行的cpu一个运行的gpu。性能不一样。而且比较复杂的效果,还需要通过着色器来实现。

程序主要分为顶点着色器和片源着色器。
var vertexShader4 = [
    'uniform float time;',
    'varying vec3 a_position;',
    'varying vec2 vUv;',
    'void main(){',
    'vUv = uv;',
    'a_position = position;',
    'vec3 posChange = position;',
    'posChange.x = posChange.x;',
    'posChange.y = (3.0+posChange.y)*(2.0*abs(tan(time*1.0)));',
    'posChange.z = posChange.z;',
     'gl_Position =  projectionMatrix * modelViewMatrix * vec4(posChange,1.0);',
    '}'
].join('\n');
var fragmentShader = [
    'varying vec2 vUv;',
    'uniform float time;',
    'varying vec3 a_position;',
    'void main(){',
    // 'gl_FragColor = vec4((cos(time*12.0))*(a_position+3.0)/12.0+0.3,1.0);', //用顶点坐标赋值颜色
    'gl_FragColor = vec4(vUv.x*cos(time*10.0),vUv.y,0.6,1.0);',  //用定点UV赋值颜色
    '}'
].join('\n');
console.log(vertexShader4);
console.log(fragmentShader);
uniforms1 = {
    time: { type:'f',value: 0.2 },
};
var cubeGeo = new THREE.BoxGeometry(4, 6, 4);
var cubeMat = new THREE.ShaderMaterial({
    uniforms: uniforms1,
    //attributes: { },
    vertexShader:vertexShader4,
    fragmentShader:fragmentShader,
    //transparent:true
});
var cube = new THREE.Mesh(cubeGeo, cubeMat);
cube.position.set(x, y, z);
cube.castShadow = true;
scene.add(cube);
为了加深对着色器的理解,又瞎写了一下。一个球,一个圆锥,透明度变化,颜色变化,x,z轴大小变化。总之就是闪瞎眼。
<script id="fragmentShader"  type="x-shader/x-vertex">
uniform float time;
varying vec3 a_position;
uniform vec3 glowColor;
uniform float	coeficient;
varying vec3	vVertexNormal;
varying vec3	vVertexWorldPosition;
void main(){
    vec3 worldVertexToCamera= cameraPosition - vVertexWorldPosition;
    vec3 viewCameraToVertex	= (viewMatrix * vec4(worldVertexToCamera, 0.0)).xyz;
    viewCameraToVertex	= normalize(viewCameraToVertex);
    float ints = abs(sin(time));
    float py = sin(a_position.y/ints);
    float pz = cos(a_position.z/2.0+0.5);
    float intensity	= coeficient*ints + dot(vVertexNormal, viewCameraToVertex);
    if(intensity > 0.6){ intensity = 1.0;}
        gl_FragColor = vec4(glowColor.r*ints,py,0.6, intensity);
    }
</script>

var vertexShader = [
    'uniform float time;',
    'varying vec3 a_position;',
    'varying vec3	vVertexWorldPosition;',
    'varying vec3	vVertexNormal;',
    'varying vec4	vFragColor;',
    'void main(){',
    '   a_position = position;',
    '	vVertexNormal	= normalize(normalMatrix * normal);',
    '	vVertexWorldPosition	= (modelMatrix * vec4(position, 1.0)).xyz;',
    '   float vpy = a_position.y;',
    '   float vpx = a_position.x*(0.75+abs(sin(time)/2.0));',
    '   float vpz = a_position.z*(0.75+abs(sin(time)/2.0));',
    '	gl_Position	= projectionMatrix * modelViewMatrix * vec4(vpx,vpy,vpz, 1.0);',
    '}'
].join('\n');

var fragmentShader = document.getElementById('fragmentShader').innerHTML;
//console.log(fragmentShader);
uniforms1 = {
    time: {type: "f", value: -0.1 },
    coeficient: {
        type: "f",
        value: -0.1
    },
    glowColor: {
        type: "c",
        value: new THREE.Color(0xffffff)
    }
};
var cubeGeo = new THREE.CylinderGeometry(0.01, 2, 20, 60,3);
var sphere = new THREE.SphereBufferGeometry(8, 64, 64);
var cubeMat = new THREE.ShaderMaterial({
    uniforms: uniforms1,
    //attributes: { },
    blending: THREE.NormalBlending,
    vertexShader: vertexShader,
    fragmentShader: fragmentShader,
    transparent: true
});
var cube1 = new THREE.Mesh(sphere, cubeMat);
var cube2 = new THREE.Mesh(cubeGeo, cubeMat);
cube1.position.set(x, y, z);
scene.add(cube1);
cube2.position.set(10, 10, 0);
scene.add(cube2);