webpack简单的多页面配置
在开发过程中本来想用写成单页面(spa),但是实际过程中会有分端的逻辑(管理端,用户端等),以及更多其他功能等,所以个人认为单页面开发跟适合展示页面逻辑,在有更复杂的展示或者功能的情况时,spa更适合用来实现一部分的展示功能,所以多页的需求还是必要的,webpack作为前端主流打包工具,也是有必要学习其多页的打包方法
前提是了解了单页面单入口的打包方式
首先基于简单的条件,一定是一看就会的


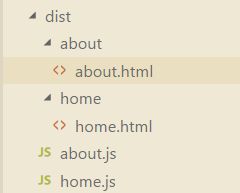
这是目录
我没有把css和js分离开来
现在要做的就是找不同。
entry不再是一个文件,所以要写成数组或者对象的格式
 entry:  {home: './src/home/index.js',
    about: './src/about/index.js'},
     output: {
      path: __dirname + '/dist',
      filename: '[name].js'
    },
[name]会自己写进去的
然后是HTML文件 ,一样的下载html-webpack-plugin插件
配置这样写
plugins: [new HtmlWebpackPlugin({
      filename: 'home/home.html',
      template: './src/home/index.html',
      inject: true,
        minify: {
          removeComments: true,
          collapseWhitespace: true
        },
        chunks:['home']

    }),
    new HtmlWebpackPlugin({
      filename: 'about/about.html',
      template: './src/about/index.html',
      inject: true,
        minify: {
          removeComments: true,
          collapseWhitespace: true
        },
        chunks:['about']

    })
    ],
很容易理解 分开两次配置
其中要强调的是chunks的配置 ,如果没有写,就会把两个js文件全都塞进两个HTML文件,这显然不是我们想要的结果
css跟之前的写法一样,这是我在项目里的配置 我用的是scss,
 {
              test: /\.scss$/,
              use: [
                {
                 loader: "style-loader" // 将 JS 字符串生成为 style 节点
                },
                {
                 loader: "css-loader" // 将 CSS 转化成 CommonJS 模块
                },
                {
                 loader: "sass-loader" // 将 Sass 编译成 CSS
                }
               ]
            },
很好理解对吧,但是如果我还需要另一个页面怎么处理,每次添加当然可以,但是能优化当然最好,下面是自动处理的配置方法
首先要获得页面的名称
function getEntry () {
  let globPath = 'src/**/html/*.html'
  // (\/|\\\\) 兼容 windows和 mac系统目录路径
  let pathDir = 'src(\/|\\\\)(.*?)(\/|\\\\)html'
  let files = glob.sync(globPath)
  let dirname, entries = []
  for (let i = 0; i < files.length; i++) {
    dirname = path.dirname(files[i])
    entries.push(dirname.replace(new RegExp('^' + pathDir), '$2'))
  }
  return entries
}
entry 部分
entry: addEntry()
//...
function addEntry () {
  let entryObj = {}
  getEntry().forEach(item => {
    entryObj[item] = resolve(__dirname, 'src', item, 'index.js')
  })
  return entryObj
}
html-webpack-plugin配置
etEntry().forEach(pathname => {
  let conf = {
    filename: path.join(pathname, pathname) + '.html',
    template: path.join(__dirname, 'src', pathname, 'html', 'index.html')
  }
  webpackconfig.plugins.push(new HtmlWebpackPlugin(conf))
})
// ...
module.exports = webpackconfig
其实在小项目中(比如只有两三个页面)手动配置更加方便,但是自动添加毕竟是一种方法,在入口更多的情况下优势就能体现出来了
几个坑点:
- webpack打包好的项目复制副本是不能直接进行打包的,需要另行配置,否则会提示类似‘…-loader can not reloved’,你重复按要求安装没用,会一直报错直到看不懂
- 在引入css出现问题,引入时候就写import css from ‘…’, require的写法还有在前面是否添加各种-loader!的问题,我使用的时候写import没什么不妥
Invalid configuration object. Webpack has been initialised using a
configuration object that does not match the API schema.
我粗浅的使用经验是,多半问题出在两种情况,一个是路径上,path的写法需要绝对路径,方法就是‘_dirname’放前面,再一个就是瞅瞅配置文件,里面的use 有没有简写吧‘loader’忘了,以前是可以这样写的,一些文档还有这种写法,但是现在需要修改