express项目 apidoc 自动生成文档简洁教程
本文是关于apidoc的配置教程,具体的参数请参考官方网站
全局安装apidoc
npm i apidoc -g
配置api-doc
方式1:根目录添加apidoc.json(推荐),apidoc.json内容如下,具体属性请参考
{
    "name": "user-service",
    "version": "1.0.0",
    "description": "用户服务API文档",
    "title": "user-service API Doc",
    "url": "http://localhost:8080/",
    "sampleUrl": "http://localhost:8080/",
    "forceLanguage": "zh-cn",
    "template": {
        "withCompare": true,
        "withGenerator": true
    }
}
方式2:项目package.json配置api-doc
{
    "name": "test",
    "version": "0.0.0",
    "private": true,
    "scripts": {
        "start": "node ./bin/www"
    },
    "dependencies": {
        "cookie-parser": "~1.4.3",
        "debug": "~2.6.9",
        "ejs": "~2.5.7",
        "express": "~4.16.0",
        "http-errors": "~1.6.2",
        "morgan": "~1.9.0"
    },
    "devDependencies": {
        "express-session": "^1.15.6",
        "mysql": "^2.15.0"
    },
    "apidoc": {
        "name": "user-service",
        "version": "1.0.0",
        "description": "用户服务API文档",
        "title": "user-service API Doc",
        "url": "http://localhost:8080/",
        "sampleUrl": "http://localhost:8080/",
        "forceLanguage": "zh-cn",
        "template": {
            "withCompare": true,
            "withGenerator": true
        }
    }
}
编写api文档
以我的项目为例,我的api请求明细写在routes中,那么,我将api文档写在routes的文件中
以查询用户数据的接口为例
var express = require('express');
var router = express.Router();

/**
 * @apiDefine CODE_200
 * @apiSuccess (Reponse 200) {Number} code 0 为成功,-1位异常
 * @apiSuccess (Reponse 200) {Json/Array/Null} data 数组或null,需要根据情况判断,一般有值时为数据类型,没有值时为[]或null
 * @apiSuccess (Reponse 200) {String} msg 请求成功/失败描述信息
 * @apiSuccess (Reponse 200) {String} [error_code] 错误码,有时没有
 * @apiSuccessExample {json} Response 200 Example
 *    HTTP/1.1 200 OK
 *    {
 *      "code": 0,
 *      "data": [],
 *      "msg": "操作成功"
 *    }
 */


/**
 * 通过用户编码查询用户信息
 * @api {get} user/getUserInfo 通过用户编码查询用户信息
 * @apiName getUserInfo
 * @apiDescription 通过用户编码查询用户信息
 * @apiGroup user
 * @apiVersion 1.0.0
 * @apiParam {String} user_code 用户编码
 * @apiParamExample  {type} Request-Example:
 *    {
 *      "user_code": "001"
 *    }
 * @apiSuccessExample {type} Success-Response
 *    HTTP/1.1 200 OK
 *    {
 *      "code": 0,
 *      "data": [
 *        {
 *         "user_img": "",
 *         "user_name": "",
 *         "user_code": "",
 *         "sex": "",
 *         "national": "",
 *         "idcard": "",
 *         "age": ""
 *        }
 *      ],
 *      "msg": "返回成功"
 *    }
 * @apiSampleRequest http://localhost:8080/user/getUserInfo
 * @apiUse CODE_200
 */
router.get('/user/getUserInfo', function (req, res, next) {
  res.json({
    code: 0,
    data: [{
      "user_img": "",
      "user_name": "",
      "user_code": "",
      "sex": "",
      "national": "",
      "idcard": "",
      "age": ""
    }],
    msg: "返回成功"
  });
});

module.exports = router;
设置静态文件目录
一般这一步在创建项目的时候已经完成,但还是需要检查一下,假设我们需要将文档内容生成再public目录下,我们需要在app.js中配置
// 设置 public 文件夹为存放静态文件的目录
app.use(express.static(path.join(__dirname, 'public')));
生成文档
打开终端,cd到项目的根路径下,执行以下命令
apidoc -i routes/ -o public/apidoc/其中,-i 是api目录; -o 是生成文档的目的地。生成完成后,项目根路径下会生成public/apidoc文件夹。
预览
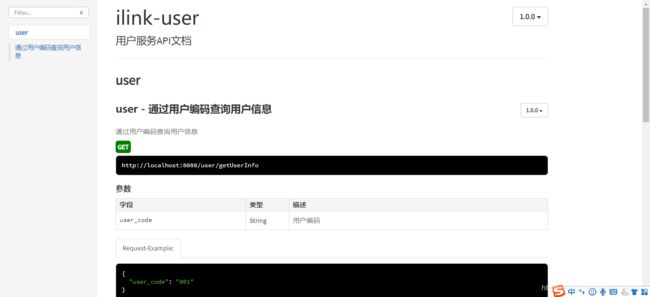
启动项目,在浏览器中输入 http://localhost:3000/apidoc
其中,3000 是项目启动的端口号,这里是不固定的,视情况而定。打开成功后,会出现这样的内容
至此,文档生成成功。

