ubuntu下tensorflow 2.0 c++动态库编译gpu版本
之前所有写的tensorflow相关的东西都是CPU下的。现在公司一台有Nvidia GTX 1060的电脑空余,于是在这台电脑上重装ubuntu后开始编译tensorflow_cc.so的GPU版本并使用。仔细说来有ABCDEF六步骤如下:
A---install bazel (参考https://docs.bazel.build/versions/master/install-ubuntu.html#install-with-installer-ubuntu)
1 apt-get install pkg-config zip g++ zlib1g-dev unzip python3
2 google手动下载bazel in https://github.com/bazelbuild/bazel/releases
3 chmod +x bazel-
./bazel-
4 在/etc/bash.bashrc设置环境变量like the following shows:
export BAZELPATH="$PATH:$HOME/bin"
source /etc/bash.bashrc
B---GPU support
0 我使用的都是root用户,建议你也这样做。computer user is root,not guest.
1 lspci | grep -i nvidia
2 gcc --version
3 https://docs.nvidia.com/cuda/cuda-installation-guide-linux/index.html 在这个链接找到适合自己的CUDA Toolkit release.我下载的是https://developer.nvidia.com/cuda-10.1-download-archive-base?target_os=Linux&target_arch=x86_64&target_distro=Ubuntu&target_version=1604&target_type=runfilelocal
4 uname -r
5 apt-get install linux-headers-$(uname -r)
期间我的报错:Could not get lock /var/lib/dpkg/lock - open (11: Resource temporarily unavailable)
我的解决办法:https://blog.csdn.net/u011596455/article/details/60322568
6 禁用nouveau驱动 https://blog.csdn.net/wd1603926823/article/details/77473746
7 关闭X-Window,很简单:sudo service lightdm stop,然后切换到tty1:Ctrl+Alt+F1即可
8 sh cuda_10.1.105_418.39_linux.run
9 service lightdm start
10 nvidia-smi 能看到自己的gpu信息
11 将nvidia驱动工具加入环境变量/etc/bash.bashrc
export LD_LIBRARY_PATH=$LD_LIBRARY_PATH:/usr/local/cuda-9.0/lib64
export PATH=$PATH:/usr/local/cuda-9.0/bin
export CUDA_HOME=$CUDA_HOME:/usr/local/cuda-9.0
source /etc/bash.bashrc
nvcc --version
12 以上都成功则证明你已安装好Nvidia GPU driver和CUDA Toolkit(including CUPTI).查看NVIDIA驱动版本信息 cat /proc/driver/nvidia/version
13 https://www.cnblogs.com/eugene0/p/11587987.html这里有一张参照表
14 https://tensorflow.google.cn/install/gpu :根据这个链接我们还没安装cuDNN.
15 dpkg -i libcudnn7_7.6.4.38-1+cuda10.1_amd64.deb
16 dpkg -i libcudnn7-dev_7.6.4.38-1+cuda10.1_amd64.deb
17 dpkg -i libcudnn7-doc_7.6.4.38-1+cuda10.1_amd64.deb (according to https://blog.csdn.net/dudu815110/article/details/88592558)至此CUDNN已成功安装
C---tensorflow
1 下载想要的tensorflow版本(There are many different versions in https://github.com/tensorflow/tensorflow/releases)
2 ./configure
其中这一项一定要选择Yes,其它按默认的走即可
Do you wish to build TensorFlow with CUDA support? [y/N]: y
CUDA support will be enabled for TensorFlow.
3 apt install git
4 bazel build --config=opt --config=cuda //tensorflow:libtensorflow_cc.so
期间我的报错了:ERROR: Analysis of target '//tensorflow:libtensorflow_cc.so' failed; build aborted: no such package '@local_config_git//': Traceback (most recent call last):
File "/home/jumper/workspace/tensorflow-2.0.0/third_party/git/git_configure.bzl", line 61
_fail(result.stderr)
File "/home/jumper/workspace/tensorflow-2.0.0/third_party/git/git_configure.bzl", line 14, in _fail
fail(("%sGit Configuration Error:%s %...)))
Git Configuration Error: Traceback (most recent call last):File "/root/.cache/bazel/_bazel_root/ec80c569286571968027dca7bea4db07/external/org_tensorflow/tensorflow/tools/git/gen_git_source.py", line 29, in
from builtins import bytes # pylint: disable=redefined-builtin
ImportError: No module named builtins
解决办法1: https://blog.csdn.net/sinat_28442665/article/details/85325232对我来说没用
解决办法2:apt install python-pip
pip install future
bazel build --config=opt --config=cuda //tensorflow:libtensorflow_cc.so
5 在你的tensorflow路径下运行: ./tensorflow/contrib/makefile/build_all_linux.sh
期间的报错信息:tensorflow/contrib/makefile/download_dependencies.sh: line 75: curl: command not found
gzip: stdin: unexpected end of file
tar: Child returned status 1
tar: Error is not recoverable: exiting now
解决办法:apt-get install curl
然后继续在你的tensorflow路径下运行: ./tensorflow/contrib/makefile/build_all_linux.sh
又报错 ./autogen.sh: 37: ./autogen.sh: autoreconf: not found
解决办法: apt-get install autoconf
apt-get install automake
apt-get install libtool
6 如需Eigen库,则进入tensorflow/contrib/makefile/downloads/eigen,执行:
mkdir build
cd build
cmake ..
make
sudo make install
安装完毕后,在usr/local/include目录下会出现eigen3文件夹。
7 整理库和头文件
a:5个so库在bazel-bin/tensorflow文件夹下libtensorflow_cc.so libtensorflow_cc.so.2 libtensorflow_cc.so.2.0.0 libtensorflow_framework.so.2 libtensorflow_framework.so.2.0.0 (something like these)。
b:将5个头文件文件夹整理出来:
8 将库路径加入系统 (我的库路径是:/home/jumper/workspace/tensorflow-gpu/lib)加在文件/etc/ld.so.conf的后面
9 ldconfig
10 ldconfig -v 运行这句可以看到刚刚的库路径。
如果出现 '/home/jumper/workspace/tensorflow-gpu/lib...libtensorflow_cc.so:No such file or directory',意味着7-a步骤不正确重新试着放入正确的库。这里就是试,放哪几个库。
11 将你刚刚放好的库,我的是 /home/jumper/workspace/tensorflow-gpu/lib下面的所有库复制一份到/usr/lib
12 ldconfig
13 gcc -ltensorflow_cc --verbose
不会出现如'can not find libtensorflow_cc'.之类的报错说明成功
D--install eclipse(网上大把资料)
E--run a demo testing tensorflow-gpu(demo如下)
#include "tensorflow/core/framework/graph.pb.h"
#include
#include
#include
#include
#include
#include
#include

#include "tensorflow/cc/ops/const_op.h"
#include "tensorflow/cc/ops/image_ops.h"
//#include "tensorflow/cc/ops/standard_ops.h"
#include "tensorflow/core/framework/graph.pb.h"
#include "tensorflow/core/framework/tensor.h"
#include "tensorflow/core/graph/default_device.h"
#include "tensorflow/core/graph/graph_def_builder.h"
#include "tensorflow/core/lib/core/errors.h"
#include "tensorflow/core/lib/core/stringpiece.h"
#include "tensorflow/core/lib/core/threadpool.h"
#include "tensorflow/core/lib/io/path.h"
#include "tensorflow/core/lib/strings/stringprintf.h"
#include "tensorflow/core/platform/env.h"
#include "tensorflow/core/platform/init_main.h"
#include "tensorflow/core/platform/logging.h"
#include "tensorflow/core/platform/types.h"
#include "tensorflow/core/public/session.h"
#include "tensorflow/core/util/command_line_flags.h"

//using namespace tensorflow;

#define MODELGRAPHRECT_PATH  "/home/SSD/EcologyAnalysis/math/font/cnnmodel/model.meta"
#define MODELRECT_PATH "/home/SSD/EcologyAnalysis/math/font/cnnmodel/model"

//#include
#include
#include
#include
using namespace cv;
using namespace std;

int getPredictLabel(tensorflow::Tensor &probabilities,int &output_class_id,double &output_prob)
{
	 int ndim2 = probabilities.shape().dims();             // Get the dimension of the tensor
	  auto tmap = probabilities.tensor();        // Tensor Shape: [batch_size, target_class_num]
	  int output_dim = probabilities.shape().dim_size(1);  // Get the target_class_num from 1st dimension
	  std::vector tout;

	  // Argmax: Get Final Prediction Label and Probability
	  for (int j = 0; j < output_dim; j++)
	  {
			//std::cout << "Class " << j << " prob:" << tmap(0, j) << "," << std::endl;
			if (tmap(0, j) >= output_prob) {
					output_class_id = j;
					output_prob = tmap(0, j);
			}
	  }

	return 0;
}

int mainnet()
{
	tensorflow::Session* session_rect;
	/////////CNN initiation--Wang Dan 20190710 for rect algaes
	tensorflow::Status statusrect = NewSession(tensorflow::SessionOptions(), &session_rect);
	if (!statusrect.ok())
	{
		std::cout << "ERROR: NewSession() for rect algaes failed..." << std::endl;
		return -1;
	}
	tensorflow::MetaGraphDef graphdefrect;
	tensorflow::Status status_loadrect = ReadBinaryProto(tensorflow::Env::Default(), MODELGRAPHRECT_PATH, &graphdefrect); //从meta文件中读取图模型;
	if (!status_loadrect.ok()) {
			std::cout << "ERROR: Loading model for rect algaes failed..." << std::endl;
			std::cout << status_loadrect.ToString() << "\n";
			return -1;
	}
	tensorflow::Status status_createrect = session_rect->Create(graphdefrect.graph_def()); //将模型导入会话Session中;
	if (!status_createrect.ok()) {
			std::cout << "ERROR: Creating graph for rect algaes in session failed..." << status_createrect.ToString() << std::endl;
			return -1;
	}
	// 读入预先训练好的模型的权重
	tensorflow::Tensor checkpointPathTensorRect(tensorflow::DT_STRING, tensorflow::TensorShape());
	checkpointPathTensorRect.scalar()() = MODELRECT_PATH;
	statusrect = session_rect->Run(
			  {{ graphdefrect.saver_def().filename_tensor_name(), checkpointPathTensorRect },},
			  {},{graphdefrect.saver_def().restore_op_name()},nullptr);
	if (!statusrect.ok())
	{
		  throw runtime_error("Error loading checkpoint for rect algaes ...");
	}
	int rectzao_rows=96;//48;
	int rectzao_cols=224;//80;


	char srcfile[200];
	char tmpfile[200];

	for(int index=1;index<1001;index++)
	{
		sprintf(srcfile, "/media/root/Windows3/projects/Ecology/images/resultimgs/temp1/%d.jpg", index);
		Mat src=imread(srcfile,0);
		if(!src.data)
		{
			continue;
		}


		//CNN start...20190710 wd
		tensorflow::Tensor resized_tensor(tensorflow::DT_FLOAT, tensorflow::TensorShape({1,rectzao_rows,rectzao_cols,1}));
		float *imgdata = resized_tensor.flat().data();
		cv::Mat cnninputImg(rectzao_rows, rectzao_cols, CV_32FC1, imgdata);
		cv::Mat srccnn(rectzao_rows, rectzao_cols, CV_8UC1);
		cv::resize(src,srccnn,cv::Size(rectzao_cols,rectzao_rows));
		srccnn.convertTo(cnninputImg, CV_32FC1);
		//对图像做预处理
		cnninputImg=cnninputImg/255;
		//CNN input
		vector > inputs;
		std::string Input1Name = "input";
		inputs.push_back(std::make_pair(Input1Name, resized_tensor));
		tensorflow::Tensor is_training_val(tensorflow::DT_BOOL,tensorflow::TensorShape());
		is_training_val.scalar()()=false;
		std::string Input2Name = "is_training";
		inputs.push_back(std::make_pair(Input2Name, is_training_val));
		//CNN predict
		vector outputs;
		string output="output";

		cv::TickMeter timer;
		timer.start();
		tensorflow::Status status_run = session_rect->Run(inputs, {output}, {}, &outputs);
		timer.stop();
		//cout<<"time is "<
也可以自己写一个demo。将你整理好的头文件和库加到这个工程。
出现报错如下:
tensorflow/core/framework/device_attributes.pb.h: No such file or directory
	google/protobuf/port_def.inc: No such file or directory
	tensorflow/core/framework/graph.pb.h: No such file or directory
	tensorflow/core/framework/node_def.pb.h: No such file or directory
	tensorflow/core/framework/attr_value.pb.h: No such file or directory
	tensorflow/core/framework/tensor.pb.h: No such file or directory
	tensorflow/core/framework/resource_handle.pb.h: No such file or directory
	tensorflow/core/framework/tensor_shape.pb.h: No such file or directory
	tensorflow/core/framework/types.pb.h: No such file or directory
	tensorflow/core/framework/function.pb.h: No such file or directory
	tensorflow/core/framework/op_def.pb.h: No such file or directory
	tensorflow/core/framework/versions.pb.h: No such file or directory
    unsupported/Eigen/CXX11/Tensor: No such file or directory
这种就是因为刚刚你整理的头文件不够正确。方法就是把之前你编译的大的tensorflow路径下的对应的这些报错的头文件放入你整理好的头文件的对应位置。比如这最后一个报错我就是复制/usr/local/include/eigen3下的unsupported文件夹到 我的/home/jumper/workspace/tensorflow-gpu/include路径下。
3  /home/jumper/workspace/tensorflow-gpu/include/unsupported/Eigen/CXX11/Tensor:14:31: fatal error: ../../../Eigen/Core: No such file or directory
      solution:copy the Eigen folder in your primer path(mine is /home/jumper/workspace/tensorflow-2.0.0/tensorflow/contrib/makefile/downloads/eigen) to your path (mine is /home/jumper/workspace/tensorflow-gpu/include)
   4  /home/jumper/workspace/tensorflow-gpu/include/tensorflow/core/framework/allocator.h:24:38: fatal error: absl/strings/string_view.h: No such file or directory
      solution:copy the absl folder in your primer path (mine is /home/jumper/workspace/tensorflow-2.0.0/tensorflow/contrib/makefile/downloads/absl) to your path (mine is /home/jumper/workspace/tensorflow-gpu/include)
   5 tensorflow/core/lib/core/error_codes.pb.h: No such file or directory
     solution:copy error_codes.pb.h in your primer path (mine is /home/jumper/workspace/tensorflow-2.0.0/tensorflow/contrib/makefile/gen/host_obj/tensorflow/core/lib/core) to your path (mine is /home/jumper/workspace/tensorflow-gpu/include/tensorflow/core/lib/core)
   6 tensorflow/core/protobuf/config.pb.h: No such file or directory
     solution:/home/jumper/workspace/tensorflow-2.0.0/tensorflow/contrib/makefile/gen/host_obj/tensorflow/core/protobuf to /home/jumper/workspace/tensorflow-gpu/include/tensorflow/core/protobuf
   7 tensorflow/core/framework/cost_graph.pb.h: No such file or directory
     solution:...
   ...like the following above.
诸如此类,看solution中写了我都是这样复制的。
8 在工程setting中加入-std=c++11好像是tensorflow2.0必须要有这个才能正常编译
将libtensorflow_cc.so库也加入工程
9 编译时报错Building target: testTensorflowGpu
Invoking: GCC C++ Linker
g++ -std=c++11 -L/home/jumper/workspace/tensorflow-gpu/lib -o "testTensorflowGpu" ./src/testgpu.o -lpthread -ltensorflow_cc
/usr/bin/ld: ./src/testgpu.o: undefined reference to symbol '_ZN10tensorflow15ReadBinaryProtoEPNS_3EnvERKNSt7__cxx1112basic_stringIcSt11char_traitsIcESaIcEEEPN6google8protobuf11MessageLiteE'
//home/jumper/workspace/tensorflow-gpu/lib/libtensorflow_framework.so.2: error adding symbols: DSO missing from command line
makefile:45: recipe for target 'testTensorflowGpu' failed
collect2: error: ld returned 1 exit status
make: *** [testTensorflowGpu] Error 1
解决办法:
ln -s libtensorflow_framework.so.2 libtensorflow_framework.so
ldconfig
将刚刚软链接的这个库libtensorflow_framework.so也加到工程中编译,不再报错,编译成功。
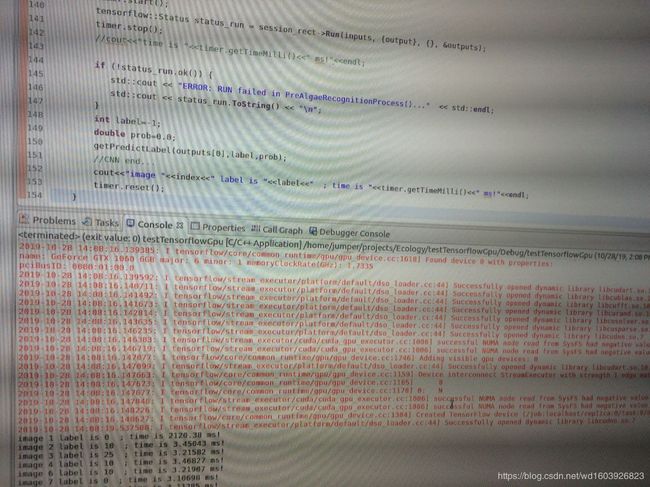
F--编译成功运行demo
2019-10-28 14:08:16.082950: I tensorflow/core/platform/profile_utils/cpu_utils.cc:94] CPU Frequency: 2808000000 Hz
2019-10-28 14:08:16.083187: I tensorflow/compiler/xla/service/service.cc:168] XLA service 0x1e5a0d0 executing computations on platform Host. Devices:
2019-10-28 14:08:16.083200: I tensorflow/compiler/xla/service/service.cc:175] StreamExecutor device (0): Host, Default Version
2019-10-28 14:08:16.084910: I tensorflow/stream_executor/platform/default/dso_loader.cc:44] Successfully opened dynamic library libcuda.so.1
2019-10-28 14:08:16.138433: I tensorflow/stream_executor/cuda/cuda_gpu_executor.cc:1006] successful NUMA node read from SysFS had negative value (-1), but there must be at least one NUMA node, so returning NUMA node zero
2019-10-28 14:08:16.138899: I tensorflow/compiler/xla/service/service.cc:168] XLA service 0x1f0ad30 executing computations on platform CUDA. Devices:
2019-10-28 14:08:16.138913: I tensorflow/compiler/xla/service/service.cc:175] StreamExecutor device (0): GeForce GTX 1060 6GB, Compute Capability 6.1
2019-10-28 14:08:16.139006: I tensorflow/stream_executor/cuda/cuda_gpu_executor.cc:1006] successful NUMA node read from SysFS had negative value (-1), but there must be at least one NUMA node, so returning NUMA node zero
2019-10-28 14:08:16.139385: I tensorflow/core/common_runtime/gpu/gpu_device.cc:1618] Found device 0 with properties:
name: GeForce GTX 1060 6GB major: 6 minor: 1 memoryClockRate(GHz): 1.7335
pciBusID: 0000:01:00.0
2019-10-28 14:08:16.139592: I tensorflow/stream_executor/platform/default/dso_loader.cc:44] Successfully opened dynamic library libcudart.so.10.1
2019-10-28 14:08:16.140711: I tensorflow/stream_executor/platform/default/dso_loader.cc:44] Successfully opened dynamic library libcublas.so.10
2019-10-28 14:08:16.141492: I tensorflow/stream_executor/platform/default/dso_loader.cc:44] Successfully opened dynamic library libcufft.so.10
2019-10-28 14:08:16.141673: I tensorflow/stream_executor/platform/default/dso_loader.cc:44] Successfully opened dynamic library libcurand.so.10
2019-10-28 14:08:16.142814: I tensorflow/stream_executor/platform/default/dso_loader.cc:44] Successfully opened dynamic library libcusolver.so.10
2019-10-28 14:08:16.143635: I tensorflow/stream_executor/platform/default/dso_loader.cc:44] Successfully opened dynamic library libcusparse.so.10
2019-10-28 14:08:16.146235: I tensorflow/stream_executor/platform/default/dso_loader.cc:44] Successfully opened dynamic library libcudnn.so.7
2019-10-28 14:08:16.146303: I tensorflow/stream_executor/cuda/cuda_gpu_executor.cc:1006] successful NUMA node read from SysFS had negative value (-1), but there must be at least one NUMA node, so returning NUMA node zero
2019-10-28 14:08:16.146719: I tensorflow/stream_executor/cuda/cuda_gpu_executor.cc:1006] successful NUMA node read from SysFS had negative value (-1), but there must be at least one NUMA node, so returning NUMA node zero
2019-10-28 14:08:16.147077: I tensorflow/core/common_runtime/gpu/gpu_device.cc:1746] Adding visible gpu devices: 0
2019-10-28 14:08:16.147099: I tensorflow/stream_executor/platform/default/dso_loader.cc:44] Successfully opened dynamic library libcudart.so.10.1
2019-10-28 14:08:16.147663: I tensorflow/core/common_runtime/gpu/gpu_device.cc:1159] Device interconnect StreamExecutor with strength 1 edge matrix:
2019-10-28 14:08:16.147673: I tensorflow/core/common_runtime/gpu/gpu_device.cc:1165] 0
2019-10-28 14:08:16.147677: I tensorflow/core/common_runtime/gpu/gpu_device.cc:1178] 0: N
2019-10-28 14:08:16.147848: I tensorflow/stream_executor/cuda/cuda_gpu_executor.cc:1006] successful NUMA node read from SysFS had negative value (-1), but there must be at least one NUMA node, so returning NUMA node zero
2019-10-28 14:08:16.148226: I tensorflow/stream_executor/cuda/cuda_gpu_executor.cc:1006] successful NUMA node read from SysFS had negative value (-1), but there must be at least one NUMA node, so returning NUMA node zero
2019-10-28 14:08:16.148627: I tensorflow/core/common_runtime/gpu/gpu_device.cc:1304] Created TensorFlow device (/job:localhost/replica:0/task:0/device:GPU:0 with 5454 MB memory) -> physical GPU (device: 0, name: GeForce GTX 1060 6GB, pci bus id: 0000:01:00.0, compute capability: 6.1)
2019-10-28 14:08:19.537588: I tensorflow/stream_executor/platform/default/dso_loader.cc:44] Successfully opened dynamic library libcudnn.so.7
image 1 label is 0 ; time is 2120.38 ms!
image 2 label is 10 ; time is 3.45043 ms!
image 3 label is 25 ; time is 3.21582 ms!
image 4 label is 10 ; time is 3.46827 ms!
image 6 label is 10 ; time is 3.21907 ms!
image 7 label is 0 ; time is 3.10698 ms!
可以看到CUDA也有一个初始化过程,往往第一次耗时较长。
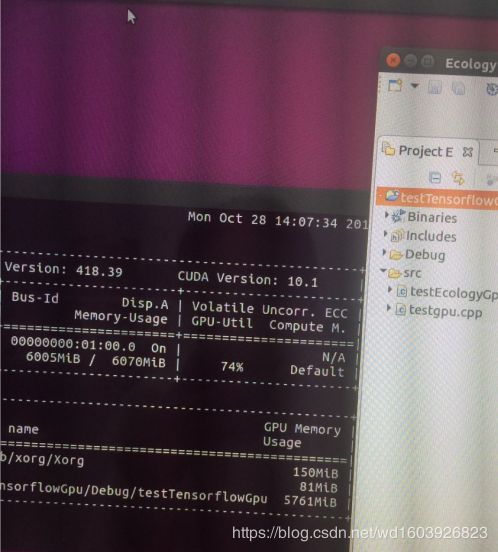
可以看到这个版本GPU此时跑到了74%。CPU版本的运行时GPU怎么浮动都始终低于10%。
我对比了一下,同一台电脑同样的图片程序模型用tensorflow-cpu和tensorflow-gpu的动态库的耗时。
tensorflow-cpu下预测分类耗时:4.13min
tensorflow-gpu下预测分类耗时:2.83min
可以看到还是提速了一些的。
附上参考的一些链接:
tensorflow各个版本需要的CUDA版本以及Cudnn的对应关系
https://blog.csdn.net/qq_27825451/article/details/89082978
https://blog.csdn.net/dragonchow123/article/details/80682787
https://tensorflow.google.cn/install/source
c++ tensorflow接口GPU使用
https://blog.csdn.net/luoyexuge/article/details/81877069
https://www.cnblogs.com/lvchaoshun/p/6614048.html
https://www.jianshu.com/p/31b00ec5bc74
https://blog.csdn.net/wanzhen4330/article/details/81699769
https://docs.nvidia.com/cuda/cuda-installation-guide-linux/index.html#pre-installation-actions
https://blog.csdn.net/u014475479/article/details/81702392
https://blog.csdn.net/caroline_wendy/article/details/80868120
附上小不点的美貌及我种的蘑菇