Beginning Spring学习笔记——第6章(二)使用Spring进行声明式事务管理
声明式事务管理启用
使用面向方面编程(AOP)实现。声明式中指定Spring管理的Bean中哪些方法被事务化,而方法体中不需要编写任何事务代码。
首先在配置类上放置@EnableTransactionManager注解。其中定义了AccountService Bean。
@Configuration
@EnableTransactionManagement
public class Ch6Configuration {

    @Bean
    public DataSource dataSource() {
        DriverManagerDataSource dataSource = new DriverManagerDataSource();
        dataSource.setDriverClassName("org.h2.Driver");
        dataSource.setUrl("jdbc:h2:tcp://localhost/~/test");
        dataSource.setUsername("sa");
        dataSource.setPassword("");
        return dataSource;
    }

    @Bean
    public PlatformTransactionManager transactionManager() {
        DataSourceTransactionManager transactionManager = new DataSourceTransactionManager();
        transactionManager.setDataSource(dataSource());
        return transactionManager;
    }

    @Bean
    public AccountService accountService() {
        AccountServiceJdbcTxImplWithSpring bean =
            new AccountServiceJdbcTxImplWithSpring();
        bean.setDataSource(dataSource());
        return bean;
    }

}
创建一个新的AccountServiceJdbcTxImplWithSpring类,并添加setter方法和一个javax.sql.DataSource类属性。将其中的transferMoney方法用@Transactional注解标记。
public class AccountServiceJdbcTxImplWithSpring implements AccountService {
    private DataSource dataSource;

    public void setDataSource(DataSource dataSource) {
        this.dataSource = dataSource;
    }

    @Transactional
    @Override
    public void transferMoney(long sourceAccountId, long targetAccountId,
            double amount) {
        Connection connection = DataSourceUtils.getConnection(dataSource);
        try {
            Statement statement = connection.createStatement();
            statement.executeUpdate("update account set balance = balance - "
                    + amount + " where id = " + sourceAccountId);
            statement.executeUpdate("update account set balance = balance + "
                    + amount + " where id = " + targetAccountId);
        } catch (SQLException e) {
            throw new RuntimeException(e);
        } finally {
            DataSourceUtils.releaseConnection(connection, dataSource);
        }
    }
最后在主函数中从Spring容器访问accountService Bean,并调用其transferMoney方法。
public class Main {
    public static void main(String[] args) {
        AnnotationConfigApplicationContext applicationContext = new AnnotationConfigApplicationContext(
                Ch6Configuration.class);
        AccountService accountService = applicationContext.getBean(AccountService.class);

        accountService.transferMoney(101L, 100L, 5.0d);
    }
}
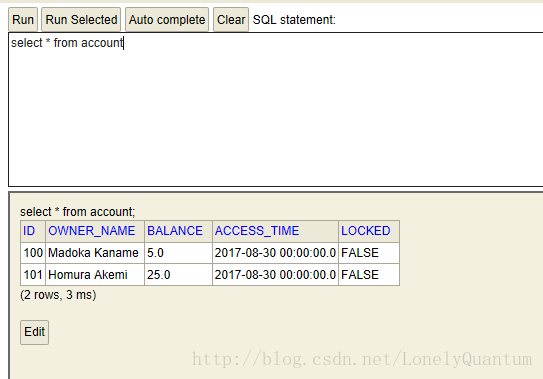
执行前数据库ACCOUNT表内容为:

执行后数据库ACCOUNT表内容为:

转账成功。
将服务层与数据访问层隔离
添加DAO层完成数据访问工作,这时一个服务对象可以依赖多个不同数据访问对象,并在执行业务时使用这些DAO对象。
下例中DAO层内容将使用第四章创建的一系列类。可以参见链接Beginning Spring学习笔记——第4章(二)使用Spring执行数据访问操作
首先创建AccountServiceImpl服务类并在其中添加AccountDao类属性。用@Transaction标记transferMoney方法并实现之。
public class AccountServiceImpl implements AccountService {

    private AccountDao accountDao;

    public void setAccountDao(AccountDao accountDao) {
        this.accountDao = accountDao;
    }

    @Override
    @Transactional
    public void transferMoney(long sourceAccountId, long targetAccountId,
            double amount) {
        Account sourceAccount = accountDao.find(sourceAccountId);
        Account targetAccount = accountDao.find(targetAccountId);
        sourceAccount.setBalance(sourceAccount.getBalance() - amount);
        targetAccount.setBalance(targetAccount.getBalance() + amount);
        accountDao.update(sourceAccount);
        accountDao.update(targetAccount);
    }
}
更改accountService Bean的创建方法,以便从AccountServiceImpl实例化服务对象并注入accountDao Bean。
@Configuration
@EnableTransactionManagement
@Import(Ch4Configuration.class)
public class Ch6Configuration {

    @Bean
    public DataSource dataSource() {
        DriverManagerDataSource dataSource = new DriverManagerDataSource();
        dataSource.setDriverClassName("org.h2.Driver");
        dataSource.setUrl("jdbc:h2:tcp://localhost/~/test");
        dataSource.setUsername("sa");
        dataSource.setPassword("");
        return dataSource;
    }

    @Bean
    public PlatformTransactionManager transactionManager() {
        DataSourceTransactionManager transactionManager = new DataSourceTransactionManager();
        transactionManager.setDataSource(dataSource());
        return transactionManager;
    }

    @Bean
    @Autowired
    public AccountService accountService(AccountDao accountDao) {
        AccountServiceImpl bean = new AccountServiceImpl();
        bean.setAccountDao(accountDao);
        return bean;
    }
}
于是就可以在Main函数中测试新类了。
public class Main {
    public static void main(String[] args) {
        AnnotationConfigApplicationContext applicationContext = new AnnotationConfigApplicationContext(
                Ch6Configuration.class);
        AccountService accountService = applicationContext.getBean(AccountService.class);

        accountService.transferMoney(100L, 101L, 5.0d);
    }
}@Transactional详解
自定义事务行为
@Transactional注解有一组属性,可以进行更改:
- propagation:定义事务范围,默认值为REQUIRED。
- isolation: 底层数据库系统隔离级别,可为READ_UNCOMMITED、READ_COMMITED、REPEATABLE_READ和SERIALIZABLE。默认为DEFAULT。
- timeout:超时时间,可直接传递给底层数据库,默认为TIMOUT_DEFAULT。
- readonly:提示底层事务子系统方法仅仅执行读取。默认为false。
- rollbackFor:java.lang.RuntimeException或其子类。
- noRollbackFor:java.lang.Exception或其子类。与rollbackFor一起定义异常操作。
在类级别使用@Transactional
此时,该类的所有公共方法都被事务化。否则只有使用了@Transactional注解的公共方法才会被事务化。虽然也可以在接口放置该注解,但是不建议这么做,因为Spring使用了基于类的代理生成机制时,生成的代理类将会继承Bean的类而不会继承接口中的注释。
在不抛出异常的情况下回滚事务
使用TransactionAspectSupport.currentTransactionStatus().setRollbackOnly()将当前事务的rollbackOnly特性设置为true,方法调用结束时检测该值为true则无论如何都会回滚。
理解事务传播规则
即propagation各值的意义。
- REQUIRED:调用一个方法,如果不存在事务则开始新事务。如果存在一个由其他方法调用开始的活动事务则保持该事务,两个方法共享相同物理事务。如果第二个方法抛出产生回滚的异常则整个事务都会回滚。
- REQUIRES_NEW:不管是否存在活动事务都会开启一个新事务。
- NESTED:需要使用JDBC3.0才可使用该规则。用保存点来标记新的方法调用,第二个方法拥有NESTED属性会在调用位置创建保存点。第二个方法生成异常时,最后一个保存点之前的事务都将回滚。
- SUPPORTS:可以让当前方法在存在的事务中工作或者没有事务情况下工作。
- NOT_SUPPORTED:调用方法时如果存在活动事务,则该事务被暂停至方法调用结束。
- NEVER:调用方法时若存在一个活动事务且发生错误,则必须在系统没有任何活动事务时调用该方法。
- MANDATORY:调用方法时如果系统中不存在活动事务且出错,则必须在访问该方法时保证已经创建活动事务。
使用进行声明式事务管理
先在src/main/resource中创建Spring Bean配置文件beans-tx.xml,然后使用tx和aop命名空间。并在其中添加
<beans xmlns="http://www.springframework.org/schema/beans"
    xmlns:xsi="http://www.w3.org/2001/XMLSchema-instance" xmlns:tx="http://www.springframework.org/schema/tx"
    xmlns:aop="http://www.springframework.org/schema/aop"
    xsi:schemaLocation="http://www.springframework.org/schema/aop http://www.springframework.org/schema/aop/spring-aop.xsd
        http://www.springframework.org/schema/beans http://www.springframework.org/schema/beans/spring-beans.xsd
        http://www.springframework.org/schema/tx http://www.springframework.org/schema/tx/spring-tx.xsd">

    <tx:advice id="txAdvice" transaction-manager="transactionManager">
        <tx:attributes>
            <tx:method name="*" propagation="REQUIRED" />
        tx:attributes>
    tx:advice>
    <aop:config>
        <aop:advisor advice-ref="txAdvice" pointcut="bean(accountService)" />
    aop:config>
beans>
此时可以取消AccountServiceImpl类中的@Transactional注解。
public class AccountServiceImpl implements AccountService {

    private AccountDao accountDao;

    public void setAccountDao(AccountDao accountDao) {
        this.accountDao = accountDao;
    }

    @Override
    //@Transactional
    public void transferMoney(long sourceAccountId, long targetAccountId,
            double amount) {
        Account sourceAccount = accountDao.find(sourceAccountId);
        Account targetAccount = accountDao.find(targetAccountId);
        sourceAccount.setBalance(sourceAccount.getBalance() - amount);
        targetAccount.setBalance(targetAccount.getBalance() + amount);
        accountDao.update(sourceAccount);
        accountDao.update(targetAccount);
    }
}
使用@ImportResource来配置Configuration类以便在容器启动期间加载前面创建的XMLBean配置文件。还可删除@EnableTransactionalManagment注解,因为没有使用@Transactional来指定事务行为。
@Configuration
//@EnableTransactionManagement
@Import(Ch4Configuration.class)
@ImportResource("classpath:/beans-tx.xml")
public class Ch6Configuration {

    @Bean
    public DataSource dataSource() {
        DriverManagerDataSource dataSource = new DriverManagerDataSource();
        dataSource.setDriverClassName("org.h2.Driver");
        dataSource.setUrl("jdbc:h2:tcp://localhost/~/test");
        dataSource.setUsername("sa");
        dataSource.setPassword("");
        return dataSource;
    }

    @Bean
    public PlatformTransactionManager transactionManager() {
        DataSourceTransactionManager transactionManager = new DataSourceTransactionManager();
        transactionManager.setDataSource(dataSource());
        return transactionManager;
    }

    @Bean
    @Autowired
    public AccountService accountService(AccountDao accountDao) {
        AccountServiceImpl bean = new AccountServiceImpl();
        bean.setAccountDao(accountDao);
        return bean;
    }
}
然后运行Main方法。
public class Main {
    public static void main(String[] args) {
        AnnotationConfigApplicationContext applicationContext = new AnnotationConfigApplicationContext(
                Ch6Configuration.class);
        AccountService accountService = applicationContext.getBean(AccountService.class);

        accountService.transferMoney(101L, 100L, 5.0d);
    }
}
