Kotlin—Anko库的使用
Kotlin我们也学了一些基础,但怎么用我们还是不知道?今天我们从基础转向实战,在Android平台上开发Kotlin
因为这篇我们会讲到anko的知识下面贴出它的官网地址,感兴趣的可以单独去研究
https://github.com/Kotlin/anko/wiki
Start
调用第三方库使用Kotlin
这里我们以ButterKnife为例,配置ButterKnife在Kotlin的环境
首先加入kotlin的classpath
ext.kotlin_version = '1.1.2-3'
repositories {
    jcenter()
}
dependencies {
    classpath 'com.android.tools.build:gradle:2.3.1'
    classpath "org.jetbrains.kotlin:kotlin-gradle-plugin:$kotlin_version"

}
然后添加kotlin依赖
apply plugin: 'kotlin-android'
compile "org.jetbrains.kotlin:kotlin-stdlib-jre7:$kotlin_version"
最后加入ButterKnife依赖,这里需要注意的是另外也添加kapt插件
apply plugin: 'kotlin-kapt'
compile 'com.jakewharton:butterknife:8.6.0'
kapt 'com.jakewharton:butterknife-compiler:8.6.0'
这样kapt会将ButterKnife的java代码转化为kotlin代码
至此环境就配置好了,当然你也可以在网上搜一搜,这里也就是做个笔记
使用anko库
Anko Dialog
对于Anko的Dialog用的最多的也Toast的使用,在Anko中使用toast是相当的简单
fun open_toast(view: View){
    toast("toast")
    longToast("long toast")
}
然后就是AlertDialog的使用也是一看就会用的那种
fun open_alert(view: View){
alert("Hi,I'm Roy","Have you tried turning it off and on again?"){
    yesButton { toast("yes") }
    noButton { toast("no") }
}.show()

//当然你也可以使用自定义的View
alert{
    customView{
        editText()
    }
}
}
当然还有其它的弹框这里就不一一介绍,具体请看官方
Anko Intent
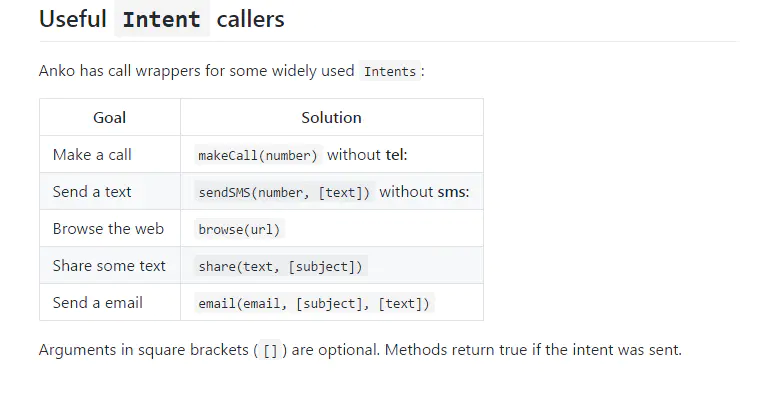
相比之前的Intent来说Anko提供的更加的方便,使用如下
startActivity(intentFor("id" to 5).singleTop())
其他的一些使用如下:
image
Anko Log
对于Log,Anko解释AndroidSDK提供的Log也是非常的简单,尽管方法需要你传递标签参数,但使用起来也是非常的简单,当然你也可以使用AnkoLogger来消除这一点
-
实现AnkoLogger的方式
info("this is second log info") //这种带lambda表达式的这种会去计算Log.isLoggable(tag, Log.INFO)是否为true,为true的话才打印 info { "this is third log info" } -
使用其对象的方式
 val logWithASpecificTag = AnkoLogger("lypop")
 logWithASpecificTag.info { "this is Log info" }
第一种Tag默认是类名,第二种可以自定义其Tag
Anko helper
你可以在你的项目中使用帮助者来简化你的代码,例如Color、Dimen等,颜色透明度直接色值.opaque就可以,尺寸的话直接使用dip(dipValue)、sp(spValue)就可以。在这里面还有一个就是applyRecursively()用来控制子View的操作,如:
    verticalLayout {
        textView{
            text = "EditText01"
            backgroundColor = 0xff000.opaque
            textSize = 14f
        }
        textView {
            text = "EditText02"
            backgroundColor = 0x99.gray.opaque
            textSize = 23f
        }
    }.applyRecursively {//如果是ViewGroup的话可以使用applyRecursively来为每个Child View进行设置
        view -> when(view){
            is TextView -> view.textColor = Color.RED
        }
    }
Anko Coroutines
Anko还提供了协程的用来做一些耗时的操作,提供的操作为bg{},具体代码如下:
    async(UI){//UI线程
        val data: Deferred = bg {//后台线程
            // Runs in background
            MyBean()
        }

        showData(data.await()) //await方法将一直等待bg返回的数据
    }
为了防止内存泄漏我们常会使用弱引用,在Anko中使用弱引用方法如下:
   val ref: Ref = this.asReference()

    async(UI){
        //ref替代了this@AnkoActivity05
        ref().showData()
    }
Anko Layout
那我们先来说一下普通写Android布局有啥缺点
- 它不是类型安全的和不是空安全
- 它迫使您为每个布局都编写相同的代码
- 在设备上解析xml浪费CPU时间和电池
- 最重要的是它不允许代码重用
那Kotlin不行吗?为什么还要用anko呢?
官方解释说Kotlin那种是解决了不能编程生成UI,但是用Kotlin代码写出来的UI难以维护所以才出现了anko库,具体相应的代码还请看官网。(其实也没必要看,毕竟出来了一种库必然有其存在的原因)
verticalLayout {
    padding = dip(30)
    button("say"){
        onClick {toast("Hello,${if (it is TextView) it.text else ""}") }
    }
    button(R.string.app_name)
    button{
        textResource = R.string.app_name
    }.lparams { //如果指定了 lparams 但是没有指定 width 或者 height,那么默认是 “wrapContent”
        width = matchParent
        topMargin = dip(10)
        horizontalMargin = dip(5)

    }
}
Activity没有显示调用setContentView,anko会自动为Activity设置Content View
这里列举了button的三种创建形式和为其设置参数
当然在Activity/Fragment也会使用xml布局,anko也为我们提供了简单的创建控件对象的方式
- 对象的名字就是控件的ID
- 使用find
(R.id.name)也可以
可以看出这几种都比Android的findViewById要舒适的多
当然代码中还可能会有
-
include
include(R.layout.something) { backgroundColor = Color.RED }.lparams(width = matchParent) { margin = dip(12) } -
自定义View
 inline fun ViewManager.myView(init: MyView.() -> Unit): MyView {
     return ankoView({ MyView(it) }, 0, init)
 }

 class MyView(ctx: Context) : View(ctx) {
     fun test() {

     }
 }
使用的时候和上面使用方法一样直接用myView{}
但是非常遗憾的是没有预览界面,虽然anko提供了支持插件,但非常遗憾的是仅支持AndroidStudio2.4+
这样我们就创建了一个简单的布局
fun Context.sendSMS(number: String, text: String = ""): Boolean {
    try {
        val intent = Intent(Intent.ACTION_VIEW, Uri.parse("sms:$number"))
        intent.putExtra("sms_body", text)
        startActivity(intent)
        return true
    } catch (e: Exception) {
        e.printStackTrace()
        return false
    }
}
Anko SQLite
在之前使用SQLiteOpenHelper,通常调用getReadableDatabase()或getWritableDatabase(),但是您必须确保在接收的SQLiteDatabase上调用close()方法。如果您从多个线程中使用它,则必须了解并发访问。 所有这一切都很艰难。
这就是为什么Android开发人员不太喜欢默认的SQLite API,而是更喜欢使用相当昂贵的包装器,如ORMs。
Anko提供了ManagedSQLiteOpenHelper 可以无缝替代默认的,当操作完毕之后就会自动关闭,在使用的时候需要去继承ManagedSQLiteOpenHelper
class MySqlHelper(ctx: Context = MyApplication.getApplication(),
              name: String? = "db",
              factory: SQLiteDatabase.CursorFactory? = null,
              version: Int = 1) : ManagedSQLiteOpenHelper(ctx, name, factory, version) {
我们如果想让它成为线程安全的可以
    companion object {
        @Volatile private var helper: MySqlHelper? = null

        fun getInstance(): MySqlHelper {
            if (null == helper) {
                synchronized(MySqlHelper::class) {
                    if (null == helper) {
                        helper = MySqlHelper()
                    }
                }
            }
            return helper!!
        }
}
然后我们就可以使用Anko提供的数据库操作了
fun queryAll(): List = use {
    select(Gps.TABEL_NAME).exec {
        parseList(classParser()) //查询使用parserXX方法需要存在查询字段的相应构造方法
    }
}

fun queryLonAfter(id: Long): List = use {
    select(Gps.TABEL_NAME, Gps.LON).whereArgs("${Gps._ID} > {id}", "id" to id)
            .exec {
                parseList(DoubleParser)
            }
}

fun deleteById(id: Long){
    use {
        delete(Gps.TABEL_NAME, "${Gps._ID} = {id}", "id" to id)
    }
}

fun updateById(id: Long) {
    use {
        update(Gps.TABEL_NAME, Gps.PROVIDER to "lbs").whereArgs("${Gps._ID} = {id}", "id" to id).exec()
    }
}
这里使用use来包裹,当里面的代码执行完毕就会自动关闭数据库
至此,Anko就讲解完毕,更多的内容还请阅读官方,Thanks♪(・ω・)ノ
