Android控件与布局——基础控件EditText
最近在用原生的控件和布局绘制一些界面并使用,虽然这些都是Android基本知识,但是有的时候真的感觉力不从心,感觉有必要对Android常用的控件和布局做一个系统的了解。后续一个月甚至更多的时间都会围绕这个主题展开,毕竟这里面还是有不少高级控件的,我也会尽量结合应用深入的进行了解。
项目GitHub地址入口
上一篇:TextView 下一篇:AutoCompleteTextView与MultiAutoCompleteTextView
在上一篇中,我们对TextView及其属性进行了比较完整的学习,当然还有很多没有触及到的知识点,今天我们的主题是EditText,它是 TextView的直接子类,下面我们就结合官方的文档描述展开学习:
* A user interface element for entering and modifying text. * When you define an edit text widget, you must specify the * {@link android.R.styleable#TextView_inputType} * attribute. For example, for plain text input set inputType to "text": **
* <EditText * android:id="@+id/plain_text_input" * android:layout_height="wrap_content" * android:layout_width="match_parent" * android:inputType="text"/>一个用户可以编辑和修改文本的接口,当你定义一个EditText控件时,一定要给定文本输入类型属性。下面还给了一个例子
上面的文档对EditText做了一个总体的介绍,这个控件支持用户编辑和修改文本,但是一定要设置inputType属性,这个属性真的很重要,平时在使用的过程中会经常用到。那么我们首先看一下一个TextView的模样:

在使用EditText的时候,我们通常都是提供一个给用户输入信息的接口,比如别人注册一个信息,需要输入年龄,性别,电话号码,邮箱以及密码等等各种各样的信息。那我们就有一个疑问了,每一条信息的数据样式都是千差万别的,比如邮箱是有特定格式的,电话号码只能是数字且长度固定,难道这些都需要我们自己等用户把所有信息输入完成之后自己再一个一个校验吗,显然不是的,这里就需要用到它(准确说是TextView的)的一个属性android:inputType。关于text的type都是统一定义在EditorInfo,我们在EditText的setTextType接口中找到答案:
* Set the type of the content with a constant as defined for {@link EditorInfo#inputType}. This
* will take care of changing the key listener, by calling {@link #setKeyListener(KeyListener)},
* to match the given content type.  If the given content type is {@link EditorInfo#TYPE_NULL}
* then a soft keyboard will not be displayed for this text view.
当然我们也可以通过对控件添加键盘监听来实现。因为考虑到inputType类型较多,我们直接根据Android的Design界面推荐的来学习。

下面我们就三个一起作为一组来学习
(1)第一组:
- Plain Text:普通文本
- Password:密码
- Password(Numeric):数字密码
在开始之前,为了更好的演示,我可能会使用电脑键盘配合软键盘的方式进行,如果你的模拟器软键盘没有开启,请参照如下操作打开,电脑键盘类似:

好了,环境准备好之后,我们来看一下运行的效果:

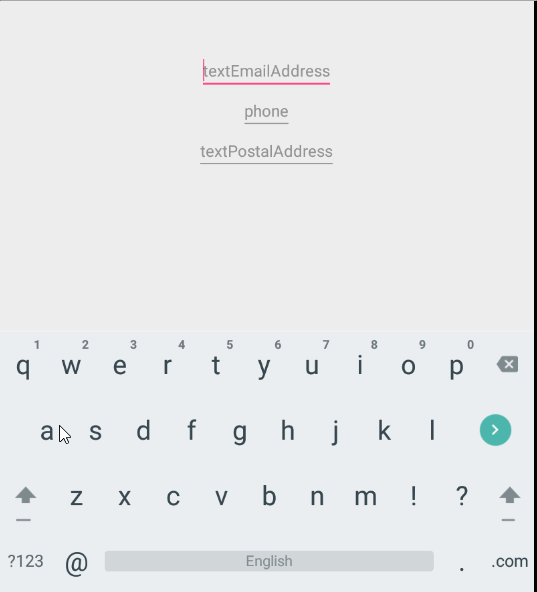
(2)第二组:
- E-mail:电子邮件
- Phone:电话
- Postal-Address:邮箱地址

运行的结果如下:
(3)第三组:
- MultilineText:多行文本
- Time:时间
- Date:日期
运行结果如下(这里为了比较第一个类型,特地加了一个EditText):

(4)第四组:
- Number
- Number(Singed)
- Number(Decimal)
运行结果:

上面列举了EditText的inputType的几个属性,主要是依据XML布局Design界面中推荐的几个,也是平时使用较多的几个,其实,该参数还可以通过EditText的setInputType()接口来实现,比如:
text.setInputType(EditorInfo.TYPE_TEXT_VARIATION_POSTAL_ADDRESS);那这个设置的参数动作究竟做了哪些逻辑处理了:
* Set the type of the content with a constant as defined for {@link EditorInfo#inputType}. This
* will take care of changing the key listener, by calling {@link #setKeyListener(KeyListener)},
* to match the given content type.  If the given content type is {@link EditorInfo#TYPE_NULL}
* then a soft keyboard will not be displayed for this text view.
通过一个定义在EditorInfo中的常量来设置EditText可以输入的内容类型,实现主要是通过改变KeyListener监听实现。
下面会介绍EditText的监听内容。关于inputType的类型还有很多其他类型,具体请参考EditorInfo类
EditText的监听部分,我们主要介绍两个,一个是焦点状态改变监听View.OnFocusChangeListener,另一个就是View.OnKeyListener,下面我们就来简单学习一下
- View.OnFocusChangeListener
- View.OnKeyListener
(1)View.OnFocusChangeListener,使用与测试结果如下:
 text=findViewById(R.id.editText);
 text.setOnFocusChangeListener(new View.OnFocusChangeListener() {
            @Override
            public void onFocusChange(View v, boolean hasFocus) {
              text.setText("是否有焦点:"+hasFocus);
            }
        });

(2)View.OnKeyListener,使用与测试结果如下:
      text=findViewById(R.id.editText);
      text1=findViewById(R.id.editText2);
      text.setOnKeyListener(new View.OnKeyListener() {
            @Override
            public boolean onKey(View v, int keyCode, KeyEvent event) {
                text1.setText("keyCode:"+keyCode+"v=text:"+(v==text));
                return false;
            }
        });
关于回调接口的介绍以及回调接口中的参数介绍如下:
* Called when a hardware key is dispatched to a view. This allows listeners to * get a chance to respond before the target view. *Key presses in software keyboards will generally NOT trigger this method, * although some may elect to do so in some situations. Do not assume a * software input method has to be key-based; even if it is, it may use key presses * in a different way than you expect, so there is no way to reliably catch soft * input key presses. * * @param v The view the key has been dispatched to. * @param keyCode The code for the physical key that was pressed * @param event The KeyEvent object containing full information about * the event. * @return True if the listener has consumed the event, false otherwise.
当硬件键盘key被点击的事件传递给一个View的时候,这个回调会调用,这样我们就可以在最终的View处理该事件之前作出响应。
通常软键盘的点击不会触发该方法,尽管有些时候会(比如点击数字)。软件的输入方式不一定是键盘点击的方式,即便如此,使用键盘点击作为输入也不一定按照你的预期进行,铺货软键盘的点击输入是不可靠的。
- 最终处理该Event的View
- 按下的物理键盘按钮对应于KeyEvent中的编码
- 包含此点击事件信息的KeyEvent
如果返回true,我们就拿不到这个点击的数据了,所以通常我们都保持默认的返回false。
考虑到上述的描述,我们先使用电脑键盘输入演示,然后在使用软键盘演示看一下
电脑键盘输入:

软键盘输入:

这个结果验证上面的描述。okay,下面我们就来结合这两个监听事件实现一个平时注册界面常见的场景:
- 监听enter键点击实现切换焦距
- 对输入的内容进行校验(这里比较简单,可以做成实时监听的方案)
运行的效果如下:

具体的实现代码如下:
package aoto.com.commonwidgetandlayout.basic_widget.editText;

import android.graphics.Color;
import android.support.v7.app.AppCompatActivity;
import android.os.Bundle;
import android.text.Editable;
import android.text.method.KeyListener;
import android.view.KeyEvent;
import android.view.View;
import android.view.inputmethod.EditorInfo;
import android.widget.EditText;
import android.widget.TextView;
import android.widget.Toast;

import aoto.com.commonwidgetandlayout.R;

/**
 * @author why
 * @date 2019-6-3 19:14:44
 */
public class EditTextActivity extends AppCompatActivity {

    EditText userNameView;
    EditText userPsdView;
    TextView userNameTip;
    TextView userPsdTip;

    boolean userNameTrigger = false;
    boolean userPsdTrigger = false;

    boolean userNameLegal=false;
    boolean userPsdLegal=false;

    @Override
    protected void onCreate(Bundle savedInstanceState) {
        super.onCreate(savedInstanceState);
        setContentView(R.layout.activity_edit_text);

        userNameView = findViewById(R.id.editText);
        userPsdView = findViewById(R.id.editText1);
        userNameTip = findViewById(R.id.userName_edit_tip);
        userPsdTip = findViewById(R.id.userPsd_edit_tip);

        userNameView.setOnFocusChangeListener(new View.OnFocusChangeListener() {
            @Override
            public void onFocusChange(View v, boolean hasFocus) {
                if (!hasFocus && userNameTrigger) {
                    userNameLegal=checkString(userNameView.getText().toString());
                    if (userNameLegal) {
                        userNameTip.setText("用户名合法");
                        userNameTip.setTextColor(Color.GREEN);
                        userNameTip.setVisibility(View.VISIBLE);
                    } else {
                        userNameTip.setTextColor(Color.RED);
                        userNameTip.setText("密码只能由文本字符,数字组成");
                        userNameTip.setVisibility(View.VISIBLE);
                    }
                }
            }
        });

        userNameView.setOnKeyListener(new View.OnKeyListener() {
            @Override
            public boolean onKey(View v, int keyCode, KeyEvent event) {
                userNameTrigger = true;
                if (keyCode == KeyEvent.KEYCODE_ENTER) {
                    userPsdView.requestFocus();
                }
                return false;
            }
        });


        userPsdView.setOnKeyListener(new View.OnKeyListener() {
            @Override
            public boolean onKey(View v, int keyCode, KeyEvent event) {
                if (keyCode == KeyEvent.KEYCODE_ENTER && userPsdTrigger == true) {
                    userPsdLegal=checkString(userPsdView.getText().toString());
                    if (userPsdLegal) {
                        userPsdTip.setText("密码合法");
                        userPsdTip.setTextColor(Color.GREEN);
                        userPsdTip.setVisibility(View.VISIBLE);
                        if(userNameLegal&&userPsdLegal){
                            Toast.makeText(EditTextActivity.this, "注册成功", Toast.LENGTH_SHORT).show();
                        }

                    } else {
                        userPsdTip.setTextColor(Color.RED);
                        userPsdTip.setText("密码只能由文本字符,数字组成");
                        userPsdTip.setVisibility(View.VISIBLE);
                    }
                } else {
                    userPsdTrigger = true;
                }
                return false;
            }
        });

    }

    private boolean checkString(String string) {
        for (char c : string.toCharArray()) {
            if (!((c >= '0' && c <= '9') || (c >= 'a' && c <= 'z') || (c >= 'A' && c <= 'Z'))) {
                return false;
            }
        }
        return true;
    }
}
布局文件也比较简单:
到这里,关于EditText以及其使用就介绍的差不多了,下一篇会介绍两个EditText的子类,如果喜欢,可以扫码关注。
注:欢迎扫码关注
