Google Maps Android API V2使用及问题解决
说明
因为Google Maps的API版本更新,之前的一些教程都是关于旧版本V1的,虽然Google说继续提供服务,但是不再提供API Key的申请。
而新的V2版本貌似改动还挺大。也没搜到国内有什么系统介绍的博客文章之类的(书肯定是来不及那么新了)。
断断续续折腾了大概半个月,因为对Android也不是特别熟悉,所以碰到这样那样的问题。
终于在昨天看见模拟器上跑的地图了。太感人了。
下面就主要说说要成功做成这一件事的流程吧。
因为肯定有时效性,所以打上一个时间戳:版本更新事件发生在2012年12月,而这篇博文目前的时间是2013年1月1日。
背景
一些相关的链接:
Google Maps Android API V1的介绍:
https://developers.google.com/maps/documentation/android/v1/mapkey?hl=zh-CN
Google Maps Android API v2的初步介绍:
https://developers.google.com/maps/documentation/android/
Introduction
https://developers.google.com/maps/documentation/android/intro
Getting Started
(本部分参考https://developers.google.com/maps/documentation/android/start)
1.首先安装Google Play services SDK
Google Maps Android API是作为这个SDK的一部分发行的。
这个安装是通过Android SDK Manager进行,配置好之后的Eclipse上面应该有Android SDK Manager的图标,一般的SDK版本安装和更新都在这里进行。
安装和更新Extras下的Google Play services即可。
2.获取API key
获取Maps API key需要两样东西:应用的signing certificate和它的package name。
获取这个key之后,把它加在应用程序的AndroidManifest.xml文件里即可。
为应用获取一个key还是需要好几个步骤的,下面详细说明:
获取数字证书(digital certificate)信息
数字证书有Debug和Release两种,下面主要说Debug的。
要获取一个叫做SHA-1 fingerprint的东西,作为数字证书的一个简短代表。
这个指纹(fingerprint)是通过一个哈希算法得到的字符串,为了得到你的证书的SHA-1 fingerprint,首先要找到你的debug keystore 文件,文件名叫debug.keystore。
默认情况下它和虚拟机AVD存放在一起,win7下的路径是:C:\Users\your_user_name\.android\,也可以通过Eclipse中的Windows > Prefs > Android > Build来查看这个路径。
然后,在cmd命令行里运行下列命令:
keytool -list -v -keystore "C:\Users\your_user_name\.android\debug.keystore" -alias androiddebugkey -storepass android -keypass android
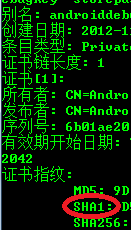
就显示一大堆东西,其中就有证书指纹:
SHA1那一行就包含了证书的SHA-1 fingerprint,是二十段用冒号割开的数字段,每段是两个十六进制的数。
在Google APIs Console上创建API Project
在Google APIs Console上创建项目,并且注册Maps API。
首先,去这个网址:https://code.google.com/apis/console/
用Gmail的账户登录,如果是第一次的话,需要创建项目,默认情况会创建一个叫做API Project的项目。
点击左边的Services,会在中间看到很多的APIs和Services,找到Google Maps Android API v2,然后把它设置成on,需要接受一些服务条款。
获得API Key
在左边的导航条中选择API Access。
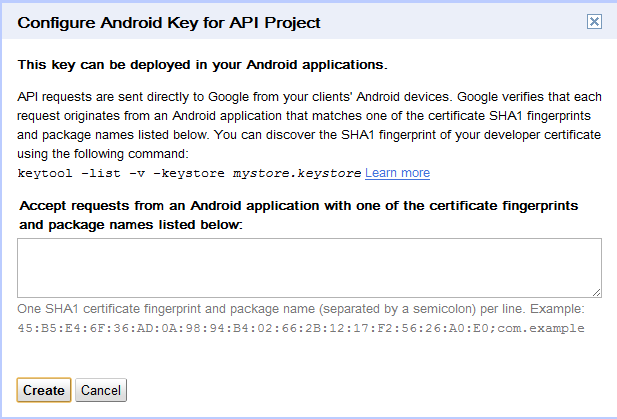
在出来的页面中选择Create New Android Key...就可以生成key了:
然后在对话框中填入:SHA-1 指纹, 分号隔开,然后是应用的 package name.然后就会生成一个Key。
比如:
3.把API Key加入应用程序
首先,建立虚拟设备AVD和应用程序。
关于AVD,官方文档并没详细介绍,我后面会有说明。
建立好应用程序,注意包名应该和申请key时候的包名一致。
之后修改AndroidManifest.xml文件:
3.1.在元素中加入子标签
<meta-data

    android:name="com.google.android.maps.v2.API_KEY"

    android:value="your_api_key"/>
其中your_api_key置换成自己申请的API Key。
3.2.加入一些许可信息
  <permission
          android:name="com.example.mapdemo.permission.MAPS_RECEIVE"
          android:protectionLevel="signature"/>
        <uses-permission android:name="com.example.mapdemo.permission.MAPS_RECEIVE"/>
其中com.example.mapdemo换成自己的包名。
4. AndroidManifest.xml中的其他具体设置
许可设置
<uses-permission android:name="android.permission.INTERNET"/>
<uses-permission android:name="android.permission.WRITE_EXTERNAL_STORAGE"/>
<uses-permission android:name="com.google.android.providers.gsf.permission.READ_GSERVICES"/>
<uses-permission android:name="android.permission.ACCESS_COARSE_LOCATION"/>
<uses-permission android:name="android.permission.ACCESS_FINE_LOCATION"/>
OpenGL ES V2特性支持
同样也是作为
<uses-feature
  android:glEsVersion="0x00020000"
  android:required="true"/>
5.加上地图
首先布局文件:
xml version="1.0" encoding="utf-8"?>
<fragment xmlns:android="http://schemas.android.com/apk/res/android"
  android:id="@+id/map"
  android:layout_width="match_parent"
  android:layout_height="match_parent"
  class="com.google.android.gms.maps.MapFragment"/>
然后在MainActivity.java:
package com.example.mapdemo;

import android.app.Activity;
import android.os.Bundle;

public class MainActivity extends Activity {

    @Override
    protected void onCreate(Bundle savedInstanceState) {
        super.onCreate(savedInstanceState);
        setContentView(R.layout.main);
    }
}
遇到的问题和解决的方法
程序编译错误,显示找不到一些类
如图:
解决这个问题,首先需要把Google Play services的类库加载进来:
在Eclipse里面选择:File > Import > Android > Existing Android Code Into Workspace然后点击Next.
之后Browse..., 找到路径下的
(如果没有这个库请在Android SDK Manager更新,在底端的Extras里面更新Google Play services)。
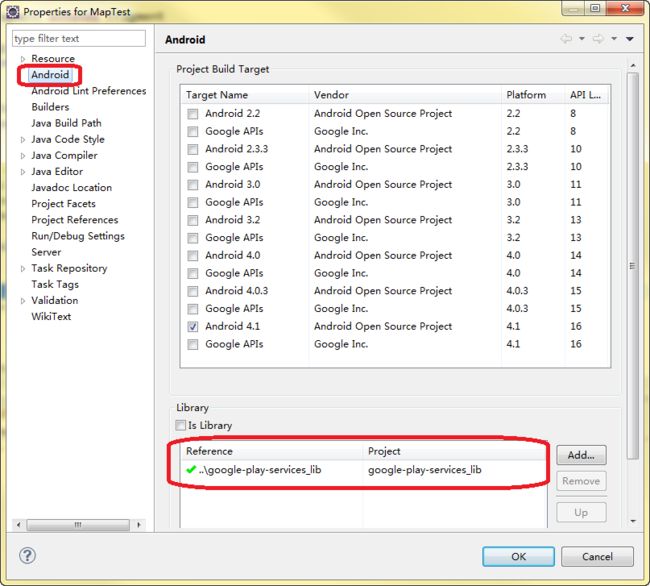
第二步是添加对这个库的引用:
在自己的项目上右键,选Properties,左边选Android,然后在下面的Library里面Add刚才的google-play-services_lib。
之后程序就应该能运行了。
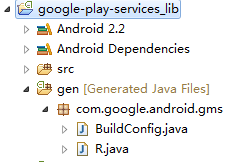
如果你的Eclipse中不是设置为自动build,则需要build一下google-play-services_lib这个项目。也可以选Project-Clean..
直到google-play-services_lib中的gen路径下生成了需要的包,这样引用才不会出错:
接着你可能会碰到下面的问题:
程序运行成功,但是显示This app won't run unless you update Google Play services.
如图:
有传言说V2不能在AVD上运行,可能Google还会对此问题进行更新。
经过搜索,这个问题已经在Stackoverflow上被讨论过了,链接:http://stackoverflow.com/questions/13691943/this-app-wont-run-unless-you-update-google-play-services-via-bazaar
所以看来在AVD上运行的问题已经被解决了。
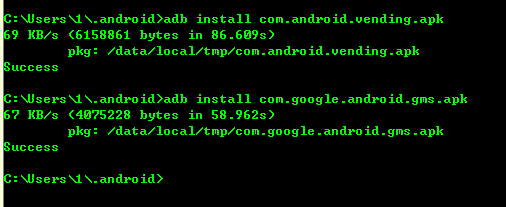
解决的方法就是在AVD上安装两个包(Google Play Store和Google Play services):
vending.apk和gms.apk,(给一个网盘链接:http://pan.baidu.com/share/link?shareid=190602&uk=2701745266)(自己在豌豆荚上搜搜也行)。
并且AVD就选择普通的API 16就行,不需要是Google APIs。我选的是Android4.1 API16.
安装时把那两个包放在当前目录,用命令行安装:
之后运行程序,就出地图了:
补充说明
因为MapFragment只在API 12及之后的版本才有,所以对于之前的版本需要使用Support Library来进行辅助。
如果minSdkVersion设置为12以前的,就需要使用Support Library。
需要更改的地方是:布局文件中,把MapFragment改为SupportMapFragment。
MainActivity继承自FragmentActivity而不是Activity。(需要import android.support.v4.app.FragmentActivity;)
附上完整代码
xml version="1.0" encoding="utf-8"?>
<manifest xmlns:android="http://schemas.android.com/apk/res/android"
    package="com.example.maptest"
    android:versionCode="1"
    android:versionName="1.0" >

    <uses-sdk
        android:minSdkVersion="8"
        android:targetSdkVersion="15" />

    <uses-feature
          android:glEsVersion="0x00020000"
          android:required="true"/>

    <permission
          android:name="com.example.maptest.permission.MAPS_RECEIVE"
          android:protectionLevel="signature"/>

    <uses-permission android:name="com.example.maptest.permission.MAPS_RECEIVE"/>

    <uses-permission android:name="android.permission.INTERNET"/>
    <uses-permission android:name="android.permission.WRITE_EXTERNAL_STORAGE"/>
    <uses-permission android:name="com.google.android.providers.gsf.permission.READ_GSERVICES"/>
    <uses-permission android:name="android.permission.ACCESS_COARSE_LOCATION"/>
    <uses-permission android:name="android.permission.ACCESS_FINE_LOCATION"/>

    <application
        android:icon="@drawable/ic_launcher"
        android:label="@string/app_name"
        android:theme="@style/AppTheme" >
        <activity
            android:name=".MainActivity"
            android:label="@string/title_activity_main" >
            <intent-filter>
                <action android:name="android.intent.action.MAIN" />

                <category android:name="android.intent.category.LAUNCHER" />
            intent-filter>
        activity>

        <meta-data
            android:name="com.google.android.maps.v2.API_KEY"
            android:value="AIzaSyAJRV7Rd_dlxnr8FYhQN3pEBUYFkhZWWpI"/>

    application>

manifest>
package com.example.maptest;

import android.os.Bundle;
import android.support.v4.app.FragmentActivity;


public class MainActivity extends FragmentActivity
{

    @Override
    public void onCreate(Bundle savedInstanceState)
    {
        super.onCreate(savedInstanceState);
        setContentView(R.layout.activity_main);
    }


}
布局文件:
xml version="1.0" encoding="utf-8"?>

<fragment xmlns:android="http://schemas.android.com/apk/res/android"
  android:id="@+id/map"
  android:layout_width="match_parent"
  android:layout_height="match_parent"
  class="com.google.android.gms.maps.SupportMapFragment"/>
再次补充说明(2013/3/9)
很荣幸,有很多朋友在本博文下留言提问。
但是有点抱歉的是,我也只是个初学者,很多问题我也不太懂,只是根据我的想法提出一些建议。
如果你的问题我没有回复,那么就说明我不知道怎么解答,见谅。
我是很希望能回答每一个人的问题的,但是有些我真的也不知道怎么回答,因为也比较忙,也没有时间把各种版本的AVD都试一试,最近关于Map开发的一些事也搁置了下来,所以关于API也没有多做什么深入研究。
下面是一些提问,以及我通常会给出的答案:
1.关于Key的生成:
生成Key的时候需要用到SHA-1指纹以及应用的包名。所以换了电脑或者重新创建项目之后都要重新申请Key。
另外这个Key也分Debug和Release两种,文中只讨论了Debug版本的Key。
可以参见原链接,得到更详细的解答:https://developers.google.com/maps/documentation/android/start
2.库的添加
google_play_services这个库的添加可以解决一些找不到类的问题。
当发生错误是ClassNotFoundException,并且是找不到com.google.android.gms这个包中的类时,请检查google_play_services库的添加。
3.包的安装
文中给出的两个包(Google Play Store和Google Play services的apk包)只是我实验的时候成功的版本,注意特定的AVD版本:Android4.1 API16,和特定的时间:2013年1月1日。
关于这个问题的更多讨论可以参见:http://stackoverflow.com/questions/13691943/this-app-wont-run-unless-you-update-google-play-services-via-bazaar
这个上面有不同版本的对应的包,毕竟不同设备好像不太一样。
或者直接Google一下你的问题,其实可以得到很多很靠谱的解答的。
另外,因为各种版本升级问题等,我给的安装包可能需要升级,随着时间的改变,Android的API以及Google Play Store和Google Play services都在升级,需要一些不同的尝试吧。
也欢迎各位把自己实验成功的API版本和安装包版本分享一下。
4.APIs的使用
关于Google Maps Android API v2的进一步使用,可以参见官方文档:https://developers.google.com/maps/documentation/android/
我也没用过v1,所以关于怎么对应的问题我也不知道。
关于定位不准或者API使用的问题,我也不懂了,尽量找时间研究吧,到时候会新发博文。
要学习的东西太多了,我得提高效率了。
各位祝好!
