Hexo搭建个人博客(二)——页面美化
写在前面:博主采用NexT.Mist v5.1.4版本主题,以下教程基于此版本进行配置。完成以下配置后,即可实现博客网站的全局设计,以后只需要专注于博客内容。如果需要增加或调整样式的,需要重新查阅相关资料进行配置。如果还没有搭建博客框架的小伙伴可以参考上一篇文章《Hexo搭建个人博客(一)——框架搭建》
目录
1、网站名称:
2、网站图标
3、顶部加载进度条
4、动态背景
5、红心点击效果
6、导航菜单
7、DaoVoice在线联系
8、搜索菜单
9、页脚
(1)建站时间
(2)网站访问统计
(3)图标更换
10、侧栏
(1)头像
(2)头像旋转动画
(3)社交链接
(4)推荐阅读
11、博客页面
(1)阅读统计
(2)来必力评论
(3)阅读结束
(4)修改博客底部标签号为图标
(5)文章底部增加版权信息
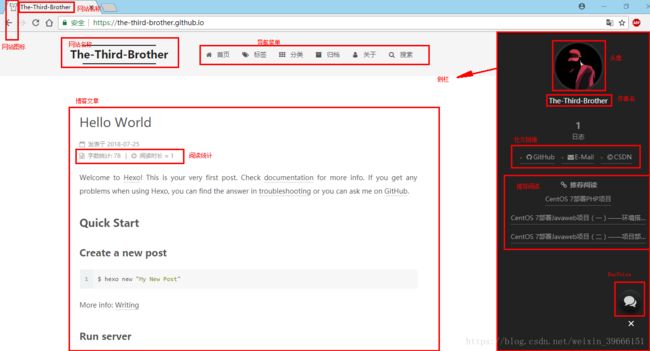
效果预览:现在开始从零美化博客页面,教程最终效果图
1、网站名称:
修改站点配置文件
2、网站图标
到easyicon中找一张(32*32)的ico图标,然后把图标放在/themes/next/source/images里,并且修改主题配置文件,更改一下路径即可
3、顶部加载进度条
修改主题配置文件,搜索Progress bar ,将pace: false改为pace: true即可,你还可以换不同样式的加载条,如下:
# Progress bar in the top during page loading.
pace: true
# Themes list:
#pace-theme-big-counter
#pace-theme-bounce
#pace-theme-barber-shop
#pace-theme-center-atom
#pace-theme-center-circle
#pace-theme-center-radar
#pace-theme-center-simple
#pace-theme-corner-indicator
#pace-theme-fill-left
#pace-theme-flash
#pace-theme-loading-bar
#pace-theme-mac-osx
#pace-theme-minimal
# For example
# pace_theme: pace-theme-center-simple
pace_theme: pace-theme-minimal
4、动态背景
在主题配置文件中找到canvas_nest: false,把它改为canvas_nest: true即可
5、红心点击效果
在/themes/next/source/js/src路径下新建一个love.js文件,添加以下代码:
!function(e,t,a){function n(){c(".heart{width: 10px;height: 10px;position: fixed;background: #f00;transform: rotate(45deg);-webkit-transform: rotate(45deg);-moz-transform: rotate(45deg);}.heart:after,.heart:before{content: '';width: inherit;height: inherit;background: inherit;border-radius: 50%;-webkit-border-radius: 50%;-moz-border-radius: 50%;position: fixed;}.heart:after{top: -5px;}.heart:before{left: -5px;}"),o(),r()}function r(){for(var e=0;e然后打开\themes\next\layout\_layout.swig文件,在末尾(在前面引用会出现找不到的bug)添加以下代码:
6、导航菜单
修改主题配置文件
 在站点根目录下,地址栏打开命令提示符,初始化相应页面,拿tags菜单举例,其他类似该操作。
hexo new page tags

这时站点根目录/source/下会产生一个tags文件夹,里边有一个index.md文件,用sublime或其他文本编辑器打开,在title下新增type属性,如:
---
title: tags
type: tags
date: 2018-07-25 16:31:02
---
7、DaoVoice在线联系
在DaoVoice注册账号,获取 app_id,打开/themes/next/layout/_partials/head.swig,写下如下代码
{% if theme.daovoice %}
{% endif %}接着打开主题配置文件,在最后写下如下代码:
# Online contact
daovoice: true
daovoice_app_id: 这里填你的刚才获得的 app_id
安装成功后可以在DaoVoice 控制台上的聊天设置里设置聊天窗口样式
DaoVoice控制台:http://dashboard.daovoice.io/app
具体设置请参考:https://hoxis.github.io/hexo-next-daovoice.html
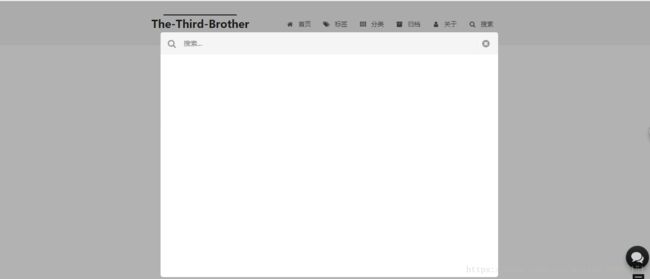
8、搜索菜单
安装插件:npm install hexo-generator-searchdb --save
在站点配置文件最后新增:
search:
  path: search.xml
  field: post
  format: html
  limit: 10000
修改主题文件,搜索local_search,将enable改为true
local_search:
  enable: true
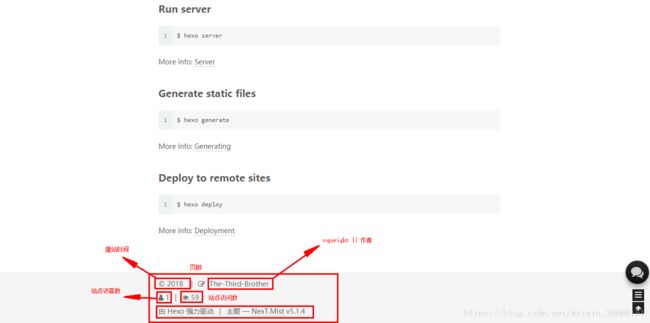
9、页脚
(1)建站时间
打开主题配置文件,搜索since,取消注释,将其设为当前年份,假设为2018。如果在2019查看,页面会显示为2018-2019
copyright || author:打开主题配置文件,搜索copyright,会有多个匹配结果,找到footer:下的copyright,如果在此处添加内容,则页脚显示copyright的内容。如果此处不设置内容,则显示站点配置文件下的author
(2)网站访问统计
打开\themes\next\layout\_partials\footer.swig文件,在最前面加上:
再在合适的地方插入以下代码:
(3)图标更换
打开themes/next/layout/_partials/footer.swig文件,找到途中红色区域对应的内容,在fontawesome里找到自己心仪的图标,复制其名称,粘贴替换下图红色区域内容即可
10、侧栏
(1)头像
打开主题配置文件,搜索Sidebar Avatar,找到其下的avatar,取消注释,将自己喜欢的头像放入\themes\next\source\images中,然后修改avatar图片路径即可
(2)头像旋转动画
打开\themes\next\source\css\_common\components\sidebar\sidebar-author.styl,在最后添加以下css样式
.site-author-image {
  display: block;
  margin: 0 auto;
  padding: $site-author-image-padding;
  max-width: $site-author-image-width;
  height: $site-author-image-height;
  border: $site-author-image-border-width solid $site-author-image-border-color;

  /* 头像圆形 */
  border-radius: 80px;
  -webkit-border-radius: 80px;
  -moz-border-radius: 80px;
  box-shadow: inset 0 -1px 0 #333sf;

  /* 设置循环动画 [animation: (play)动画名称 (2s)动画播放时长单位秒或微秒 (ase-out)动画播放的速度曲线为以低速结束
    (1s)等待1秒然后开始动画 (1)动画播放次数(infinite为循环播放) ]*/


  /* 鼠标经过头像旋转360度 */
  -webkit-transition: -webkit-transform 1.0s ease-out;
  -moz-transition: -moz-transform 1.0s ease-out;
  transition: transform 1.0s ease-out;
}

img:hover {
  /* 鼠标经过停止头像旋转
  -webkit-animation-play-state:paused;
  animation-play-state:paused;*/

  /* 鼠标经过头像旋转360度 */
  -webkit-transform: rotateZ(360deg);
  -moz-transform: rotateZ(360deg);
  transform: rotateZ(360deg);
}

/* Z 轴旋转动画 */
@-webkit-keyframes play {
  0% {
    -webkit-transform: rotateZ(0deg);
  }
  100% {
    -webkit-transform: rotateZ(-360deg);
  }
}
@-moz-keyframes play {
  0% {
    -moz-transform: rotateZ(0deg);
  }
  100% {
    -moz-transform: rotateZ(-360deg);
  }
}
@keyframes play {
  0% {
    transform: rotateZ(0deg);
  }
  100% {
    transform: rotateZ(-360deg);
  }
}
(3)社交链接
打开主题配置文件,搜索Social Links,取消注释之下的social:,修改或添加自己的社交链接即可,如
(4)推荐阅读
打开主题配置文件,搜索Blog rolls,修改相应内容,如:
11、博客页面
(1)阅读统计
在根目录下运行以下命令
npm install hexo-wordcount --save搜索后修改主题配置文件 ,如下:
# Post wordcount display settings
# Dependencies: https://github.com/willin/hexo-wordcount
post_wordcount:
  item_text: true
  wordcount: true
min2read: true然后更改样式,在字数统计后添加一个“字”,打开\themes\next\layout\_macro\post.swig 文件,搜索以下内容并添加进一个“字”
{{ wordcount(post.content) }} 字
在阅读时长后添加分钟,在同个文件中搜索以下内容并添加“分钟”
{{ min2read(post.content) }} 分钟
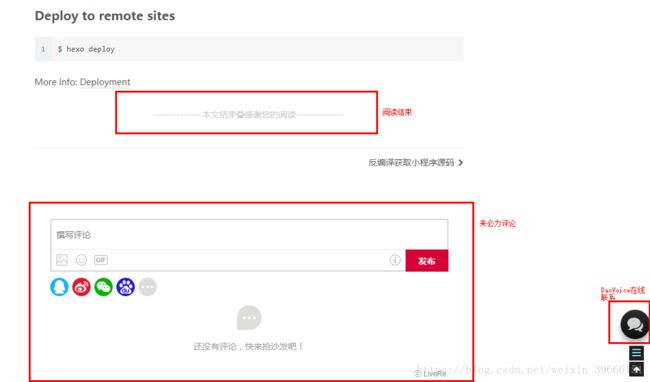
(2)来必力评论
livere官网注册后,复制其uid字段(具体过程请参照:《hexo博客优化之实现来必力评论功能》),打开/themes/next/_config.yml配置文件,定位到livere_uid字段,粘贴上刚刚复制的uid即可。浏览器预览效果时可能需要等待一点点时间才会显示来必力评论功能,所以一开始没有看到效果的小伙伴也不用慌,请给它一点时间,它将给你偌大惊喜。
(3)阅读结束
在\themes\next\layout\_macro 路径下新建 passage-end-tag.swig 文件,并添加以下内容:
    {% if not is_index %}
        -------------本文结束感谢您的阅读-------------
    {% endif %}
然后打开\themes\next\layout\_macro\post.swig文件,搜索post-footer,在post-footer 前两个div添加以下代码
  {% if not is_index %}
    {% include 'passage-end-tag.swig' %}
  {% endif %}
然后打开主题配置文件(_config.yml),在末尾添加:
# 文章末尾添加“本文结束”标记
passage_end_tag:
  enabled: true
(4)修改博客底部标签号为图标
打开/themes/next/layout/_macro/post.swig文件,搜索 rel="tag">#,将 # 换成
(5)文章底部增加版权信息
在next/layout/_macro/下添加 my-copyright.swig文件
{% if page.copyright %}
本文标题:{{ page.title }}
文章作者:{{ theme.author }}
发布时间:{{ page.date.format("YYYY年MM月DD日 - HH:MM") }}
最后更新:{{ page.updated.format("YYYY年MM月DD日 - HH:MM") }}
原始链接:{{ page.permalink }}
许可协议: 署名-非商业性使用-禁止演绎 4.0 国际 转载请保留原文链接及作者。
{% endif %}在next/source/css/_common/components/post/下添加my-post-copyright.styl文件:
.my_post_copyright {
  width: 85%;
  max-width: 45em;
  margin: 2.8em auto 0;
  padding: 0.5em 1.0em;
  border: 1px solid #d3d3d3;
  font-size: 0.93rem;
  line-height: 1.6em;
  word-break: break-all;
  background: rgba(255,255,255,0.4);
}
.my_post_copyright p{margin:0;}
.my_post_copyright span {
  display: inline-block;
  width: 5.2em;
  color: #b5b5b5;
  font-weight: bold;
}
.my_post_copyright .raw {
  margin-left: 1em;
  width: 5em;
}
.my_post_copyright a {
  color: #808080;
  border-bottom:0;
}
.my_post_copyright a:hover {
  color: #a3d2a3;
  text-decoration: underline;
}
.my_post_copyright:hover .fa-clipboard {
  color: #000;
}
.my_post_copyright .post-url:hover {
  font-weight: normal;
}
.my_post_copyright .copy-path {
  margin-left: 1em;
  width: 1em;
  +mobile(){display:none;}
}
.my_post_copyright .copy-path:hover {
  color: #808080;
  cursor: pointer;
}修改next/layout/_macro/post.swig,在代码
      {% if not is_index %}
        {% include 'wechat-subscriber.swig' %}
      {% endif %}
之前添加增加如下代码:
      {% if not is_index %}
        {% include 'my-copyright.swig' %}
      {% endif %}
修改next/source/css/_common/components/post/post.styl文件,在最后一行增加代码:
@import "my-post-copyright"此时,当你打开浏览器预览的时候你可能看不到效果,是因为我们还没有在/source/_post/目录中的.md文件头部添加copyright属性,如:
---
title: Hello World
copyright: true
---只有copyright为true时内容才会显示,如果我们需要以后创建的新的页面都自动生成该字段,/scaffolds/post.md文件中添加copyright这一属性,如下:
---
title: {{ title }}
date: {{ date }}
copyright: true
tags:
---
注意:之前生成过的页面需要手动添加copyright字段
参考文章:《hexo的next主题个性化教程:打造炫酷网站》
《hexo的next主题个性化配置教程》
《hexo next 配置 DaoVoice 实现在线聊天功能》


