Android肝帝战纪之基于上篇单Activity+多Fragment框架,开发电商式导航栏,多Fragment切换
电商式导航栏,多Fragment切换
本文默认在已经搭建好的框架上进行开发
点此链接到上一篇基础框架的搭建
界面构思示意图
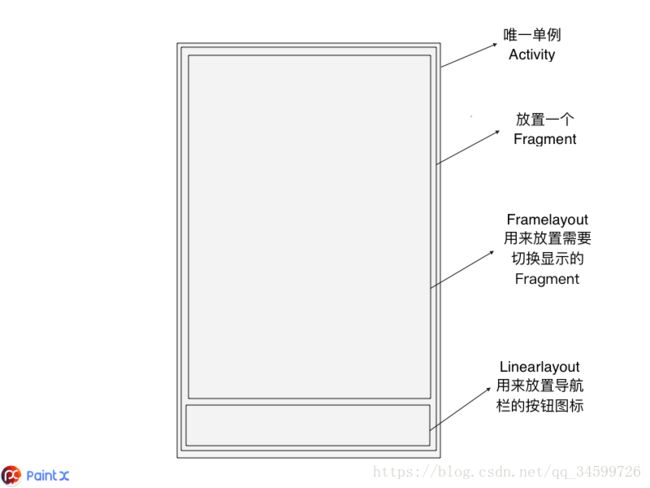
设计思路
在底部的LinearLayout中添加相应的图标,然后设置tag绑定相应的 Fragment数组对应的下标值,再点击切换的时候,根据获取到的tag值,取出数组中对应下标的Fragment,在通过相关方法显示。
封装目标:只需添加相应的按钮对象和相应的视图即可,然后在Activity中显示即可。先创建可切换的Fragment的基类BottomItemFragment(实现一个双击退出功能)
// 定义为抽象类即每个itemfragment的基类
public abstract class BottomItemFragment extends MyFragment implements View.OnKeyListener{
    // 当前按下返回按钮的时间
    private long mExitTime = 0;
    // 双击返回键之间的延迟
    private static final int EXIT_TIME = 2000;

    @Override
    public void onResume(){
        super.onResume();
        View rootView = getView();
        // 防止双击退出失效
        if (rootView!=null){
            rootView.setFocusableInTouchMode(true);
            rootView.requestFocus();
            rootView.setOnKeyListener(this);
        }
    }

    @Override
    public boolean onKey(View v, int keyCode, KeyEvent event){
        if (keyCode == KeyEvent.KEYCODE_BACK && event.getAction() == KeyEvent.ACTION_DOWN){
            if ((System.currentTimeMillis() - mExitTime) > EXIT_TIME) {
                Toast.makeText(getContext(), "双击退出", Toast.LENGTH_SHORT).show();
                mExitTime = System.currentTimeMillis();
            } else {
                _mActivity.finish();
                if (mExitTime != 0) {
                    mExitTime = 0;
                }
            }
            return true;
        }
    }
}- 底部导航栏按钮对象的封装(这边的icon用的是字体图标,不明白的请移步我的博客)
- 字体图标库的使用链接
public final class BottomTabBean {
    private final CharSequence ICON;
    private final CharSequence TITLE;

    public BottomTabBean(CharSequence ICON, CharSequence TITLE){
        this.ICON = ICON;
        this.TITLE = TITLE;
    }

    public CharSequence getICON(){
        return ICON;
    }
    public CharSequence getTITLE(){
        return TITLE;
    }
}- 新建一个ItemBuilder,目的是用来把每一个Fragment和底部的按钮对象进行绑定组装进一个LinkedHashMap的集合
public final class ItemBuilder{
    private final LinkedHashMap ITEMS = new LinkedHashMap<>();

    static ItemBuilder builder(){
        return new ItemBuilder();
    }

    public final ItemBuilder addItem(BottomTabBean bean, BottomItemDelegate delegate){
        ITEMS.put(bean, delegate);
        return this;
    }

    public final ItemBuilder addItems(LinkedHashMap items){
        ITEMS.putAll(items);
        return this;
    }

    public final LinkedHashMap build(){
        return ITEMS;
    }
} - 接下来贴两个布局文件,一个是根Fragment的布局,其实就是一个FrameLayout加上一个底部按钮的LinearLayout
<RelativeLayout xmlns:android="http://schemas.android.com/apk/res/android"
    android:layout_width="match_parent"
    android:layout_height="match_parent">

    <android.support.v7.widget.ContentFrameLayout
        android:id="@+id/bottom_bar_delegate_container"
        android:layout_above="@+id/bottom_bar"
        android:layout_width="match_parent"
        android:layout_height="match_parent"/>

    <android.support.v7.widget.LinearLayoutCompat
        android:id="@+id/bottom_bar"
        android:layout_width="match_parent"
        android:layout_alignParentBottom="true"
        android:orientation="horizontal"
        android:layout_height="60dp"/>

RelativeLayout>- 然后是底部按钮的item布局
<RelativeLayout xmlns:android="http://schemas.android.com/apk/res/android"
    android:layout_width="0dp"
    android:layout_height="match_parent"
    android:layout_weight="1"
    android:paddingBottom="6dp"
    android:paddingTop="6dp">

    <com.joanzapata.iconify.widget.IconTextView
        android:id="@+id/icon_bottom_item"
        android:layout_width="match_parent"
        android:layout_height="wrap_content"
        android:layout_alignParentTop="true"
        android:layout_centerHorizontal="true"
        android:gravity="center"
        android:textSize="25sp" />

    <android.support.v7.widget.AppCompatTextView
        android:id="@+id/tv_bottom_item"
        android:layout_width="match_parent"
        android:layout_height="wrap_content"
        android:layout_alignParentBottom="true"
        android:layout_centerHorizontal="true"
        android:gravity="center" />

RelativeLayout>- 万事俱备,接下来就是新建一个BaseBottomFragment,将页面进行组装
public abstract class BaseBottomFragment extends MyFragment implements View.OnClickListener {
    // 将传过来的LinkedHashMap集合里面的键值对拆分之后,分别存入两个ArrayList
    private final ArrayList TAB_BEAN = new ArrayList<>();
    private final ArrayList ITEM_FRAGMENT = new ArrayList<>();

    // 定义一个LinkedHashMap接受传过来的页面数据
    private final LinkedHashMap ITEMS = new LinkedHashMap<>();

    // 当前显示fragment的页面标记
    private int mCurrentFragment = 0;
    // 首次加载页面时显示的主页标记 = 0
    private int mIndexFragment = 0;

    // 点击之后按钮显示的颜色
    private int mClickColor = Color.RED;

    //对子类提供的设置的抽象方法
    // 让子类传入布局所需要的按钮和布局
    public abstract LinkedHashMap setItems(ItemBuilder itemBuilder);
    // 让子类传入设置首次加载的主页
    public abstract int setIndexDelegate();
    // 让子类传入设置点击之后按钮的颜色
    @ColorInt
    public abstract int setClickColor();

    @Override
    public Object setLayout() {
        return R.layout.delegate_bottom;
    }
    // ButterKnife绑定,自己去Github上看使用的方法,我这边是在Android Library里面使用的,所以是R2文件
    @BindView(R2.id.bottom_bar)
    LinearLayoutCompat mBottomBar = null;

    @Override
    public void onCreate(@Nullable Bundle savedInstanceState) {
        super.onCreate(savedInstanceState);
        mIndexDelegate = setIndexDelegate();
        if (setClickColor()!=0){
            mClickColor = setClickColor();
        }

        final ItemBuilder builder = ItemBuilder.builder();
        final LinkedHashMap items = setItems(builder);

        ITEMS.putAll(items);
        // for 循环取出ITEMS中的键值对的值
        for(Map.Entry item:ITEMS.entrySet()){
            final BottomTabBean key = item.getKey();
            final BottomItemDelegate value = item.getValue();
            TAB_BEANS.add(key);
            ITEM_DELEGATES.add(value);
        }
    }

    @Override
    public void onBindView(@Nullable Bundle saveInstanceState, View rootView){
        final size = ITEMS.size();
        // for循环填充底部布局,比较核心的内容
        for(int i = 0 ;i < size; i++){
            LayoutInflater.from(getContext()).inflate(R.layout.bottom_item_icon_text_layout, mBottomBar);
            final RelativeLayout item = mBottomBar.getChildAt(i);
            // 设置tag
            item.setTag(i);
            item.setOnClickListener(this);
            final IconTextView itemIcon = (IconTextView)item.getChildAt(0);
            final AppCompatTextView itemTitle = (AppCompatTextView)item.getChildAt(1);
            final BottomTabBean bean = TAB_BEAN.get(i);
            itemIcon.setText(bean.getICON());
            itemTitle.setText(bean.getTITLE());
            if (i == mIndexFragment){
                itemIcon.setTextColor(mClickColor);
                itemTitle.setTextColor(mClickColor);
            }
        }
        // 将fragments的ArrayList转化为SupportFragment的数组,框架需要
        final SupportFragment[] fragmentArray = ITEM_FRAGMENTS.toArray(new SupportFragment[size]);
        // Fragmentation提供的设置方法
        loadMultipleRootFragment(R.id.bottom_bar_delegate_container, mIndexFragment, fragmentArray);
    }

    // 重置按钮的颜色
    private void resetColor() {
        final int count = mBottomBar.getChildCount();
        for (int i = 0; i < count; i++) {
            final RelativeLayout item = (RelativeLayout) mBottomBar.getChildAt(i);
            final IconTextView itemIcon = (IconTextView) item.getChildAt(0);
            itemIcon.setTextColor(Color.GRAY);
            final AppCompatTextView itemTitle = (AppCompatTextView) item.getChildAt(1);
            itemTitle.setTextColor(Color.GRAY);
        }
    }

    // 点击之后重新导入delegate,设置按钮的颜色
    @Override
    public void onClick(View view) {
        final int tag = (int) view.getTag();
        resetColor();
        final RelativeLayout item = (RelativeLayout) view;
        final IconTextView itemIcon = (IconTextView) item.getChildAt(0);
        itemIcon.setTextColor(mClickColor);
        final AppCompatTextView itemTitle = (AppCompatTextView) item.getChildAt(1);
        itemTitle.setTextColor(mClickColor);
        // Fragmentation提供的方法
        showHideFragment(ITEM_DELEGATES.get(tag), ITEM_DELEGATES.get(mCurrentDelegate));
        mCurrentDelegate = tag;
    }
} - 至此,封装完成,底部带导航栏的多Fragment界面已经ok了,接下来就是新建一个底部导航栏的实例,将数据填充进去就OK了
public class MyBottomFragment extends BaseBottomFragment{
    @Override
    public LinkedHashMap setItems(ItemBuilder itemBuilder) {
        final LinkedHashMap items = new LinkedHashMap<>();
        items.put(new BottomTabBean("{fa-home}","主页"),new IndexFragment());
        items.put(new BottomTabBean("{fa-sort}","分类"),new SortFragment());
        items.put(new BottomTabBean("{fa-compass}","发现"),new IndexFragment());
        items.put(new BottomTabBean("{fa-shopping-cart}","购物车"),new IndexFragment());
        items.put(new BottomTabBean("{fa-user}","我的"),new IndexFragment());

        return itemBuilder.addItems(items).build();
    }

    @Override
    public int setIndexDelegate() {
        return 0;
    }

    @Override
    public int setClickColor() {
        return Color.parseColor("#FF0000");
    }
} - 最后在单一的Activity中的setRootFragment方法中设置MyBottomFragment页面,显示即可。