Django教程——入门阶段(二)模拟登陆
写在前面
这一系列的博客适用于零基础的想要使用Django开发网页的人,由浅至深,分为入门,进阶,技巧三个篇章。
(三)模型类
1.用途
完成和数据库的交互
2.逻辑
我们假设有一个登录逻辑,用户需要输入用户名和密码才能够访问网站主页。那么数据库中就必须存储用户名和密码的信息。
3.操作
第一步:
在应用SimpleWebsite的models.py中写入如下代码
   class User(models.Model):
        Uname = models.CharField(max_length=20)
        Upassword = models.CharField(max_length=20)
注解:
1.Django中就是用类去操作数据库,不用写SQL语言,底层的机制会直接帮你做好转换(当然会有一定的效率损失)。
2.这里定义一个User类,继承的model.Model
这是套路,可以先这么写,不用管为啥
然后有Uname和Upassword两个属性,规定为
model.CharField类型,最大长度是20
3.一般来说,在数据库中都会加一个唯一标识字段——id,Django的模型类中会自动添加这个id字段,所以代码中不加也无妨,数据库中其实是有这个id字段的。
第二步:
输入控制台命令
1.python manage.py makemigrations
2.python manage.py migrate
注解:
1.仅仅在models.py中定义是不够的,还需要将改变迁移到数据库中,这里先采用Django自带的数据库(回头说和mysql的连接)
2.首先形成迁移你可以看到做出的新的改变,确认无误后完成正式迁移,这也是Django的优势之处,对于数据库的改变这样复杂的操作实际两下命令行就OK了
(四)视图
1.用途
完成和用户的交互
2.逻辑
还是刚刚的那个登录逻辑,用户如果有账号密码就可以直接登录,没有就需要注册
3.操作
第一步:配路由
1.在SimpleWebsite文件夹下新建urls.py文件夹
2.在主文件的urls.py中
添加include模块
然后再加入一条path
from django.contrib import admin
from django.urls import path,include

urlpatterns = [
    path('admin/', admin.site.urls),
    path('',include('SimpleWebsite.urls'))
]
3.在SimpleWebsite文件夹的urls.py下,写入如下代码
from . import views
from django.urls import path

urlpatterns = [
    path('',views.index),
]
第二步:写视图
1.在应用SimpleWebsite的views.py中先写一个简单的函数测试到目前为止是否正确
from django.shortcuts import render
from django.http import HttpResponse

def index(request):
    return HttpResponse("Hello world")
注意:函数中的request参数是必须的
2.在控制台输入
python manage.py runserver
网页显示如下表示到现在一切都正常

3.配置模板
在templates文件夹下新建与应用同名的文件夹SimpleWebsite
新建一个名为Index的HTML文件,写上Hello!
在views.py中修改如下
from django.shortcuts import render
# from django.http import HttpResponse
def index(request):
    # return HttpResponse("hello world")
    return render(request,'SimpleWebsite/Index.html')
render这个函数意为渲染,后面的都是套路,记着就行。
再此输入python manage.py runserver测试有无问题
4.修改Index.html如下
<html lang="en">
<head>
    <meta charset="UTF-8">
    <title>Hello World!title>
head>
<body>

<form method="post">
    用户名:
    <input type="text" name="Uname">
    密码:
    <input type="password" name="Upassword">

   <input type="submit" value="登录">
    <br/>
form>

body>
html>
前端的美化什么的不属于Django的重点,放到后面单独说,这里用最朴素的页面。
写到这里发现用户根本就没有账号和密码(当然可以自己再控制台里输入,不过这样就没什么意思了)所以类似于刚才的操作再写一个注册逻辑。
5.写注册逻辑
(1)写url
from . import views
from django.urls import path

urlpatterns = [
    path('',views.index),
    path('register/',views.register)
]
(2)创建Register.html,写注册页面
<html lang="en">
<head>
    <meta charset="UTF-8">
    <title>Registertitle>
head>
<body>
    <form method="post">
        用户名:
        <input type="text" name="Uname">
        密码:
        <input type="password" name="Upassword">
        <input type="submit" value="创建账户">
    form>
body>
html>
(3)写视图,处理数据
from django.shortcuts import render,redirect
from SimpleWebsite import models
# from django.http import HttpResponse
def index(request):
    # return HttpResponse("hello world")
    return render(request,'SimpleWebsite/Index.html')

def register(request):
    if request.method == 'GET':
        return render(request,'SimpleWebsite/Register.html')
    if request.method == 'POST:
        Uname = request.POST.get('Uname')
        Upassword = request.POST.get('Upassword')
        models.User.objects.create(Uname=Uname,Upassword=Upassword)
        return redirect('/')
注解:
1.这里引入的redirect意为重定向,关于它的具体用法会在后面解答,这里只要知道它的用处是回到登录界面就行了。
2.request的用处此刻用上了,它就是用于传递前端发过来的数据
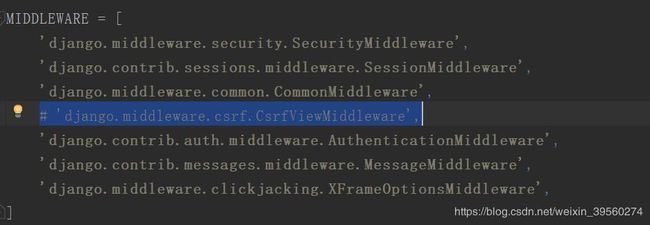
3.为了避免跨页保护,需要关闭它,将下图中的那一行注释掉即可。
关于csrf以及Django的保护后面会在Django的安全机制中详细说,入门阶段很多知识点被漏掉了,只是降低难度,不代表它不重要。
 6.写登陆逻辑
既然有了账号密码,那就可以自然的写登陆逻辑了。
from django.shortcuts import render,redirect
from SimpleWebsite import models
from django.http import HttpResponse
def index(request):
    # return HttpResponse("hello world")
    if request.method == 'GET':
        return render(request,'SimpleWebsite/Index.html')
    if request.method == 'POST':
        Uname = request.POST.get('Uname')
        Upassword = request.POST.get('Upassword')
        if models.User.objects.filter(Uname=Uname,Upassword=Upassword):
            return HttpResponse('登录成功')
        else:
            return HttpResponse('登录失败')

def register(request):
    if request.method == 'GET':
        return render(request,'SimpleWebsite/Register.html')
    if request.method == 'POST':
        Uname = request.POST.get('Uname')
        Upassword = request.POST.get('Upassword')
        models.User.objects.create(Uname=Uname,Upassword=Upassword)
        return redirect('/')
网页中再加入一个注册链接
<html lang="en">
<head>
    <meta charset="UTF-8">
    <title>Hello World!title>
head>
<body>

<form method="post">
    用户名:
    <input type="text" name="Uname">
    密码:
    <input type="password" name="Upassword">

   <input type="submit" value="登录">
    <br/>
form>
<a href="register/">注册a>
body>
html>
到这儿,一个简单的小应用就搭建起来了,可能对于新手来说还有很多搞不定的,比如POST,GET方法,模型类的操作,request的应用等等,后面会慢慢说。
写在后面
水平有限,如有错误或者不足之处,望不吝赐教。