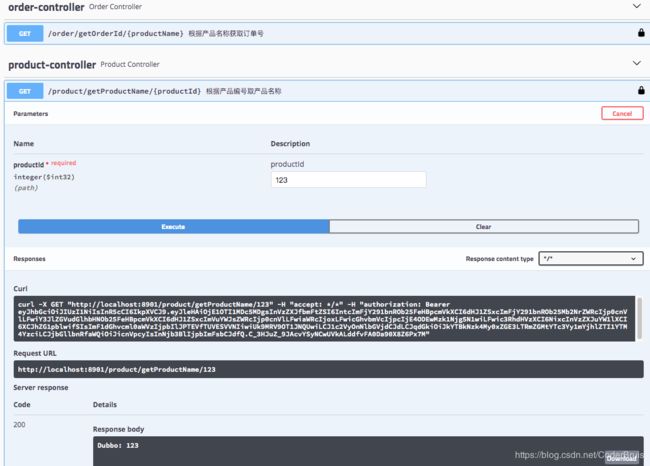
实战电商后端系统(一)—— 项目搭建以及Dubbo+SpringBoot+Oauth2+Swagger2的集成
文章目录
- 前言
- 正文
- 1. 项目工程目录介绍
- 2. 搭建oauth服务,提供OAuth2的认证和授权功能
- 2.1 配置WebSecurity类型的安全配置类
- 2.2 配置认证服务器相关的安全配置类
- 2.3 配置资源服务器相关的安全配置类
- 2.4 配置Swagger整合OAuth2的配置类
- 3. 搭建product和order服务
- 3.1 引入api服务的接口并实现
- 4. 搭建gateway服务
- 4.1 配置资源服务器配置类
- 4.2 引入Swagger2相关配置类
- 4.3 Swagger OAuth2 跨域认证
- 5. 效果展示
- 5.1 oauth服务本身的Swagger OAuth2认证
- 5.2 gateway服务的Swagger OAuth2跨域认证
- 5.3 通过nginx来解决跨域
- 相关文章
前言
本系统技术栈用到了Dubbo、Zookeeper、SpringBoot、Oauth2、Swagger、Nginx,项目刚开始起步,每完成一个大功能都会专门写一篇博文来记录技术细节以及遇到的技术难点,如项目中有哪些设计或者架构不太正确的地方,请大家在留言区中提出,互相学习~
光学习理论源码不动手实践是不得行的,阅读底层源码能力上来了,编码工程能力也要齐头并进!!
正文
1. 项目工程目录介绍
先声明下版本:
SpringBoot: 2.1.14.RELEASE
Dubbo: 2.6.2
Zookeeper: 3.4.6
OAuth2: 2.3.5
Swagger2: 2.9.2

项目刚起步,模块也比较简单明了,api模块定义了服务的接口定义,core模块定义了需要用到的pojo、model、dto以及公共组件、工具类等。gateway表示的是网关服务,外部访问系统统一走网关。oauth服务用于提供基于oauth2的认证和授权服务,所有走网关的接口请求都需要经过oauth2服务的认证、授权。order和product服务就是写业务服务的模块。
关于如何创建子模块,通过右键dubboproject工程——>New——>Module,然后选择maven
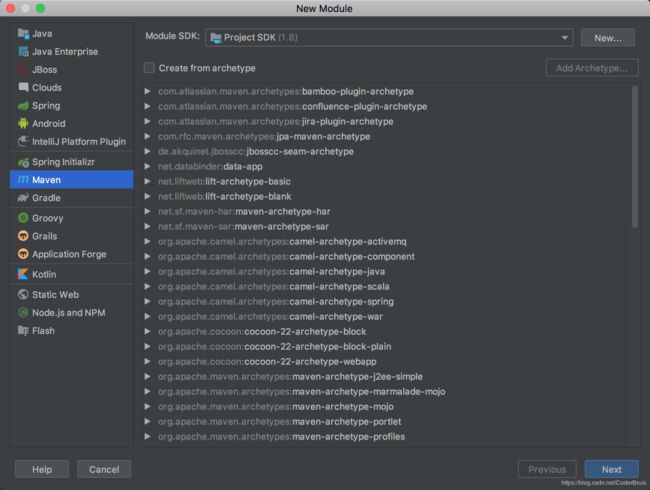
比如此处我们需要新建一个backend模块。
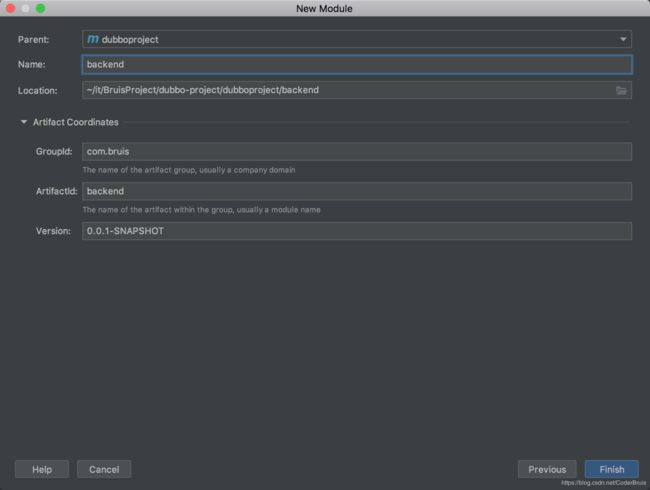
此时,backend服务已经创建成功了。
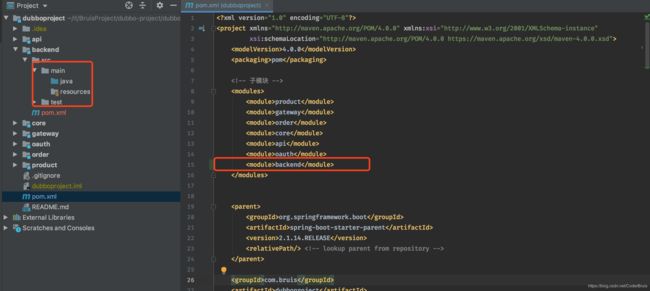
可以看到backend已经导入了父pom.xml引入的相关依赖了
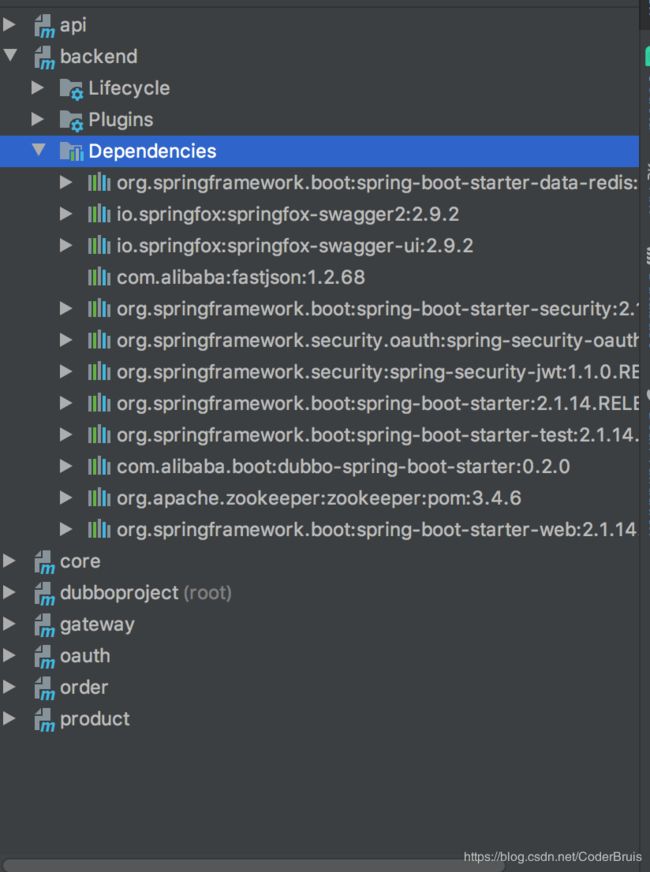
看下父pom.xml的配置内容:
    4.0.0
    pom


        product
        gateway
        order
        core
        api
        oauth


        org.springframework.boot
        spring-boot-starter-parent
        2.1.14.RELEASE


    com.bruis
    dubboproject
    0.0.1-SNAPSHOT
    dubboproject
    dubboproject


        1.8


            org.springframework.boot
            spring-boot-starter-data-redis


            io.springfox
            springfox-swagger2
            2.9.2


            io.springfox
            springfox-swagger-ui
            2.9.2


            com.alibaba
            fastjson
            1.2.68


            org.springframework.boot
            spring-boot-starter-security


            org.springframework.security.oauth
            spring-security-oauth2
            2.3.5.RELEASE


            org.springframework.security
            spring-security-jwt
            1.1.0.RELEASE


            org.springframework.boot
            spring-boot-starter


            org.springframework.boot
            spring-boot-starter-test
            test


            com.alibaba.boot
            dubbo-spring-boot-starter
            0.2.0


            org.apache.zookeeper
            zookeeper
            3.4.6
            pom


            org.springframework.boot
            spring-boot-starter-web


                org.springframework.boot
                spring-boot-maven-plugin
2. 搭建oauth服务,提供OAuth2的认证和授权功能
搭建oauth服务的目的是为了希望各个服务都是受保护的,只有通过合法的认证信息才能访问相关资源,所以这里借助SpringSecurity+OAuth2来搭建一个给各个服务发放访问令牌的认证服务器oauth服务。
由于网上已经有很多OAuth2相关知识内容的博客了,这里就不再赘述了。

(这里给读者提供了一个白嫖OAuth2的学习视频白嫖OAuth2学习视频)
2.1 配置WebSecurity类型的安全配置类
首先得配置一个WebSecurity类型的安全配置类,在oauth服务下的config包中,定义了WebSecurityConfig类,代码如下:
package com.bruis.oauth.config;

import org.springframework.beans.factory.annotation.Autowired;
import org.springframework.context.annotation.Bean;
import org.springframework.core.annotation.Order;
import org.springframework.security.authentication.AuthenticationManager;
import org.springframework.security.config.annotation.authentication.builders.AuthenticationManagerBuilder;
import org.springframework.security.config.annotation.web.builders.HttpSecurity;
import org.springframework.security.config.annotation.web.configuration.EnableWebSecurity;
import org.springframework.security.config.annotation.web.configuration.WebSecurityConfigurerAdapter;
import org.springframework.security.core.userdetails.UserDetailsService;
import org.springframework.security.crypto.bcrypt.BCryptPasswordEncoder;
import org.springframework.security.crypto.password.PasswordEncoder;
import org.springframework.security.oauth2.provider.error.OAuth2AccessDeniedHandler;


/**
 * @author LuoHaiYang
 */
@Order(2)
@EnableWebSecurity
public class WebSecurityConfig extends WebSecurityConfigurerAdapter {

    /**
     * 自定义用户服务类、用于用户名、密码校验、权限授权
     */
    @Autowired
    private UserDetailsService userDetailsService;

    @Override
    protected void configure(AuthenticationManagerBuilder auth) throws Exception {
        auth.userDetailsService(userDetailsService).passwordEncoder(passwordEncoder());
    }

    @Override
    @Bean
    public AuthenticationManager authenticationManagerBean() throws Exception {
        return super.authenticationManagerBean();
    }

    /**
     * 安全拦截机制
     * @param http
     * @throws Exception
     */
    @Override
    protected void configure(HttpSecurity http) throws Exception {
        http.csrf().disable()
                .requestMatchers().anyRequest()
                .and()
                .authorizeRequests()
                .antMatchers("/oauth/**").permitAll() //oauth下的所有方法,无须认证
                .and().exceptionHandling().accessDeniedHandler(new OAuth2AccessDeniedHandler());
    }


    /**
     * 密码加密策略
     * @return
     */
    @Bean
    public PasswordEncoder passwordEncoder() {
        return new BCryptPasswordEncoder();
    }
}
2.2 配置认证服务器相关的安全配置类
紧接着就要配置认证服务器配置类:AuthorizationServerConfiguration,该类用于进行认证和授权。
package com.bruis.oauth.config;

import org.springframework.beans.factory.annotation.Autowired;
import org.springframework.context.annotation.Bean;
import org.springframework.context.annotation.Configuration;
import org.springframework.data.redis.connection.RedisConnectionFactory;
import org.springframework.http.HttpMethod;
import org.springframework.security.authentication.AuthenticationManager;
import org.springframework.security.core.userdetails.UserDetailsService;
import org.springframework.security.crypto.password.PasswordEncoder;
import org.springframework.security.oauth2.config.annotation.configurers.ClientDetailsServiceConfigurer;
import org.springframework.security.oauth2.config.annotation.web.configuration.AuthorizationServerConfigurerAdapter;
import org.springframework.security.oauth2.config.annotation.web.configuration.EnableAuthorizationServer;
import org.springframework.security.oauth2.config.annotation.web.configurers.AuthorizationServerEndpointsConfigurer;
import org.springframework.security.oauth2.config.annotation.web.configurers.AuthorizationServerSecurityConfigurer;
import org.springframework.security.oauth2.provider.token.DefaultTokenServices;
import org.springframework.security.oauth2.provider.token.ResourceServerTokenServices;
import org.springframework.security.oauth2.provider.token.TokenStore;
import org.springframework.security.oauth2.provider.token.store.JwtAccessTokenConverter;
import org.springframework.security.oauth2.provider.token.store.JwtTokenStore;
import org.springframework.security.oauth2.provider.token.store.redis.RedisTokenStore;

import java.util.UUID;


/**
 * @author LuoHaiYang
 *
 * 开启授权服务器
 *
 */
@Configuration
@EnableAuthorizationServer
public class AuthorizationServerConfiguration extends AuthorizationServerConfigurerAdapter {

    /**
     * 设置jwt加密key
     */
    private static final String JWT_SIGNING_KEY = "jwt_MC43A6m0Xt9jUIV";

    /**
     * 认证方式
     */
    @Autowired
    private AuthenticationManager authenticationManager;

    /**
     * 自定义用户服务
     */
    @Autowired
    private UserDetailsService userDetailsService;

    @Autowired
    private PasswordEncoder passwordEncoder;

    @Autowired
    private RedisConnectionFactory redisConnectionFactory;

    /**
     * 配置客户端对应授权方式及客户端密码
     * 当前使用内存模式
     *
     * withClient + secret需要进行base64为加密:
     *
     * 明文:bruis:123456    BASE64:
     *
     */
    @Override
    public void configure(ClientDetailsServiceConfigurer clients) throws Exception {
        clients.inMemory()
                .withClient("bruis")
                .secret(passwordEncoder.encode("123456"))
                .authorizedGrantTypes("password", "refresh_token")
                .scopes("all");
    }

    @Override
    public void configure(AuthorizationServerEndpointsConfigurer endpoints) throws Exception {
        endpoints.tokenStore(tokenStore())
                .authenticationManager(authenticationManager)
                .accessTokenConverter(accessTokenConverter())
                .allowedTokenEndpointRequestMethods(HttpMethod.GET, HttpMethod.POST)  //支持GET  POST  请求获取token
                .userDetailsService(userDetailsService) //必须注入userDetailsService否则根据refresh_token无法加载用户信息
//                .exceptionTranslator(customWebResponseExceptionTranslator)
                .reuseRefreshTokens(true);  //开启刷新token
    }

    /**
     * 认证服务器的安全配置
     *
     * @param security
     * @throws Exception
     */
    @Override
    public void configure(AuthorizationServerSecurityConfigurer security) throws Exception {
        security
                .tokenKeyAccess("permitAll()")
                .checkTokenAccess("isAuthenticated()") //isAuthenticated():排除anonymous   isFullyAuthenticated():排除anonymous以及remember-me
                .allowFormAuthenticationForClients();  //允许表单认证
    }


    /**
     * jwt令牌增强,添加加密key
     */
    @Bean
    public JwtAccessTokenConverter accessTokenConverter() {
        JwtAccessTokenConverter converter = new JwtAccessTokenConverter();
        converter.setSigningKey(JWT_SIGNING_KEY);
        return converter;
    }

    /**
     * 使用JWT存储令牌信息
     * @return
     */
    @Bean
    public TokenStore tokenStore() {
        RedisTokenStore redisTokenStore = new RedisTokenStore(redisConnectionFactory);
        // 解决每次生成的 token都一样的问题
        redisTokenStore.setAuthenticationKeyGenerator(oAuth2Authentication -> UUID.randomUUID().toString());
        return redisTokenStore;
    }

    /**
     * token认证服务
     */
    @Bean
    public ResourceServerTokenServices tokenService() {
        // 授权服务和资源服务在统一项目内,可以使用本地认证方式,如果再不同工程,需要使用远程认证方式
        DefaultTokenServices defaultTokenServices = new DefaultTokenServices();
        defaultTokenServices.setTokenStore(tokenStore());
        defaultTokenServices.setSupportRefreshToken(true);
        return defaultTokenServices;
    }

}
2.3 配置资源服务器相关的安全配置类
配置一个资源服务器的安全配置类。
package com.bruis.oauth.config;

import org.springframework.beans.factory.annotation.Autowired;
import org.springframework.context.annotation.Configuration;
import org.springframework.security.config.annotation.web.builders.HttpSecurity;
import org.springframework.security.oauth2.config.annotation.web.configuration.EnableResourceServer;
import org.springframework.security.oauth2.config.annotation.web.configuration.ResourceServerConfigurerAdapter;
import org.springframework.security.oauth2.config.annotation.web.configurers.ResourceServerSecurityConfigurer;
import org.springframework.security.oauth2.provider.token.ResourceServerTokenServices;

/**
 * @author LuoHaiYang
 *
 * 资源服务器配置
 *
 */
@Configuration
@EnableResourceServer
public class ResourceServerConfiguration extends ResourceServerConfigurerAdapter {
    private static final String RESOURCE_ID = "ALL";

    @Autowired
    private ResourceServerTokenServices tokenServices;

    /**
     * 验证令牌配置
     * RESOURCE_ID 必须和授权服务器中保持一致
     * @param config
     */
    @Override
    public void configure(ResourceServerSecurityConfigurer config) {
        config.resourceId(RESOURCE_ID)
                .tokenServices(tokenServices)
                .stateless(true);
    }


    @Override
    public void configure(HttpSecurity http) throws Exception {
        http
                .authorizeRequests()
                .antMatchers("/users/**").authenticated() //配置users访问控制,必须认证过后才可以访问
                .antMatchers("/test/**").permitAll() //配置test无须认证,可以匿名访问
                .antMatchers("/webjars/**", "/resources/**", "/swagger-ui.html"
                        , "/swagger-resources/**", "/v2/api-docs", "index.html").permitAll()
                .anyRequest().authenticated();
    }

}
2.4 配置Swagger整合OAuth2的配置类
由于Swagger整合OAuth2时,由于也需要进行认证操作,所以需要配置一下两个类:SwaggerAutoConfiguration和Swagger2Config
package com.bruis.oauth.config;

import org.springframework.context.annotation.Configuration;
import org.springframework.web.servlet.config.annotation.ResourceHandlerRegistry;
import org.springframework.web.servlet.config.annotation.WebMvcConfigurerAdapter;

/**
 * @author LuoHaiYang
 */
@Configuration
public class SwaggerAutoConfiguration extends WebMvcConfigurerAdapter {

    /**
     * 因为swagger-ui.html 是在springfox-swagger-ui.jar里的,
     * 修改了路径后,Spring Boot不会自动把/swagger-ui.html这个路径映射到对应的目录META-INF/resources/下面,
     * 所以需要修改springboot配置类,为swagger建立新的静态文件路径映射就可以了
     * @param registry
     */
    @Override
    public void addResourceHandlers(ResourceHandlerRegistry registry) {
        registry.addResourceHandler("swagger-ui.html")
                .addResourceLocations("classpath:/META-INF/resources/");
        registry.addResourceHandler("/webjars/**")
                .addResourceLocations("classpath:/META-INF/resources/webjars/");

    }

}
package com.bruis.oauth;

import org.springframework.context.annotation.Bean;
import org.springframework.context.annotation.Configuration;
import springfox.documentation.builders.ApiInfoBuilder;
import springfox.documentation.builders.OAuthBuilder;
import springfox.documentation.builders.PathSelectors;
import springfox.documentation.builders.RequestHandlerSelectors;
import springfox.documentation.service.*;
import springfox.documentation.spi.DocumentationType;
import springfox.documentation.spring.web.plugins.Docket;
import springfox.documentation.swagger2.annotations.EnableSwagger2;
import springfox.documentation.spi.service.contexts.SecurityContext;

import java.util.Arrays;
import java.util.Collections;

/**
 * @author LuoHaiYang
 */
@Configuration
@EnableSwagger2
public class Swagger2Config {

    private static final String VERSION = "1.0";
    private static final String TITLE = "分布式电商授权服务接口文档";
    private static final String DESCRIPTION = "接口文档";
    private static final String BASEPACKAGE = "com.bruis.oauth.controller";
    private static final String SERVICE_URL = "http://localhost:8902";

    private static final String CLIENT_ID = "swagger";
    private static final String CLIENT_SECRET = "123456";
    private static final String GRANT_TYPE = "password";
    private static final String SCOPE = "test";


    @Bean
    public Docket createRestApi(){
        return new Docket(DocumentationType.SWAGGER_2).apiInfo(apiInfo())
//                .enable(true)
                .select()
                // 所有ApiOperation注解的方法,生成接口文档
                //.apis(RequestHandlerSelectors.withMethodAnnotation(ApiOperation.class))
                .apis(RequestHandlerSelectors.basePackage(BASEPACKAGE))
                .paths(PathSelectors.any())
                .build()
                .securitySchemes(Collections.singletonList(securityScheme()))
                .securityContexts(Collections.singletonList(securityContext()));
    }

    private ApiInfo apiInfo() {
        return new ApiInfoBuilder()
                .title(TITLE)
                .description(DESCRIPTION)
                .termsOfServiceUrl(SERVICE_URL)
                .version(VERSION)
                .build();
    }

    /**
     * 设置安全策略
     * @return
     */
    private SecurityScheme securityScheme() {
        GrantType grantType = new ResourceOwnerPasswordCredentialsGrant("http://localhost:8902/oauth/token");
        return new OAuthBuilder()
                .name("OAuth2")
                .grantTypes(Collections.singletonList(grantType))
                .scopes(Arrays.asList(scopes()))
                .build();
    }

    /**
     * 安全上下文
     * @return
     */
    private SecurityContext securityContext() {
        return SecurityContext.builder()
                .securityReferences(Collections.singletonList(new SecurityReference("OAuth2", scopes())))
                .forPaths(PathSelectors.any())
                .build();
    }

    private AuthorizationScope[] scopes() {
        return new AuthorizationScope[]{
                new AuthorizationScope("test", "")
        };
    }

}
类在模块中的位置:
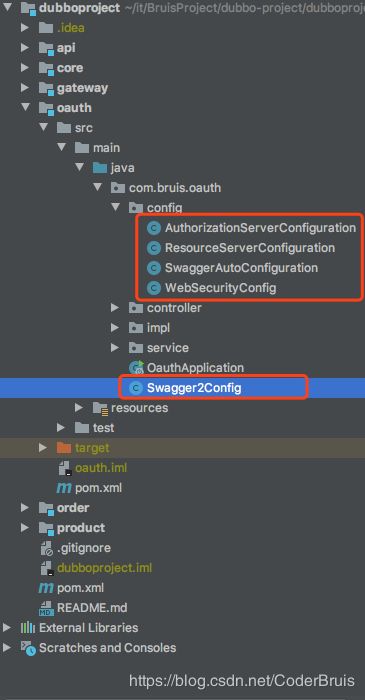
配置好相关安全配置类后,还需要定义一个校验用户名密码的类:
package com.bruis.oauth.impl;

import com.alibaba.fastjson.JSON;
import com.bruis.common.model.dataObject.UserDTO;
import org.springframework.beans.factory.annotation.Autowired;
import org.springframework.security.core.authority.AuthorityUtils;
import org.springframework.security.core.userdetails.UserDetails;
import org.springframework.security.core.userdetails.UserDetailsService;
import org.springframework.security.core.userdetails.UsernameNotFoundException;
import org.springframework.security.crypto.password.PasswordEncoder;
import org.springframework.stereotype.Service;

/**
 * @author LuoHaiYang
 */
@Service(value = "userDetailsService")
public class UserServiceImpl implements UserDetailsService {

    @Autowired
    private PasswordEncoder passwordEncoder;

    @Override
    public UserDetails loadUserByUsername(String s) throws UsernameNotFoundException {
        // 这里需要写根据用户名查询用户逻辑。。。。。。
        UserDTO user = new UserDTO();
        user.setId(1);
        user.setUsername("admin");
        user.setPhone("188103956897");
        user.setStatus(6);

        UserDTO userDTO = new UserDTO();
        // 为了增强jwt令牌内容,可以将整个对象转json存放到username中
        userDTO.setUsername(JSON.toJSONString(user));
        userDTO.setAuthorities(AuthorityUtils.commaSeparatedStringToAuthorityList("ROLE_NORMAL,ROLE_MEDIUM, user:select"));

        userDTO.setPassword(passwordEncoder.encode("123"));

        return userDTO;
    }


}
由于tokenStore使用的是RedisTokenStore,认证服务器生成的令牌将被存储到Redis中,所以需要在oauth配置中加入redis的配置。
oauth服务配置文件如下:
server.port=8902
spring.application.name=oauth-service
spring.redis.host=127.0.0.1
spring.redis.port=6379
swagger2.auth.clientId=hiauth_swagger2
swagger2.auth.clientSecret=123456
swagger2.auth.authorizationuri=http://localhost:8902/auth/authorize
swagger2.auth.tokenUri=http://localhost:8902/oauth/token
swagger2.auth.scopes=AUTU
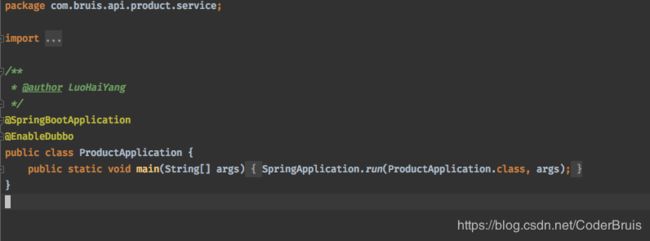
需要注意的是,如果需要对接口进行权限拦截,需要在启动类中加入以下配置,否则不生效:
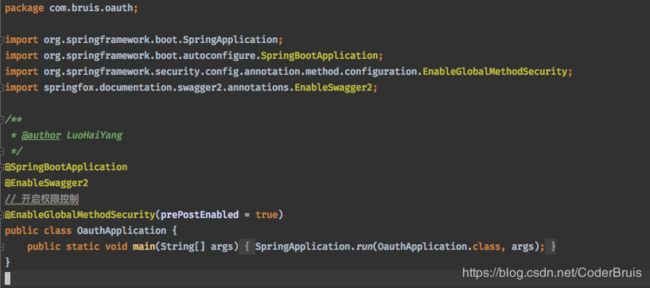
3. 搭建product和order服务
以product服务为例,配置文件如下:
server.port=8904
# redis
spring.redis.host=127.0.0.1
spring.redis.port=6379
# 连接池最大连接数
spring.redis.lettuce.pool.max-active=8
# 连接池最大阻塞等待时间
spring.redis.lettuce.pool.max-wait=8
# dubbo
dubbo.application.name=product
dubbo.protocol.port=20881
dubbo.registry.address=zookeeper://127.0.0.1:2181
dubbo.consumer.timeout=5000
3.1 引入api服务的接口并实现
在product服务中,需要引入core和api的依赖,pom.xml相关配置如下:
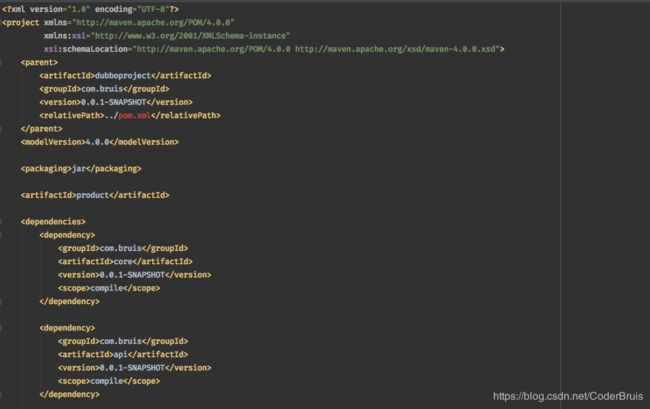
则在serviceImpl包中,可以直接实现api服务中的ProductService接口:
package com.bruis.api.product.service.impl;

import com.alibaba.dubbo.config.annotation.Service;
import com.bruis.api.service.ProductService;

/**
 * @author LuoHaiYang
 */
@Service
public class ProductServiceImpl implements ProductService {
    @Override
    public String getProductName(Integer productId) {
        return "Dubbo: " + productId;
    }
}
需要注意的是,@Service注解使用的是dubbo包下的注解,并非Spring中的@Service。
order服务搭建过程和product相似,就不说明了。
4. 搭建gateway服务
4.1 配置资源服务器配置类
config包中定义了资源服务配置,由于gateway属于资源服务器,所以需要ResourceServerConfigure配置资源服务器配置,使得gateway有能力去oauth服务中进行认证和授权。
package com.bruis.api.gateway.config;

import org.springframework.beans.factory.annotation.Autowired;
import org.springframework.context.annotation.Bean;
import org.springframework.context.annotation.Configuration;
import org.springframework.data.redis.connection.RedisConnectionFactory;
import org.springframework.security.config.annotation.web.builders.HttpSecurity;
import org.springframework.security.oauth2.config.annotation.web.configuration.EnableResourceServer;
import org.springframework.security.oauth2.config.annotation.web.configuration.ResourceServerConfigurerAdapter;
import org.springframework.security.oauth2.config.annotation.web.configurers.ResourceServerSecurityConfigurer;
import org.springframework.security.oauth2.provider.token.store.redis.RedisTokenStore;

/**
 * @author LuoHaiYang
 */
@Configuration
@EnableResourceServer
public class ResourceServerConfigure extends ResourceServerConfigurerAdapter {

    @Autowired
    private RedisConnectionFactory redisConnectionFactory;

    @Bean
    public RedisTokenStore tokenStore() {
        RedisTokenStore tokenStore = new RedisTokenStore(redisConnectionFactory);
        return tokenStore;
    }

    @Override
    public void configure(HttpSecurity http) throws Exception {
        http.csrf().disable()
                //.requestMatchers().antMatchers("/**")
                //.and()
                .authorizeRequests()
                .antMatchers("/api/**").authenticated()
                .antMatchers("/webjars/**", "/resources/**", "/swagger-ui.html"
                        , "/swagger-resources/**", "/v2/api-docs", "index.html").permitAll()
                .anyRequest().authenticated();
    }

    @Override
    public void configure(ResourceServerSecurityConfigurer resources) throws Exception {
        resources.tokenStore(tokenStore());
    }
}
4.2 引入Swagger2相关配置类
引入Swagger需要配置SwaggerAutoConfiguration
package com.bruis.api.gateway.config;

import org.springframework.context.annotation.Configuration;
import org.springframework.web.servlet.config.annotation.ResourceHandlerRegistry;
import org.springframework.web.servlet.config.annotation.WebMvcConfigurerAdapter;

/**
 * @author LuoHaiYang
 */
@Configuration
public class SwaggerAutoConfiguration extends WebMvcConfigurerAdapter {

    /**
     * 因为swagger-ui.html 是在springfox-swagger-ui.jar里的,
     * 修改了路径后,Spring Boot不会自动把/swagger-ui.html这个路径映射到对应的目录META-INF/resources/下面,
     * 所以需要修改springboot配置类,为swagger建立新的静态文件路径映射就可以了
     * @param registry
     */
    @Override
    public void addResourceHandlers(ResourceHandlerRegistry registry) {
        registry.addResourceHandler("swagger-ui.html")
                .addResourceLocations("classpath:/META-INF/resources/");
        registry.addResourceHandler("/webjars/**")
                .addResourceLocations("classpath:/META-INF/resources/webjars/");

    }

}
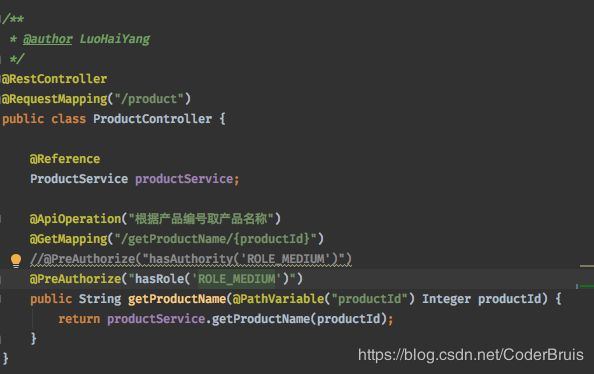
下面看下gateway服务的controller接口,目前就实现了OrderController和ProductController,属于Demo级别用于演示作用。
package com.bruis.api.gateway.controller;

import com.alibaba.dubbo.config.annotation.Reference;
import com.bruis.api.service.OrderService;
import io.swagger.annotations.ApiOperation;
import org.springframework.security.access.prepost.PreAuthorize;
import org.springframework.web.bind.annotation.*;

/**
 * @author LuoHaiYang
 */
@RestController
@RequestMapping("/order")
public class OrderController {

	// 需要调用order服务的OrderService
    @Reference
    OrderService orderService;

    @ApiOperation("根据产品名称获取订单号")
    @GetMapping("/getOrderId/{productName}")
    @PreAuthorize("hasAuthority('user:write')")
    public String getOrderId(@PathVariable("productName") String productName) {
        return orderService.getOrderId(productName);
    }

}
package com.bruis.api.gateway.controller;

import com.alibaba.dubbo.config.annotation.Reference;
import com.bruis.api.service.ProductService;
import io.swagger.annotations.ApiOperation;
import org.springframework.security.access.prepost.PreAuthorize;
import org.springframework.web.bind.annotation.GetMapping;
import org.springframework.web.bind.annotation.PathVariable;
import org.springframework.web.bind.annotation.RequestMapping;
import org.springframework.web.bind.annotation.RestController;

/**
 * @author LuoHaiYang
 */
@RestController
@RequestMapping("/product")
public class ProductController {

	// 需要调用produc服务的ProductService
    @Reference
    ProductService productService;

    @ApiOperation("根据产品编号取产品名称")
    @GetMapping("/getProductName/{productId}")
    //@PreAuthorize("hasAuthority('ROLE_MEDIUM')")
    @PreAuthorize("hasRole('ROLE_MEDIUM2')")
    public String getProductName(@PathVariable("productId") Integer productId) {
        return productService.getProductName(productId);
    }
}
在启动类中引入@EnableDubbo来开启Dubbo的使用
package com.bruis.api.gateway;

import com.alibaba.dubbo.config.spring.context.annotation.EnableDubbo;
import org.springframework.boot.SpringApplication;
import org.springframework.boot.autoconfigure.SpringBootApplication;
import org.springframework.security.config.annotation.method.configuration.EnableGlobalMethodSecurity;
import springfox.documentation.swagger2.annotations.EnableSwagger2;

/**
 * @author LuoHaiYang
 */
@SpringBootApplication
// 开启dubbo
@EnableDubbo
// 开启Swagger2
@EnableSwagger2
// 开启权限控制
@EnableGlobalMethodSecurity(prePostEnabled = true)
public class GatewayApplication {
    public static void main(String[] args) {
        SpringApplication.run(GatewayApplication.class, args);
    }
}
gateway服务配置文件比较简单,如下:
server.port=8901
spring.redis.host=127.0.0.1
spring.redis.port=6379
dubbo.application.name=gateway
dubbo.protocol.port=20880
dubbo.protocol.name=dubbo
dubbo.registry.address=zookeeper://127.0.0.1:2181
4.3 Swagger OAuth2 跨域认证
由于引入的Swagger 也需要OAuth2进行认证,同时存在了跨域的认证,所以不进行处理的话会报错。
先看下Swagger2Config配置类内容
package com.bruis.api.gateway;

import org.springframework.context.annotation.Bean;
import org.springframework.context.annotation.Configuration;
import springfox.documentation.builders.ApiInfoBuilder;
import springfox.documentation.builders.OAuthBuilder;
import springfox.documentation.builders.PathSelectors;
import springfox.documentation.builders.RequestHandlerSelectors;
import springfox.documentation.service.*;
import springfox.documentation.spi.DocumentationType;
import springfox.documentation.spi.service.contexts.SecurityContext;
import springfox.documentation.spring.web.plugins.Docket;
import springfox.documentation.swagger2.annotations.EnableSwagger2;

import java.util.Arrays;
import java.util.Collections;

/**
 * @author LuoHaiYang
 */
@Configuration
@EnableSwagger2
public class Swagger2Config {

    private static final String VERSION = "1.0";
    private static final String TITLE = "分布式电商网关服务接口文档";
    private static final String DESCRIPTION = "接口文档";
    private static final String BASEPACKAGE = "com.bruis.api.gateway.controller";
    private static final String SERVICE_URL = "http://localhost:8902";

    @Bean
    public Docket createRestApi(){
        return new Docket(DocumentationType.SWAGGER_2).apiInfo(apiInfo())
                .select()
                .apis(RequestHandlerSelectors.basePackage(BASEPACKAGE))
                .paths(PathSelectors.any())
                .build()
                .securitySchemes(Collections.singletonList(securityScheme()))
                .securityContexts(Collections.singletonList(securityContext()));
    }

    private ApiInfo apiInfo() {
        return new ApiInfoBuilder()
                .title(TITLE)
                .description(DESCRIPTION)
                .termsOfServiceUrl(SERVICE_URL)
                .version(VERSION)
                .build();
    }

    /**
     * 设置安全策略
     * @return
     */
    private SecurityScheme securityScheme() {
        GrantType grantType = new ResourceOwnerPasswordCredentialsGrant("http://dubbo-swagger.cn");
        //GrantType grantType = new ResourceOwnerPasswordCredentialsGrant("http://localhost:8902/oauth/token");
        return new OAuthBuilder()
                .name("OAuth2")
                .grantTypes(Collections.singletonList(grantType))
                .scopes(Arrays.asList(scopes()))
                .build();
    }

    /**
     * 安全上下文
     * @return
     */
    private SecurityContext securityContext() {
        return SecurityContext.builder()
                .securityReferences(Collections.singletonList(new SecurityReference("OAuth2", scopes())))
                .forPaths(PathSelectors.any())
                .build();
    }

    private AuthorizationScope[] scopes() {
        return new AuthorizationScope[]{
                new AuthorizationScope("test", "")
        };
    }

}
由于oauth服务端口是8902,gateway服务端口是8901,所以gateway进行认证请求访问时,访问的是http://localhost:8902/oauth/token需要进行跨域请求,所以需要处理掉跨域问题,先看下同域情况下即oauth服务本身的Swagger OAuth2认证以及gateway没有处理跨域时的Swagger OAuth2跨域认证。
启动zk、启动redis、启动order服务、product服务、oauth服务以及gateway服务。
5. 效果展示
5.1 oauth服务本身的Swagger OAuth2认证
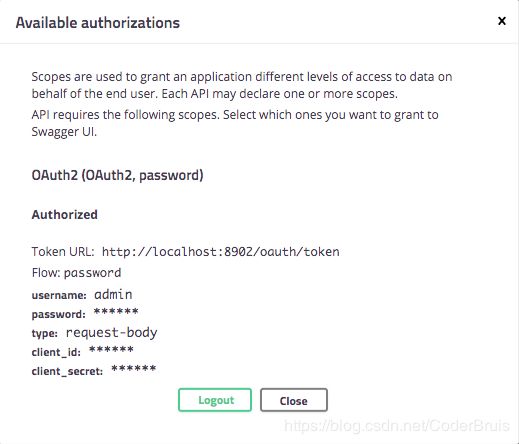
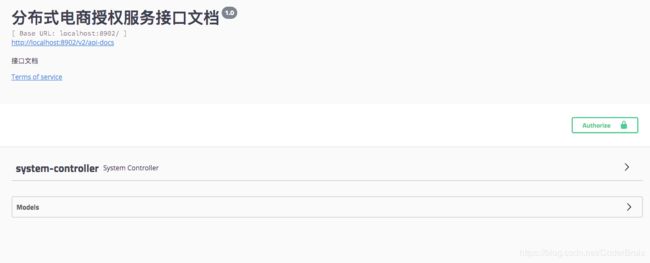
访问http://localhost:8902/swagger-ui.html
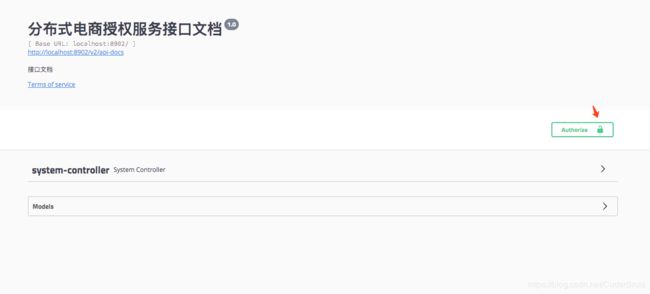
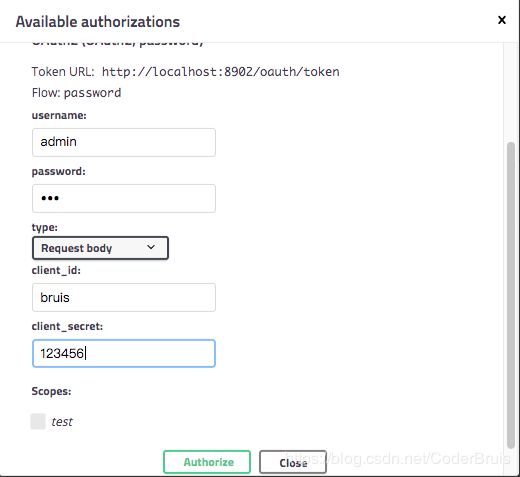
需要注意到的是Token URL是:http://localhost:8902/oauth/token。
username和password是在UserServiceImpl中定义的,账号密码为:admin/123
而client_id和client_secret是在AuthorizationServerConfiguration配置类中定义的:分别为 bruis/123456
5.2 gateway服务的Swagger OAuth2跨域认证
没有解决gateway跨域认证时,去进行认证,效果如下:
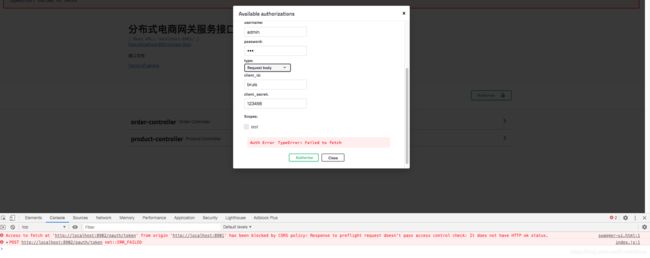
所以有两种方案解决:
- 在oauth服务端配置跨域请求;
- 通过nginx代理解决跨域请求;
5.3 通过nginx来解决跨域
本人通过nginx跨域来解决的。
下面看下本人nginx的配置内容:
server {
listen 80;
autoindex on;
## server_name需要修改为你的服务地址
server_name dubbo-swagger.cn;
access_log /usr/local/nginx/logs/access.log combined;
index index.html index.htm index.jsp index.php;
if ( $query_string ~* ".*[\;'\<\>].*" ){
        return 404;
        }

location / {
        proxy_pass http://127.0.0.1:8902/oauth/token;
	if ($request_method = 'OPTIONS') {
          add_header 'Access-Control-Allow-Origin' '*';
          add_header 'Access-Control-Allow-Methods' 'GET, POST, OPTIONS';
          add_header 'Access-Control-Allow-Headers' 'DNT,User-Agent,X-Requested-With,If-Modified-Since,Cache-Control,Content-Type,Range,Authorization';
          add_header 'Access-Control-Max-Age' 1728000;
          add_header 'Content-Type' 'text/plain; charset=utf-8';
          add_header 'Content-Length' 0;
          return 204;
        }
        if ($request_method = 'POST') {
          add_header 'Access-Control-Allow-Origin' '*';
          add_header 'Access-Control-Allow-Methods' 'GET, POST, OPTIONS';
          add_header 'Access-Control-Allow-Headers' 'DNT,User-Agent,X-Requested-With,If-Modified-Since,Cache-Control,Content-Type,Range,Authorization';
          add_header 'Access-Control-Expose-Headers' 'Content-Length,Content-Range';
        }
        if ($request_method = 'GET') {
          add_header 'Access-Control-Allow-Origin' '*';
          add_header 'Access-Control-Allow-Methods' 'GET, POST, OPTIONS';
          add_header 'Access-Control-Allow-Headers' 'DNT,User-Agent,X-Requested-With,If-Modified-Since,Cache-Control,Content-Type,Range,Authorization';
          add_header 'Access-Control-Expose-Headers' 'Content-Length,Content-Range';
        }
      }

}
该配置文件的意思就是将所有访问http://dubbo-swagger.cn路径的请求都代理到http://localhost:8902/oauth/token路径,注意该文件是在nginx.conf同路径下的vhost_swagger目录中,需要在nginx.conf中引入以下配置:
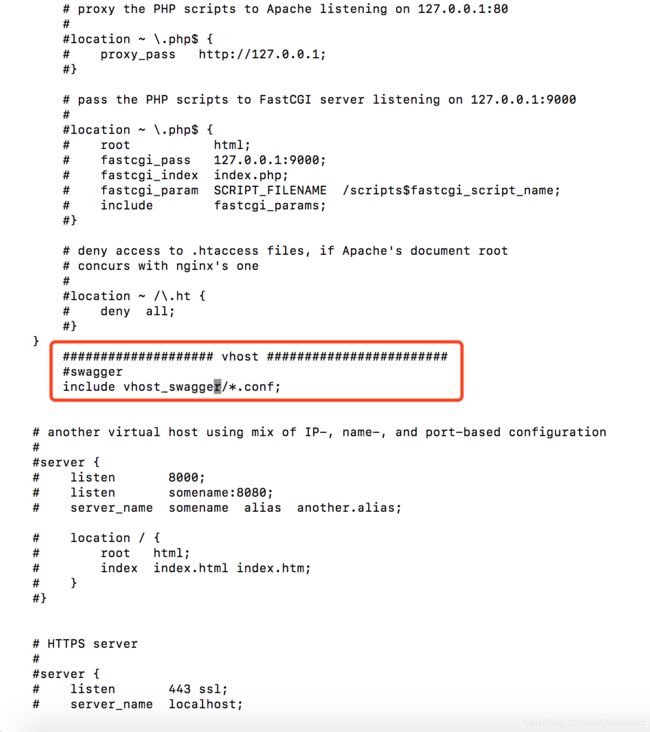
配置好nginx后,还需要在 hosts文件中加入如下配置:
127.0.0.1 dubbo-swagger.cn
启动nginx!
然后在gateway服务中,修改类Swagger2Config的配置如下:
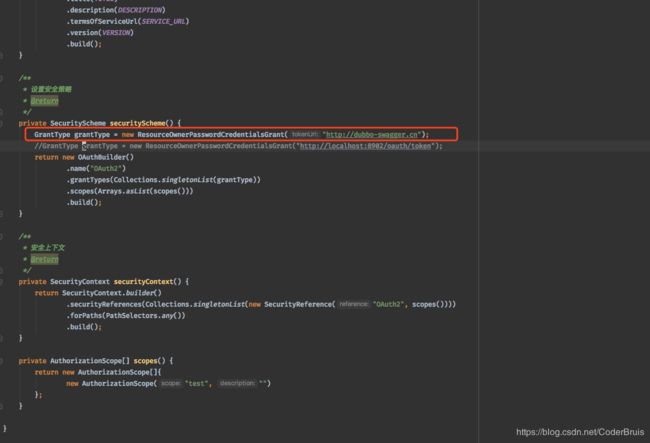
然后重启gateway。
值得注意的是,此时swagger的授权地址已经变成了http://dubbo-swagger.cn
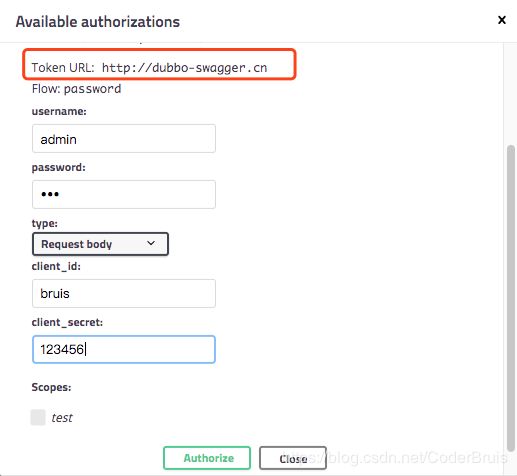
终于,gateway服务认证成功了。
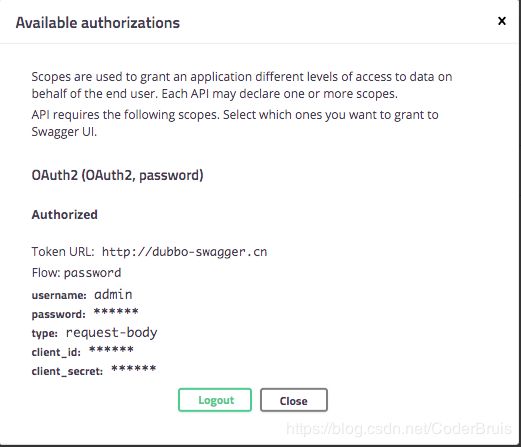
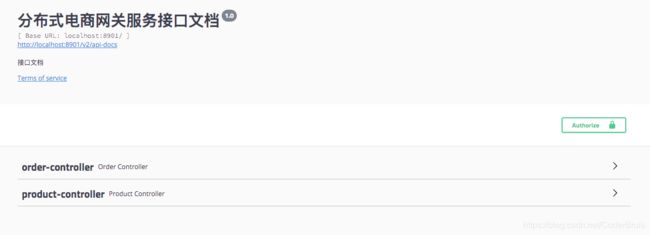
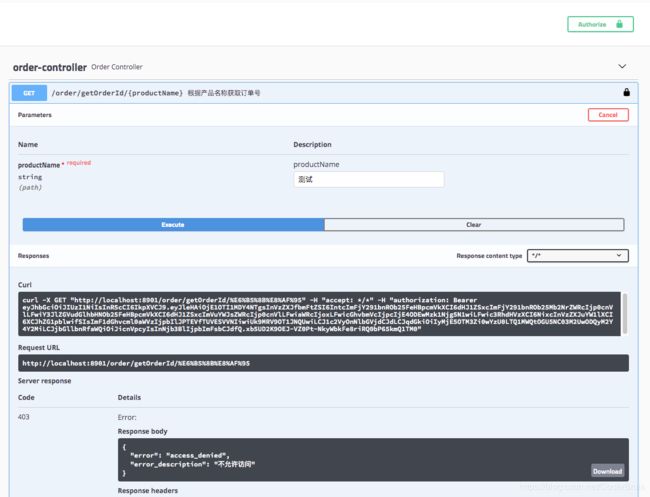
由于没有接口权限,所以这里报403,access_denied。
下面用postman来展示下通过token来访问接口。
先以密码模式进行认证获取token。
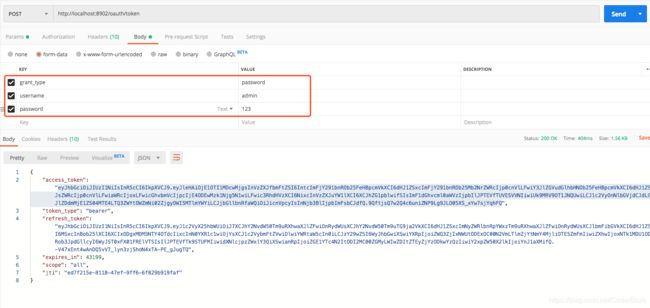
除了这几个参数外,我们需要在请求头中配置Authorization信息,否则请求将返回401:
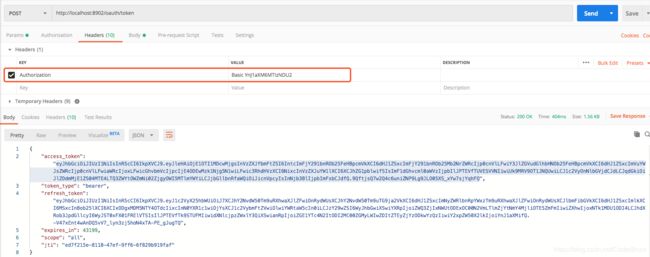
值为Basic加空格加client_id:client_secret(就是在FebsAuthorizationServerConfigure类configure(ClientDetailsServiceConfigurer clients)方法中定义的client和secret)经过base64加密后的值(可以使用http://tool.oschina.net/encrypt?type=3)

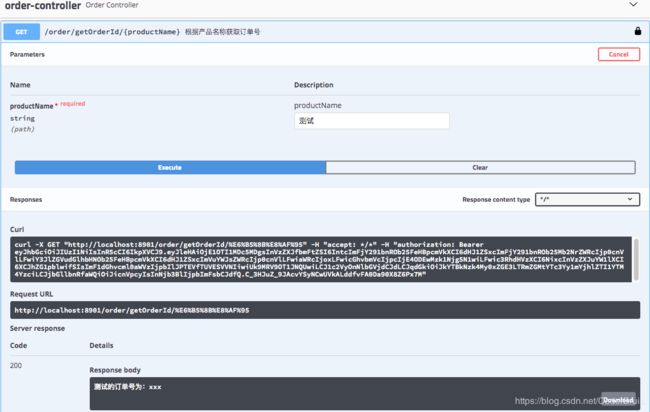
然后携带token去访问gateway服务接口

重新调整下接口权限,重新访问接口
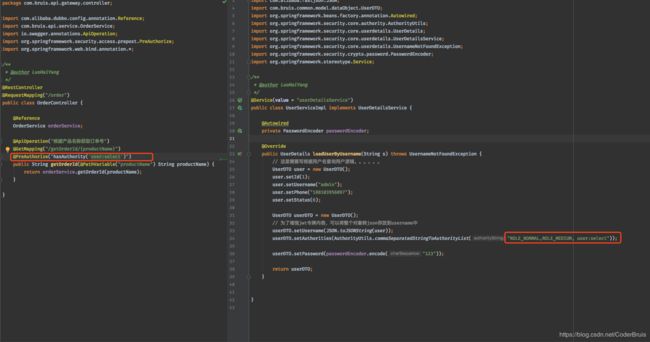
每个人都有一颗白嫖的心,

下面贴上github源码地址,本篇文章对应的项目是在 v0.0.1分支上,文中涉及的nginx配置文件放在项目的others目录中,有需要的读者在切换到该分支上进行操作即可。觉得博主写的不错,关注、点赞、star三连。。。
https://github.com/coderbruis/Distributed-mall
相关文章
- 实战电商后端系统(二)—— 将OAuth2认证和权限信息存入MySQL数据库
- 实战电商后端系统(三)—— 以vue-element-admin为基础的前端项目对接后端接口
