《Cocos Creator游戏实战》关卡功能实现
关卡功能实现
创建节点
设置关卡信息
实现关卡界面
为预制添加脚本
完善Game.js逻辑
在上一节教程中我们讲解了打砖块的主要功能与逻辑实现,在这一篇教程中,笔者会在它的基础上增加关卡功能(建议先阅读上一节教程)。
运行效果如下:
Cocos Creator版本:2.2.0
后台回复"关卡",获取该项目完整文件:
![]()
创建节点
1. bg就是一个背景图片。
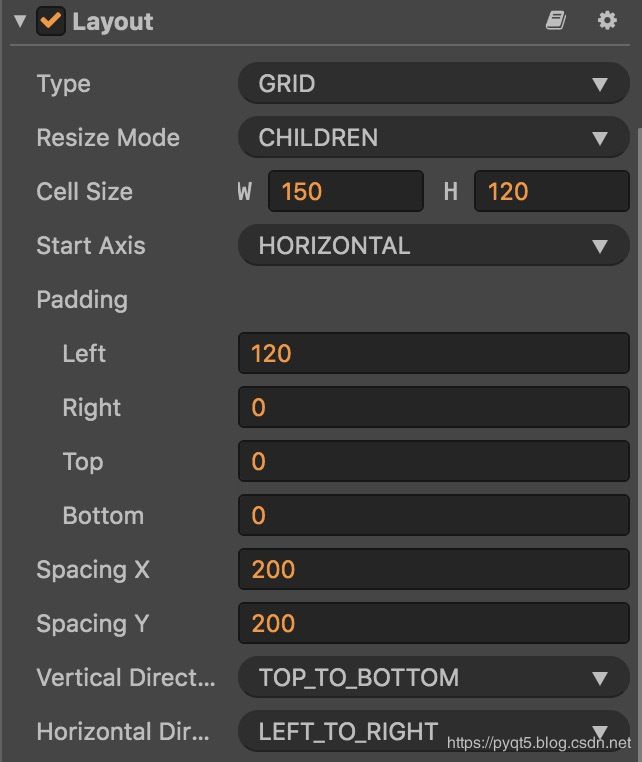
2. levelsLayout为一个布局节点,节点上的Layout组件属性设置如下(除了Type和Resize Mode,其他属性大家可以根据需要自行修改):
该节点用来对各个关卡进行布局,完成后样子如下:
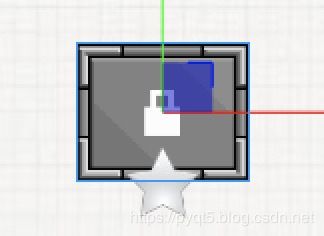
3. level是一个预制节点,其子节点num用于提示当前关卡数,star节点用于提示是否已经通关(没有通关的时候为灰色,通关后变为黄色)。另外num节点初始状态不可见,只有玩家通过当前关卡后,后面一个关卡的数字才会显示(当然第一关在一开始就要显示数字)。
设置关卡信息
我们在scripts文件夹中新建一个Settings.js脚本,编写如下代码:
// Settings.js
let settings = [
    {
        level: 1,                   // 第1关
        row: 3,                     // 行数
        col: 3,                     // 列数
        spaceX: 20,                 // 列间隔
        spaceY: 20,                 // 行间隔
        brickWidth: 200,            // 砖块宽度
        brickHeight: 100,           // 砖块高度
        levelState: 'UNLOCKED',     // 关卡状态
        transparentBricks: [[1,0], [2,2]]  // 刚开始就透明的砖块
    },

    {
        level: 2,                   // 第2关
        row: 6,
        col: 6,
        spaceX: 10,
        spaceY: 10,
        brickWidth: 120,
        brickHeight: 70,
        levelState: 'LOCKED',
        transparentBricks: [[3,5], [4,1], [3,4]]
    },

    {
        level: 3,                   // 第3关
        row: 9,
        col: 9,
        spaceX: 10,
        spaceY: 10,
        brickWidth: 100,
        brickHeight: 50,
        levelState: 'LOCKED',
        transparentBricks: [[7,5], [3,1], [5,7],[7,2],[6,8],[7,7]]
    },

    {
        level: 4,                   // 第4关
        row: 12,
        col: 15,
        spaceX: 5,
        spaceY: 5,
        brickWidth: 80,
        brickHeight: 40,
        levelState: 'LOCKED',
        transparentBricks: [[1,1], [2,2], [3,3],[4,4],[5,5],[6,6],[7,7],[8,8],[9,9]]
    },

    {
        level: 5,                   // 第5关
        row: 12,
        col: 15,
        spaceX: 5,
        spaceY: 5,
        brickWidth: 80,
        brickHeight: 40,
        levelState: 'LOCKED',
        transparentBricks: [[1,1], [2,2], [3,3],[4,4],[5,5],[6,6],[7,7],[8,8],[9,9]]
    },

    {
        level: 6,                   // 第6关
        row: 13,
        col: 13,
        spaceX: 4,
        spaceY: 4,
        brickWidth: 60,
        brickHeight: 30,
        levelState: 'LOCKED',
        transparentBricks: [[9,9], [1,1], [3,4],[5,4],[5,6],[7,6],[7,8],[8,10],[9,1]]
    },
]

export {settings};
在这个脚本中我们就新建了一个JSON变量settings,其中每个数组元素都包含了相应关卡的具体配置(这里共有六个关卡)。这里笔者讲一下levelState和transparentBricks这两个键:
- levelState用来判断当前关卡的状态:未解锁,解锁或通过。
- 通过控制transparentBricks我们就可以创建出形状各异的砖块布局。
最后用export输出该变量,我们会在其他脚本中调用。
实现关卡界面
新建Select.js脚本,编写如下代码:
// Select.js
import {settings} from './Settings.js';

cc.Class({
    extends: cc.Component,

    properties: {
        levelPrefab: cc.Prefab,
        levelsLayout: cc.Node
    },

    // LIFE-CYCLE CALLBACKS:

    onLoad () {
        this.initLevels();
    },

    initLevels () {
        if (!cc.sys.localStorage.getItem('settings')) {
            for (let i=0; i
下面是对该脚本代码的解释:
- 在该脚本的开头我们导入了Settings.js中的setting变量。
- 在properties中添加levelPrefab和levelsLayout属性。
- initLevels方法用于创建各个关卡预制,并添加到布局中。
在initLevels方法中,我们首先判断本地存储中是否有settings项。
如果没有的话,那么说明玩家第一次玩,于是我们就新建预制,并将Settings.js中的各个关卡信息保存到相应预制中,调用changePic方法来设置预制相应的图片(该方法会根据levelState来设置相应的图片)。最后我们要将所有关卡信息存入本地,我们之后也会在Game.js的win方法中更新关卡信息,而游戏以后也都会只从本地存储中读取关卡信息了(当然可以选择把本地存储改为服务器存储)。
如果有的话,那么说明玩家不是第一次玩了,于是我们就从本地中读取关卡信息,创建并设置预制。
为预制添加脚本
新建Level.js脚本,添加代码如下:
// Level.js
cc.Class({
    extends: cc.Component,

    properties: {
        unlockedPic: cc.SpriteFrame,
        lockedPic: cc.SpriteFrame,
        greyStarPic: cc.SpriteFrame,
        yellowStarPic: cc.SpriteFrame,
    },

    // LIFE-CYCLE CALLBACKS:

    onLoad () {
        // 触摸监听
        this.node.on('touchstart', this.onTouchStart, this);
    },

    changePic (levelState, num) {
        // 更改图片
        if (levelState == 'UNLOCKED') {
            // 解锁关卡
            this.node.children[0].active = true;
            this.node.children[0].getComponent(cc.Label).string = num;
            this.node.getComponent(cc.Sprite).spriteFrame = this.unlockedPic;
            this.node.children[1].getComponent(cc.Sprite).spriteFrame = this.greyStarPic;
        }
        else if (levelState == 'PASSED') {
            // 通关
            this.node.children[0].active = true;
            this.node.children[0].getComponent(cc.Label).string = num;
            this.node.getComponent(cc.Sprite).spriteFrame = this.unlockedPic;
            this.node.children[1].getComponent(cc.Sprite).spriteFrame = this.yellowStarPic;

        }
        else if (levelState == 'LOCKED') {
            // 关卡未解锁
            this.node.getComponent(cc.Sprite).spriteFrame = this.lockedPic;
            this.node.children[1].getComponent(cc.Sprite).spriteFrame = this.greyStarPic;
        }
    },

    onTouchStart () {
        if (this.node.settings['levelState'] == 'LOCKED')
            return;

        // 将目标关卡信息存入本地,在Game.js中取出
        cc.sys.localStorage.setItem('currentLevelInfo', JSON.stringify(this.node.settings));
        cc.director.loadScene('打砖块');
    }
});
下面是对该脚本代码的解释:
- 在properties中添加四个属性,都是SpriteFrame类型。前两张图片用于关卡背景,后两张用于星星。
- 在onLoad方法中添加触摸监听。在onTouchStart方法中我们首先根据关卡的levelState来判断它是否已经解锁,如果已经解锁则将当前关卡信息存入currentLevelInfo项中,然后进入打砖块场景。
- 在changgePic方法中,我们同样根据levelState来设置相应图片。相信看代码大家可以看懂,这里笔者就不再赘述。
完善Game.js逻辑
在Game.js脚本中,我们首先在onLoad方法中获取currentLevelInfo项,并设置相关变量:
// Game.js
onLoad () {
    ...

    // 首先获取当前关卡信息
    let currentLevelInfo = JSON.parse(cc.sys.localStorage.getItem('currentLevelInfo'));
    this.level = currentLevelInfo['level'];                                           // 第几关
    this.row = currentLevelInfo['row'];                                               // 行数
    this.col = currentLevelInfo['col'];                                               // 列数
    this.spaceX = currentLevelInfo['spaceX'];                                         // 列间隔
    this.spaceY = currentLevelInfo['spaceY'];                                         // 行间隔
    this.brickWidth = currentLevelInfo['brickWidth'];                                 // 砖块宽度
    this.brickHeight = currentLevelInfo['brickHeight'];                               // 砖块高度
    this.transparentBricks = currentLevelInfo['transparentBricks'];                   // 刚开始就透明的砖块
    this.speed = 20;                                                                  // bar移动速度

    ...
},
然后在initBricksLayout方法中根据当前关卡中的transparentBrick来设置透明砖块:
// Game.js
initBricksLayout () {
    ...

    // 循环放置砖块
    for (let i=0; i
最后我们在win方法中更新关卡信息,只用更改关卡中的levelState就行啦:
// Game.js
win () {
    // 更新关卡信息
    let settings = JSON.parse(cc.sys.localStorage.getItem('settings'));
    settings[this.level-1]['levelState'] = 'PASSED';        // 当前关卡状态变为通过(数组下标-1)
    settings[this.level]['levelState'] = 'UNLOCKED';        // 下一关卡状态变为解锁
    cc.sys.localStorage.setItem('settings', JSON.stringify(settings));

    console.log('恭喜过关!');
    cc.director.loadScene('关卡');
},
好了,那么今天的教程就到这,希望大家有所收获~


