Spring-cloud微服务 Eureka学习教程-单服务器配置之快速搭建EurekaServer、EurekaClient(基础)
以下实例代码下载地址:https://github.com/wades2/EurekaDemo
Eureka是Spring Cloud Netflix的一个子模块,也是核心模块之一。用于云端服务发现,一个基于REST的服务,用于定位服务,以实现云端中间层服务发现和故障转移。
什么是服务发现:服务发现是微服务基础架构的关键原则之一。试图着手配置每个客户端或某种格式的约定可以说是非常困难的和非常脆弱的。Eureka是Netflix服务发现的一种服务和客户端。这种服务是可以被高可用性配置的和部署,并且在注册的服务当中,每个服务的状态可以互相复制给彼此。
什么是服务注册:当一个客户端注册到Eureka,它提供关于自己的元数据(诸如主机和端口,健康指标URL,首页等)Eureka通过一个服务从各个实例接收心跳信息。如果心跳接收失败超过配置的时间,实例将会正常从注册里面移除。【引】
所以在配置Eureka的时候,我们需要配置Eureka-Service端,用于监听各个注册在shan上面的客户端,也需要的客户端去实现这个注册。此篇文章作为一个入门,先谈谈怎么单点配置。由于Spring-cloud是基于Spring Boot的一整个生态,所以搭建Eureka也是基于spring-boot的(建议对spring-boot相对生疏的可以先从spring-boot入门)。
首先我们需要配置的是Service端:
以下是我service端的pom配置:
    4.0.0

        org.springframework.boot
        spring-boot-starter-parent
        1.5.3.RELEASE


    com.example
    demo
    0.0.1-SNAPSHOT
    jar
    demo
    Demo project for Spring Boot


        1.8
        Greenwich.M3


                org.springframework.cloud
                spring-cloud-dependencies
                Camden.SR5
                pom
                import


            org.springframework.boot
            spring-boot-starter-web


            org.springframework.cloud
            spring-cloud-starter-eureka-server
            1.3.6.RELEASE


            org.springframework.boot
            spring-boot-starter-test
            test


                org.springframework.boot
                spring-boot-maven-plugin


            spring-milestones
            Spring Milestones
            https://repo.spring.io/milestone

                false
spring-cloud-starter-eureka-server,这个就是eureka注册中心。
然后是service端的配置文件:
# 应用程序的名称
spring.application.name=eureka-server2
#修改启动端口
server.port=8083
# 是否将该实例的注册信息注册到Eureka服务器上,在只有一个Eureka服务器的情况下没必要,只是用于实例的发现
eureka.client.register-with-eureka=false

# 是否向Eureka服务器获取注册信息,在单实例的Eureka中共没必要
eureka.client.fetch-registry=false
#Eureka Server能够迅速有效地踢出已关停的节点,但是新手由于Eureka自我保护模式,以及心跳周期长的原因,常常会遇到Eureka Server不踢出已关停的节点的问题
# 设为false,关闭自我保护
eureka.server.enable-self-preservation=false
#清理间隔
eureka.server.eviction-interval-timer-in-ms=60000

eureka.client.serviceUrl.defaultZone=http://localhost:8083/eurekaeureka.server.enable-self-preservation这里有关service的配置,一般不建议关闭自我保护,这里只是留着后期做个测试。如果正常配置,
eureka.server.enable-self-preservation依旧为true。然后我们尝试写运行zhu主程序:
package com.example.demo;

import org.springframework.boot.SpringApplication;
import org.springframework.boot.autoconfigure.SpringBootApplication;
import org.springframework.cloud.netflix.eureka.server.EnableEurekaServer;

@SpringBootApplication
@EnableEurekaServer
public class DemoApplication {
    public static void main(String[] args) {
        SpringApplication.run(DemoApplication.class, args);
    }
}
在这里可能会有一部分坑,就是没有EnableEurekaServer,这个原因就是相关依赖的jar包没有导入进去,进POM文件里面,推荐添加上版本号。然后重新MAVEN导入下就好了。
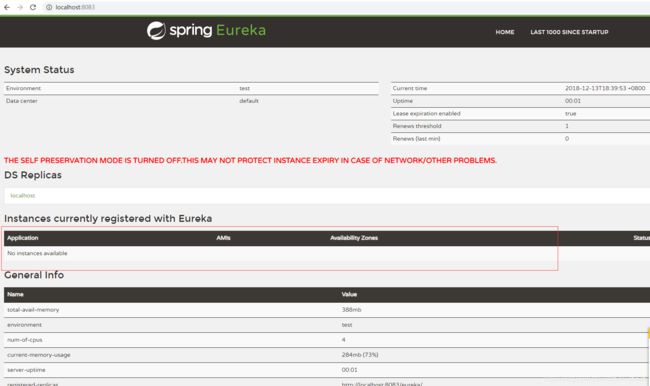
现在我们运行起来,可以看到页面是这个样子的:
因为我们还没有实例注册进去,所以可以看到里面什么实例都没有。接下来我们可以开始Client端,也是注入实例。
我们重新new一个模块出来。我个人的demo是这样的:
Client端配置:
POM文件引入配置:
    4.0.0

        org.springframework.boot
        spring-boot-starter-parent
        1.5.3.RELEASE


    com.example
    demo
    0.0.1-SNAPSHOT
    jar
    demo
    Demo project for Spring Boot


        1.8
        Greenwich.M3


                org.springframework.cloud
                spring-cloud-dependencies
                Camden.SR5
                pom
                import


            org.springframework.boot
            spring-boot-starter-web


            org.springframework.cloud
            spring-cloud-starter-netflix-eureka-client
            1.4.0.M1


            org.springframework.cloud
            spring-cloud-starter-eureka-server
            1.3.6.RELEASE


            org.springframework.boot
            spring-boot-starter-test
            test


                org.springframework.boot
                spring-boot-maven-plugin


            spring-milestones
            Spring Milestones
            https://repo.spring.io/milestone

                false
然后是配置文件application.properties:
spring.application.name=eureka_client

#eureka.client.allow-redirects=false
#修改启动端口
server.port=8084
eureka.client.serviceUrl.defaultZone=http://localhost:8083/eureka
eureka.client.register-with-eureka=true
这里的defaultzone就是注册service的默认地址。
然后是启动项:
package com.example.demo;

import org.springframework.boot.SpringApplication;
import org.springframework.boot.autoconfigure.SpringBootApplication;
import org.springframework.cloud.client.discovery.EnableDiscoveryClient;
import org.springframework.cloud.netflix.eureka.EnableEurekaClient;

@SpringBootApplication
//@EnableEurekaClient
@EnableDiscoveryClient
public class DemoApplication {
    public static void main(String[] args) {
        SpringApplication.run(DemoApplication.class, args);
    }
}
我们这里用的注解是EnableDiscoveryClient,当然也可以选择EnableEurekaClient。
EnableDiscoveryClient基于spring-cloud-commons, EnableEurekaClient基于spring-cloud-netflix。如果选用的注册中心是eureka,那么就推荐@EnableEurekaClient,如果是其他的注册中心,那么推荐使用@EnableDiscoveryClient。
启动Client之后,我们可以看到,实例下有了数据:


