笔记-OkHttp源码
文章目录
- 一、OkHttp基本使用:
- 二、代码跟踪寻找最终生成Response的代码
- 三、查看网络请求的发起
- 四、Socket访问网络
官网:https://square.github.io/okhttp/
一、OkHttp基本使用:
由官网可以知道其发起网络请求的步骤为:创建Request,创建OkhttpClient,由client和request生成call,call执行execute得到response。
 @Test
    public void okHttpTest(){
       try{
           Request request = new Request.Builder()
                   .url("http://itnewers.com:8080/linxz-user/")
                   .build();
           OkHttpClient client = new OkHttpClient();
           Response response=client.newCall(request).execute();
           String line=response.body().string();
           System.out.println(line);
       }catch (Exception e){
           e.printStackTrace();
       }
    }
从使用的直观之上关键的类是:
Request、OkHttpClient、Call(RealCall)、Response。
二、代码跟踪寻找最终生成Response的代码
查看第三方库源码往往感觉一觉醒来突然处在一个荒岛上,我是谁?我在哪?我要干什么?
“惨痛”的经验告诉我,要根据结果寻找造成最终生成这个结果的代码,其他一切都先不要理会—“斩首行动”。
所以我的目标就是根据OkHttp基本的使用,查看、跟踪、寻找最终生成Response的代码。由上面的代码可以知道,生成Response的方法是由execute得到的,走进这个方法:
@Override public Response execute() throws IOException {
    synchronized (this) {
      if (executed) throw new IllegalStateException("Already Executed");
      executed = true;
    }
    captureCallStackTrace();
    try {
      client.dispatcher().executed(this);
      Response result = getResponseWithInterceptorChain();
      if (result == null) throw new IOException("Canceled");
      return result;
    } finally {
      client.dispatcher().finished(this);
    }
  }
进入方法之后能知道这个方法是在RealCall中执行的,而RealCall这个类正好是实现Call接口的类。
方法内容很少:
- captureCallStackTrace:貌似是日志跟踪。
- client.dispatcher().executed(this):dispatcher为调度的意思,这时候引出了Dispatcher这个类,查看它的executed方法大概知道这是要将call放到队列Queue中。
- getResponseWithInterceptorChain:很直观能知道Response是根据这个方法得到得。
- client.dispatcher().finished(this):将call移出队列。
“斩首行动”的精髓在于不打小兵,直接找到正主儿砍了。所以先不管其他的,直接跟着getResponseWithInterceptorChain走,查看这个方法:
Response getResponseWithInterceptorChain() throws IOException {
    // Build a full stack of interceptors.
    List interceptors = new ArrayList<>();
    interceptors.addAll(client.interceptors());
    interceptors.add(retryAndFollowUpInterceptor);
    interceptors.add(new BridgeInterceptor(client.cookieJar()));
    interceptors.add(new CacheInterceptor(client.internalCache()));
    interceptors.add(new ConnectInterceptor(client));
    if (!forWebSocket) {
      interceptors.addAll(client.networkInterceptors());
    }
    interceptors.add(new CallServerInterceptor(forWebSocket));

    Interceptor.Chain chain = new RealInterceptorChain(
        interceptors, null, null, null, 0, originalRequest);
    return chain.proceed(originalRequest);
  }
看到这里突然感觉很温馨,因为使用过OkHttp的基本都用过它的拦截器功能,这里突然看到一大推的“乱七八糟”的拦截器,虽然不知道这是什么鬼,但还是有种在荒岛上找到亲人的感觉。chain.proceed(originalRequest)很熟悉啊,我们添加的拦截器后面释放网络的时候不也是使用chain.proceed(originalRequest)实现的么。
不要被“亲情”所迷惑,继续寻找最终生成Response的方法,跟着chain.proceed走:
public Response proceed(Request request, StreamAllocation streamAllocation, HttpCodec httpCodec,
      RealConnection connection) throws IOException {
    if (index >= interceptors.size()) throw new AssertionError();

    calls++;

    // If we already have a stream, confirm that the incoming request will use it.
    if (this.httpCodec != null && !this.connection.supportsUrl(request.url())) {
      throw new IllegalStateException("network interceptor " + interceptors.get(index - 1)
          + " must retain the same host and port");
    }

    // If we already have a stream, confirm that this is the only call to chain.proceed().
    if (this.httpCodec != null && calls > 1) {
      throw new IllegalStateException("network interceptor " + interceptors.get(index - 1)
          + " must call proceed() exactly once");
    }

    // Call the next interceptor in the chain.
    RealInterceptorChain next = new RealInterceptorChain(
        interceptors, streamAllocation, httpCodec, connection, index + 1, request);
    Interceptor interceptor = interceptors.get(index);
    Response response = interceptor.intercept(next);

    // Confirm that the next interceptor made its required call to chain.proceed().
    if (httpCodec != null && index + 1 < interceptors.size() && next.calls != 1) {
      throw new IllegalStateException("network interceptor " + interceptor
          + " must call proceed() exactly once");
    }

    // Confirm that the intercepted response isn't null.
    if (response == null) {
      throw new NullPointerException("interceptor " + interceptor + " returned null");
    }

    return response;
  }
方法有点点小长,但不要紧,深得“斩首”行动的我很快就定位到了Response response = interceptor.intercept(next);这行代码上,继续跟踪这个代码走。刚想走,突然发现不对劲,interceptor.intercept(next)不是拦截器拦截了next吗,关键的应该是这个next,差点迷路,查看这个next对象的类吧…我日…这个next就是RealInterceptorChain,proceed方法本身就是在这个类上,也就是RealInterceptorChain里又调用了RealInterceptorChain…
迷路了…全剧终!!!
此时此刻不得不停下来好好看看这一段代码了。这段的核心代码是:
 RealInterceptorChain next = new RealInterceptorChain(
        interceptors, streamAllocation, httpCodec, connection, index + 1, request);
    Interceptor interceptor = interceptors.get(index);
    Response response = interceptor.intercept(next)
这段代码最开始是由方法getResponseWithInterceptorChain()中的
Interceptor.Chain chain = new RealInterceptorChain(
        interceptors, null, null, null, 0, originalRequest);
    return chain.proceed(originalRequest);
生成的,streamAllocation、httpCodec、connection皆为null,
interceptors是getResponseWithInterceptorChain的方法中生成的一大串拦截器。回过头来再看看getResponseWithInterceptorChain方法的代码,里面有5个默认的拦截器以及两个动态加入的拦截器列表client.interceptors()跟client.networkInterceptors(),假设这连个的数据没有,于是得到具体的interceptors数据:
- RetryAndFollowUpInterceptor
- BridgeInterceptor
- CacheInterceptor
- ConnectInterceptor
- CallServerInterceptor
刚进来的时候:index=0,
 RealInterceptorChain next = new RealInterceptorChain(
        interceptors, streamAllocation, httpCodec, connection, 0 + 1, request);
 Interceptor interceptor = interceptors.get(0);
 Response response = interceptor.intercept(next);
即:
interceptor=RetryAndFollowUpInterceptor,
Response response=RetryAndFollowUpInterceptor.intercept(next)
查看RetryAndFollowUpInterceptor的intercept方法:
    ...省略...
    try {
        response = ((RealInterceptorChain) chain).proceed(request, streamAllocation, null, null);
        releaseConnection = false;
      } catch (RouteException e) {
        // The attempt to connect via a route failed. The request will not have been sent.
        if (!recover(e.getLastConnectException(), false, request)) {
          throw e.getLastConnectException();
        }
    ...省略...
由此可以看到这里由调用了proceed方法,即:RealInterceptorChain.proceed。这个很眼熟,在哪里见过?没有看错,这个正是getResponseWithInterceptorChain方法中最后两句:
 Interceptor.Chain chain = new RealInterceptorChain(
        interceptors, null, null, null, 0, originalRequest);
    return chain.proceed(originalRequest);
上面next生成的时候对应的index=0+1,
也就是说这里面进拦截器RetryAndFollowUpInterceptor中 RealInterceptorChain实例话的时候index=1。
这时候对应的interceptors还是一样的,只不是index=1,所以:
index=1:
interceptor=BridgeInterceptor,
Response response=BridgeInterceptor.intercept(next)
…
由此可以知道,proceed里面的执行就跟递归调用一样,把拦截器都执行了一遍。这也就解释了为什么OkHttpClient能传入多个拦截器。
new OkHttpClient.Builder()
         .addInterceptor(interceptor1)
         .addInterceptor(interceptor2)
         .addInterceptor(interceptor3)
                   ...
通过分析代码,获取Response最终是在拦截器下进行的。
通过查看这些默认的拦截器,可以知道ConnectInterceptor是用来连接网络,CallServerInterceptor用来将流数据封装Response的,由于这个流程只跟踪Response,所以这里只稍微看一下CallServerInterceptor拦截器:
public final class CallServerInterceptor implements Interceptor {
  private final boolean forWebSocket;

  public CallServerInterceptor(boolean forWebSocket) {
    this.forWebSocket = forWebSocket;
  }

  @Override public Response intercept(Chain chain) throws IOException {
    RealInterceptorChain realChain = (RealInterceptorChain) chain;
    HttpCodec httpCodec = realChain.httpStream();
    StreamAllocation streamAllocation = realChain.streamAllocation();
    RealConnection connection = (RealConnection) realChain.connection();
    Request request = realChain.request();

    long sentRequestMillis = System.currentTimeMillis();
    httpCodec.writeRequestHeaders(request);

    Response.Builder responseBuilder = null;
    if (HttpMethod.permitsRequestBody(request.method()) && request.body() != null) {
      // If there's a "Expect: 100-continue" header on the request, wait for a "HTTP/1.1 100
      // Continue" response before transmitting the request body. If we don't get that, return what
      // we did get (such as a 4xx response) without ever transmitting the request body.
      if ("100-continue".equalsIgnoreCase(request.header("Expect"))) {
        httpCodec.flushRequest();
        responseBuilder = httpCodec.readResponseHeaders(true);
      }

      if (responseBuilder == null) {
        // Write the request body if the "Expect: 100-continue" expectation was met.
        Sink requestBodyOut = httpCodec.createRequestBody(request, request.body().contentLength());
        BufferedSink bufferedRequestBody = Okio.buffer(requestBodyOut);
        request.body().writeTo(bufferedRequestBody);
        bufferedRequestBody.close();
      } else if (!connection.isMultiplexed()) {
        // If the "Expect: 100-continue" expectation wasn't met, prevent the HTTP/1 connection from
        // being reused. Otherwise we're still obligated to transmit the request body to leave the
        // connection in a consistent state.
        streamAllocation.noNewStreams();
      }
    }

    httpCodec.finishRequest();

    if (responseBuilder == null) {
      responseBuilder = httpCodec.readResponseHeaders(false);
    }

    Response response = responseBuilder
        .request(request)
        .handshake(streamAllocation.connection().handshake())
        .sentRequestAtMillis(sentRequestMillis)
        .receivedResponseAtMillis(System.currentTimeMillis())
        .build();

    int code = response.code();
    if (forWebSocket && code == 101) {
      // Connection is upgrading, but we need to ensure interceptors see a non-null response body.
      response = response.newBuilder()
          .body(Util.EMPTY_RESPONSE)
          .build();
    } else {
      response = response.newBuilder()
          .body(httpCodec.openResponseBody(response))
          .build();
    }

    if ("close".equalsIgnoreCase(response.request().header("Connection"))
        || "close".equalsIgnoreCase(response.header("Connection"))) {
      streamAllocation.noNewStreams();
    }

    if ((code == 204 || code == 205) && response.body().contentLength() > 0) {
      //这个异常很常见。原本我使用OkHttp的时候,在Error回调的时候会
      //偶尔报“HTTP 204 had non-zero 12”,原来这个异常是在这里抛出来的
      throw new ProtocolException(
          "HTTP " + code + " had non-zero Content-Length: " + response.body().contentLength());
    }

    return response;
  }
}
代码很长,但是很容易就能看到Response生成的关键代码:
    Response response = responseBuilder
        .request(request)
        .handshake(streamAllocation.connection().handshake())
        .sentRequestAtMillis(sentRequestMillis)
        .receivedResponseAtMillis(System.currentTimeMillis())
        .build();
至此Response最终生成的代码被找到了。那我们访问网络的时候得到的最终String数据是在哪里得到的呢?通过刚开始OkHttp基本使用中 String line=response.body().string();可以知道,网络请求需要的流数据是封装在body里面,所以在这个类里面疯狂寻找body,最终定位到这里:
 int code = response.code();
    if (forWebSocket && code == 101) {
      // Connection is upgrading, but we need to ensure interceptors see a non-null response body.
      response = response.newBuilder()
          .body(Util.EMPTY_RESPONSE)
          .build();
    } else {
      response = response.newBuilder()
          .body(httpCodec.openResponseBody(response))
          .build();
    }
这里终于看到了一个熟悉的东西:int code = response.code();这个就跟HttpURLConnection中的网络请求的responseCode一样,HTTP协议请求状态码,离我们要找的东西越来越近了。根据代码结构定位到httpCodec.openResponseBody(response),走进方法里面:

从这里可以知道OkHttp网络是支持HTTP1.0、HTTP2.0两种的(Volley只支持HTTP1.0)。走进HTTP2.0:
@Override public ResponseBody openResponseBody(Response response) throws IOException {
    Source source = new StreamFinishingSource(stream.getSource());
    return new RealResponseBody(response.headers(), Okio.buffer(source));
  }
从这里能知道把流stream转为ResponseBody了,再查看body.string()方法:
public final String string() throws IOException {
    BufferedSource source = source();
    try {
      Charset charset = Util.bomAwareCharset(source, charset());
      return source.readString(charset);
    } finally {
      Util.closeQuietly(source);
    }
  }
这个就是开头OkHttp使用的时候 String line=response.body().string()得到的数据的方法,至此,网络Response跟踪完成了。总结一下步骤:

这个流程下来关键的类:
- Request
- OkHttpClient
- RealCall(Call)
- Dispatcher
- 5个默认拦截器
- RealInterceptorChain
- ResponseBody
- Response
三、查看网络请求的发起
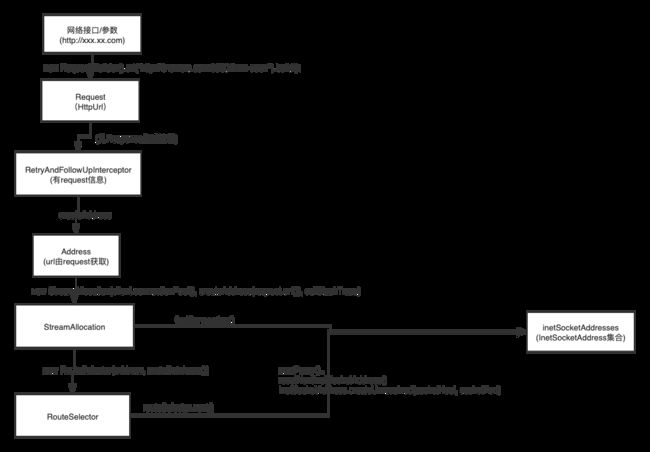
上面Response跟踪的流程上看,并没有发现网络请求发起的相关信息,由Response获取的结果上看,网络请求的发起也是由可能是在那5个默认的拦截器上进行的,通过查看资料知道,网络请求的发起是在ConnectInterceptor拦截器中。
public final class ConnectInterceptor implements Interceptor {
  public final OkHttpClient client;

  public ConnectInterceptor(OkHttpClient client) {
    this.client = client;
  }

  @Override public Response intercept(Chain chain) throws IOException {
    RealInterceptorChain realChain = (RealInterceptorChain) chain;
    Request request = realChain.request();
    StreamAllocation streamAllocation = realChain.streamAllocation();

    // We need the network to satisfy this request. Possibly for validating a conditional GET.
    boolean doExtensiveHealthChecks = !request.method().equals("GET");
    HttpCodec httpCodec = streamAllocation.newStream(client, doExtensiveHealthChecks);
    RealConnection connection = streamAllocation.connection();

    return realChain.proceed(request, streamAllocation, httpCodec, connection);
  }
}
HttpCodec httpCodec = streamAllocation.newStream(client, doExtensiveHealthChecks);从字面newStream意思猜测这个是生成流的意思,doExtensiveHealthChecks标识是否是GET请求,这个之前或者里面就已经连接上目标网络了,进入这个方法:
 public HttpCodec newStream(OkHttpClient client, boolean doExtensiveHealthChecks) {
    int connectTimeout = client.connectTimeoutMillis();
    int readTimeout = client.readTimeoutMillis();
    int writeTimeout = client.writeTimeoutMillis();
    boolean connectionRetryEnabled = client.retryOnConnectionFailure();

    try {
      RealConnection resultConnection = findHealthyConnection(connectTimeout, readTimeout,
          writeTimeout, connectionRetryEnabled, doExtensiveHealthChecks);
      HttpCodec resultCodec = resultConnection.newCodec(client, this);

      synchronized (connectionPool) {
        codec = resultCodec;
        return resultCodec;
      }
    } catch (IOException e) {
      throw new RouteException(e);
    }
  }
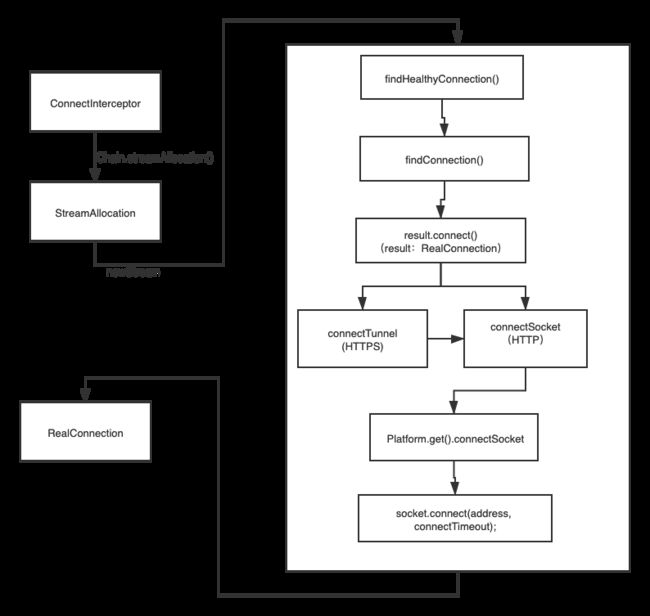
RealConnection,见名知义真实连接跟踪RealConnection的生成过程可以看到,最终在RealConnection中进行了Socket连接,
 private RealConnection findHealthyConnection(int connectTimeout, int readTimeout,
      int writeTimeout, boolean connectionRetryEnabled, boolean doExtensiveHealthChecks)
      throws IOException {
      ...省略...
  }
…
public void connect(
      int connectTimeout, int readTimeout, int writeTimeout, boolean connectionRetryEnabled) {
    if (protocol != null) throw new IllegalStateException("already connected");

    ...省略...
    while (true) {
      try {
        if (route.requiresTunnel()) {
          connectTunnel(connectTimeout, readTimeout, writeTimeout);
        } else {
          connectSocket(connectTimeout, readTimeout);
        }
        establishProtocol(connectionSpecSelector);
        break;
      } catch (IOException e) {

    }

    ...省略...
  }
connectTunnel:进行HTTPS连接
connectSocket: 进行HTTP连接
两者最终都会执行 Platform.get().connectSocket(rawSocket, route.socketAddress(), connectTimeout);
public void connectSocket(Socket socket, InetSocketAddress address,
      int connectTimeout) throws IOException {
    socket.connect(address, connectTimeout);
  }
最终底层为Socket连接。
流程类:
- ConnectInterceptor
- StreamAllocation
- RealConnection
- Platform
流程图下图:
四、Socket访问网络
- Android访问网络都是通过TCP、UDP两种方式,访问接口大都是使用TCP方式。
- Socket:是对TCP/IP协议的封装,Socket本身并不是协议,而是一个调用接口(API),通过Socket,我们才能使用TCP/IP协议。
- Socket封装Http网络请求:Socket+HTTP头部。
Socket封装Http网络请求:
@Test
    public void socketTest(){
        try {
            URL url=new URL("http://itnewers.com:8080/");
            String host=url.getHost();
            int port=url.getPort();
            SocketAddress socketAddress=new InetSocketAddress(host,port);
            Socket socket=new Socket();
            socket.connect(socketAddress);

            OutputStreamWriter streamWriter = new OutputStreamWriter(socket.getOutputStream());
            BufferedWriter bufferedWriter = new BufferedWriter(streamWriter);
            bufferedWriter.write("GET " + "/linxz-user/" + " HTTP/1.1\r\n");
            bufferedWriter.write("Host: " + url.getHost() + "\r\n");
            bufferedWriter.write("\r\n");
            bufferedWriter.flush();

            BufferedInputStream streamReader = new BufferedInputStream(socket.getInputStream());
            BufferedReader bufferedReader = new BufferedReader(new InputStreamReader(streamReader, "utf-8"));
            String line;
            while((line = bufferedReader.readLine())!= null)
            {
                System.out.println(line);
            }
            bufferedReader.close();
            bufferedWriter.close();
            socket.close();
        } catch (Exception e) {
            e.printStackTrace();
        }
    }
访问结果如下:
HTTP/1.1 200 OK
Server: Apache-Coyote/1.1
Accept-Ranges: bytes
ETag: W/"799-1560868948000"
Last-Modified: Tue, 18 Jun 2019 14:42:28 GMT
Content-Type: text/html
Content-Length: 799
Date: Thu, 26 Dec 2019 01:48:24 GMT
Streamlet个人网站
欢迎来到Streamlet个人网站
Process finished with exit code 0
发起请求步骤:
- 1、new InetSocketAddress()
- 2、new Socket()
- 3、socket.connect(socketAddress)
- 4、获取OutputStream:socket.getOutputStream()
- 5、发送请求:HTTP请求头+HOST
获取服务器端返回来的数据步骤:
- 1、获取InputStream:socket.getInputStream()
- 2、将InputStream转为字符串(String)、文件(image、file)等
OkHttp中Socket连接网络、获取服务器端数据相关代码: