android自定义View之重写View来实现全新的控件
当android系统原生的控件无法满足我们的需要求时,我们完全可以新建一个自定义的View实现需要的功能。自定义控件通常要重写它的onDraw(),onMeasure()等方法来实现绘制逻辑。下面我就以一个例子来了解如何创建一个自定义View。
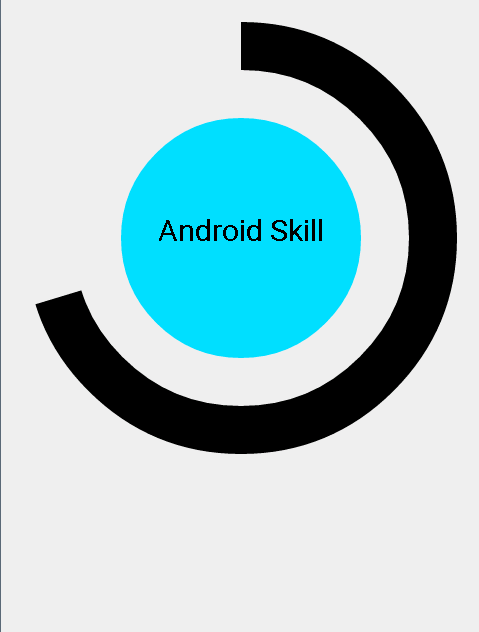
实现效果如图:

项目分析:图中的自定义View分为三个部分,分别只中间的圆形,中间的文字,外圈的弧形。我们设置View的绘制长度就是屏幕的宽度。
第一步:绘制三种图像—–创建类ArcImg,继承View
package com.wjc.drawview0504;

import android.app.Application;
import android.content.Context;
import android.graphics.Canvas;
import android.graphics.Paint;
import android.graphics.RectF;
import android.support.v4.content.ContextCompat;
import android.util.AttributeSet;
import android.util.Log;
import android.view.View;

/**
 * Created by admin on 2016/5/4.
 */
public class ArcImg extends View {
    private int mWidth;
    private int mHeihgt;

    private Paint mCirclePaint,mArcPaint,mTextPaint;
    private float mCircleXY;
    private float mRadius;

    private RectF mArcRectF;
    private float mSweepValue=66;
    private float mSweepAngle;

    private String mShowText;
    private float mShowTextSie;

    public ArcImg(Context context, AttributeSet attrs) {
        super(context, attrs);
    }

        //对宽高重新进行定义
    @Override
    protected void onMeasure(int widthMeasureSpec, int heightMeasureSpec) {
         mWidth=MeasureSpec.getSize(widthMeasureSpec);
         mHeihgt=MeasureSpec.getSize(heightMeasureSpec);
        setMeasuredDimension(mWidth,mHeihgt);
        initView();
    }


    public void initView(){
 //设置圆的参数
       float length=0;//自定义View的宽度
        if(mWidth>mHeihgt){
            length=mHeihgt;
        }else{
            length=mWidth;
        }
        mCircleXY=(float)(length/2);//圆心坐标
        mRadius=mCircleXY/2;//设置圆的半径
        mCirclePaint=new Paint();//画笔
        mCirclePaint.setAntiAlias(true);//平滑
      // mCirclePaint.setColor(getResources().getColor(android.R.color.holo_blue_bright));//过时了
        mCirclePaint.setColor(ContextCompat.getColor(getContext(),android.R.color.holo_blue_bright));
 //设置弧线
        mArcRectF=new RectF(
                (float)(length*0.1),
                (float)(length*0.1),
                (float)(length*0.9),
                (float)(length*0.9));
        mSweepAngle=(mSweepValue/100f)*360f;//扫过的角度
        mArcPaint=new Paint();
        mArcPaint.setAntiAlias(true);
        mArcPaint.setStrokeWidth((float) (length * 0.1));
        mArcPaint.setStyle(Paint.Style.STROKE);
//设置文字
        mShowText=setShowText();
        mShowTextSie=setShowTextSize();
        mTextPaint=new Paint();
        mTextPaint.setTextSize(mShowTextSie);
        mTextPaint.setTextAlign(Paint.Align.CENTER);
    }


//绘制图像
    @Override
    protected void onDraw(Canvas canvas) {
        super.onDraw(canvas);
        //绘制圆
        canvas.drawCircle(mCircleXY, mCircleXY, mRadius, mCirclePaint);
        //绘制弧线
        /**
         * mArcRectF :指定圆弧的外轮廓矩形区域。
         startAngle: 圆弧起始角度,单位为度。
         sweepAngle: 圆弧扫过的角度,顺时针方向,单位为度。
         useCenter: 如果为True时,在绘制圆弧时将圆心包括在内,通常用来绘制扇形。
         paint: 绘制圆弧的画板属性,如颜色,是否填充等。
         */
      canvas.drawArc(mArcRectF, 270, mSweepAngle, false, mArcPaint);
        //绘制文字
        canvas.drawText(mShowText,0,mShowText.length(),mCircleXY,mCircleXY,mTextPaint);

    }

    private float setShowTextSize(){
        this.invalidate();//刷新View,在UI线程中进行
        return  30;
    }

    private String setShowText(){
        this.invalidate();
        return "Android Skill";
    }
 //设置不同弧度的状态值
    public void setSweepValue(float sweepValue){
        if(sweepValue!=0){
            mSweepValue=sweepValue;
        }else{
            mSweepValue=25;
        }
    }
}
代码中,设置圆的颜色,在 API 23 之前使用a这种写法,但API 23 建议使用ContextCompat.getColor(context,id),如b,我使用了getContext()获取context,如果哪位有更好的方法,请告知!
a. mCirclePaint.setColor(getResources().getColor(android.R.color.holo_blue_bright));//过时了
b. mCirclePaint.setColor(ContextCompat.getColor(getContext(),android.R.color.holo_blue_bright));
而在绘制文字中,我看了drawText()的源代码,实在不能理解源代码坐标(x,y)意思,我认为x,y是文字的中心,你觉得呢?
canvas.drawText(mShowText,0,mShowText.length(),mCircleXY,mCircleXY,mTextPaint);drawText()的源代码:
 /**
     * Draw the text, with origin at (x,y), using the specified paint.
     * The origin is interpreted based on the Align setting in the paint.
     *
     * @param text  The text to be drawn
     * @param start The index of the first character in text to draw
     * @param end   (end - 1) is the index of the last character in text to draw
     * @param x     The x-coordinate of the origin of the text being drawn
     * @param y     The y-coordinate of the baseline of the text being drawn
     * @param paint The paint used for the text (e.g. color, size, style)
     */
    public void drawText(@NonNull String text, int start, int end, float x, float y,
            @NonNull Paint paint) {
        if ((start | end | (end - start) | (text.length() - end)) < 0) {
            throw new IndexOutOfBoundsException();
        }
        native_drawText(mNativeCanvasWrapper, text, start, end, x, y, paint.mBidiFlags,
                paint.getNativeInstance(), paint.mNativeTypeface);
    }
第二步:在布局xml中引用
    <com.wjc.drawview0504.ArcImg
        android:id="@+id/circle"
        android:layout_width="match_parent"
        android:layout_height="match_parent" />
第三步:在activity中调用,检测自定义View是否成功
        mArcImg=(ArcImg)findViewById(R.id.circle);
        mArcImg.setSweepValue(70);//指定弧度比例
好了,整个流程就这样了。现在我的案例基本是来自徐宜生的《android群英传》,如果哪位也在看这本书,欢迎一起讨论,学习。