Android学习笔记之屏幕宽高、状态栏宽高、标题宽高以及left()、top()、right()、bottom()
Android学习笔记之屏幕宽高、状态栏宽高、标题宽高以及left()、top()、right()、bottom()
前言:
想学号安卓,这几个方法及属性你不得不学会怎么获取,当你学会了如何获取屏幕宽高、状态栏宽高、标题栏宽高以及子控件与父控件的left()、top()、right()、bottom()等,这会对你学习自定义控件会有很大的帮助,我之前做自定义的时候有时候也很难弄清他们之间的区别,今天有必要把这些知识点总结起来跟大家一起分享分享,让自己在今后的学习中不在为这些方法感到苦恼。
首先要了解的是安卓的屏幕分布区域(这里我采用的是1080 * 1920的屏幕),如下图所示:
通过上图我们就可以知道手机屏幕主要的三个区域了,下面我们开始使用代码来获取这三个区域的宽高度。
这里需要注意一下,这里我们所测的高度并不是1920,因为最底下有一个模拟的虚拟按钮占据了一定的空间高度,所以具体的高度,会根据手机的具体情况获取。
为什么我有时候在使用getLeft(), getRight(), getTop(), getBottom()它们得到的结果是0?
出现这种情况可能是在刚启动程序,程序刚开始绘制 view 的时候,你马上使用代码去捕获上面的值。这个时候,由于view 是刚开始绘制的,你得到的就会是 0,所以,这里我们所有的测试都放在点击事件里面来进行。
- 获取整个屏幕的宽度:
可以通过一下5中形式获取整个屏幕的宽高度
/**
     * 获取屏幕的总宽度
     * 采用5中方法
     */
    public void getTotalScreenWidthAndHeight() {
        //方法1
        WindowManager manager1 = getWindowManager();
        Display display = manager1.getDefaultDisplay();
        Point point = new Point();
        display.getSize(point);
        Log.d(TAG, "getTotalScreenWidth: width = " + point.x);
        Log.d(TAG, "getTotalScreenWidth: height = " + point.y);
        //方法2
        WindowManager manager2 = (WindowManager) getSystemService(WINDOW_SERVICE);
        int width = manager2.getDefaultDisplay().getWidth();
        int height = manager2.getDefaultDisplay().getHeight();
        Log.d(TAG, "getTotalScreenWidth: width = " + width);
        Log.d(TAG, "getTotalScreenWidth: height = " + height);
        //方法3
        WindowManager manager3 = getWindowManager();
        int width1 = manager3.getDefaultDisplay().getWidth();
        int height1 = manager3.getDefaultDisplay().getHeight();
        Log.d(TAG, "getTotalScreenWidth: width = " + width1);
        Log.d(TAG, "getTotalScreenWidth: height = " + height1);
        //方法4
        WindowManager manager4 = this.getWindowManager();
        DisplayMetrics outMetrics = new DisplayMetrics();
        manager4.getDefaultDisplay().getMetrics(outMetrics);
        int width2 = outMetrics.widthPixels;
        int height2 = outMetrics.heightPixels;
        Log.d(TAG, "getTotalScreenWidth: width = " + width2);
        Log.d(TAG, "getTotalScreenWidth: height = " + height2);
        //方法5
        Resources resources  = getResources();
        DisplayMetrics dm = resources.getDisplayMetrics();
        float density1 = dm.density;
        int width3 = dm.widthPixels;
        int height3 = dm.heightPixels;
        Log.d(TAG, "getTotalScreenWidth: width = " + width3);
        Log.d(TAG, "getTotalScreenWidth: height = " + height3);
    }
获取的结果为:width = 1080 height = 1794 上面也已经说过了,这里为什么不是1920,因为虚拟按钮部分占据了126的高度
- 获取标题栏的高度以及到底部的高度
/**
     * 获取屏幕标题栏到底部的高度
     */
    public void getScreenTitleHeight() {
        Rect outRect = new Rect();
        getWindow().getDecorView().getWindowVisibleDisplayFrame(outRect);
        //打印标题栏的高度
        Log.d(TAG, "height = " + outRect.top);
        //打印标题栏到底部的高度
        Log.d(TAG, "width = " + outRect.width() + " height = " + outRect.height());
    }
结果为:height = 63 outRect.top是状态栏占用的高度为63 width = 1080 height = 1731 宽度不变是毫无疑问的,高度是1731 刚好整个屏幕的高度(1794) - (1731)标题栏到底部的高度 就刚好是63了。
- 获取view绘制区域的高度:
/**
     * 获取view绘制区域的高度
     */
    public void getScreenViewHeight(){
        Rect outRect = new Rect();
        getWindow().findViewById(Window.ID_ANDROID_CONTENT).getDrawingRect(outRect);
        Log.d(TAG, "height = " + outRect.height());
    }
结果为:height = 1584 表示的是view绘制区域到底部的高度, 这样获取的结果就出来了,下面总结一下整个的需要掌握的高度
屏幕总宽高度: 1080 * 1794
屏幕标题栏到底部的宽高度 : 1080 * 1731
屏幕状态栏的高度:63
屏幕view绘制区域的宽高度 : 1080 * 1584
屏幕的标题栏高度为:1794(整个屏幕高度) - 1584(view绘制区的高度) - 63(状态栏的高度) = 147(标题栏的高度)。
- 下面开始讲解如何判断父控件的各种宽高距离
getLeft():
getRight();
getTop();
getBottom();
getPaddingLeft():
getPaddingRight():
getPaddingTop():
getPaddingBottm():
先看一下布局
activity_main.xml
<RelativeLayout xmlns:android="http://schemas.android.com/apk/res/android"
    android:id="@+id/activity_main"
    android:layout_width="match_parent"
    android:paddingLeft="13dp"
    android:paddingRight="14dp"
    android:paddingTop="15dp"
    android:paddingBottom="16dp"
    android:layout_height="match_parent">
    <Button
        android:layout_width="wrap_content"
        android:layout_height="wrap_content"
        android:layout_centerInParent="true"
        android:text="获取宽高度"
        android:onClick="onClick"/>
RelativeLayout>
MainActivity.java
public class MainActivity extends AppCompatActivity {

    private static final String TAG = MainActivity.class.getSimpleName();
    private ImageView mImage;

    @Override
    protected void onCreate(Bundle savedInstanceState) {
        super.onCreate(savedInstanceState);
        setContentView(R.layout.activity_main);
        mImage = (ImageView) findViewById(R.id.mImage);

    }
    /**
     * 测试父控件的left  top  right  bottom
     * @param view 子控件
     */
    public void testParentView(View view) {
        String parentName = view.getClass().getSimpleName();
        left(parentName, view.getLeft());
        top(parentName, view.getTop());
        right(parentName, view.getRight());
        bottom(parentName, view.getBottom());
    }
    private void bottom(String childName, float distance) {
        Log.d(TAG, childName + "bottom: " + distance);
    }

    private void right(String childName, float distance) {
        Log.d(TAG, childName + "right: " + distance);
    }

    private void top(String childName, float distance) {
        Log.d(TAG, childName + "top: " + distance);
    }

    private void left(String childName, float distance) {
        Log.d(TAG, childName + "left: " + distance);
    }

    public void onClick(View view) {
        //测试父容器的left ....  bottom
        testParentView((View) mImage.getParent());
        //测试父容器的paddingLeft .... paddingBottom
        testParentPadding((View) mImage.getParent());
    }

}
log打印的结果如下:
D/MainActivity: RelativeLayoutleft: 0.0
D/MainActivity: RelativeLayouttop: 0.0
D/MainActivity: RelativeLayoutright: 1080.0
D/MainActivity: RelativeLayoutbottom: 1584.0
可以看出来view绘制区域就是整个父控件的区域。
然后我们看看父容器的padding方法结果:
private void testParentPadding(View view) {
        String parentName = view.getClass().getSimpleName();
        Log.d(TAG, parentName + "testParentPadding: left = " + view.getPaddingLeft());
        Log.d(TAG, parentName + "testParentPadding: right = " + view.getPaddingRight());
        Log.d(TAG, parentName + "testParentPadding: top = " + view.getPaddingTop());
        Log.d(TAG, parentName + "testParentPadding: bottom = " + view.getPaddingBottom());
    }
结果如下:
D/MainActivity: RelativeLayouttestParentPadding: left = 34
D/MainActivity: RelativeLayouttestParentPadding: right = 37
D/MainActivity: RelativeLayouttestParentPadding: top = 39
D/MainActivity: RelativeLayouttestParentPadding: bottom = 42
你会发现我们在xml布局文件中设置的left、right、top、bottom分别是13dp、14dp、15dp、16dp,为什么这里打印的是34、37、39、42呢?这里就是有关dp转px的小知识了,在android中所有的屏幕单位都是以px为最小单位,有关单位的转换请跳转这里。
- 关于子控件与父控件之间的距离关系
布局代码如下
<RelativeLayout xmlns:android="http://schemas.android.com/apk/res/android"
    android:id="@+id/activity_main"
    android:layout_width="match_parent"
    android:layout_height="match_parent">
    <ImageView
        android:id="@+id/mImage"
        android:layout_width="wrap_content"
        android:layout_height="wrap_content"
        android:src="@mipmap/ic_launcher"
        />
    <Button
        android:layout_width="wrap_content"
        android:layout_height="wrap_content"
        android:layout_centerInParent="true"
        android:text="获取宽高度"
        android:onClick="onClick"/>
RelativeLayout>
在MainActivity.java中添加以下方法
/**
* 测试子控件的宽高度
*/
public void testChildView(View view) {
        String childName = view.getClass().getSimpleName();
        left(childName, view.getLeft());
        top(childName, view.getTop());
        right(childName, view.getRight());
        bottom(childName, view.getBottom());
    }
 public void onClick(View view) {
        testChildView(mImage);
        testParentView((View) mImage.getParent());
        testParentPadding((View) mImage.getParent());
    }
首先获取ImageView的left right top bottom
打印结果如下:
D/MainActivity: AppCompatImageViewleft: 0.0
D/MainActivity: AppCompatImageViewtop: 0.0
D/MainActivity: AppCompatImageViewright: 126.0
D/MainActivity: AppCompatImageViewbottom: 126.0
这里我们主要要掌握的就是,对于任何控件来说,他的 left、top 都是直接计算的。right = left + 图片占用的宽度
bottom = top + 图片占用的高度 这里图片的宽度为126px 高度也是126px,,我们通过如下代码可以测试下图片的宽高度。
Log.d(TAG, "mImage width = " + mImage.getWidth() + " mImage height = " + mImage.getHeight());打印结果为:
D/MainActivity: mImage width = 126 mImage height = 126
如果将ImageView控件的宽高都改变一下:
<ImageView
        android:id="@+id/mImage"
        android:layout_width="200dp"
        android:layout_height="200dp"
        android:src="@mipmap/ic_launcher"
        />
打印结果为:
D/MainActivity: AppCompatImageViewleft: 0.0
D/MainActivity: AppCompatImageViewtop: 0.0
D/MainActivity: AppCompatImageViewright: 525.0
D/MainActivity: AppCompatImageViewbottom: 525.0
这样获取的宽高同样是将dp转换成px
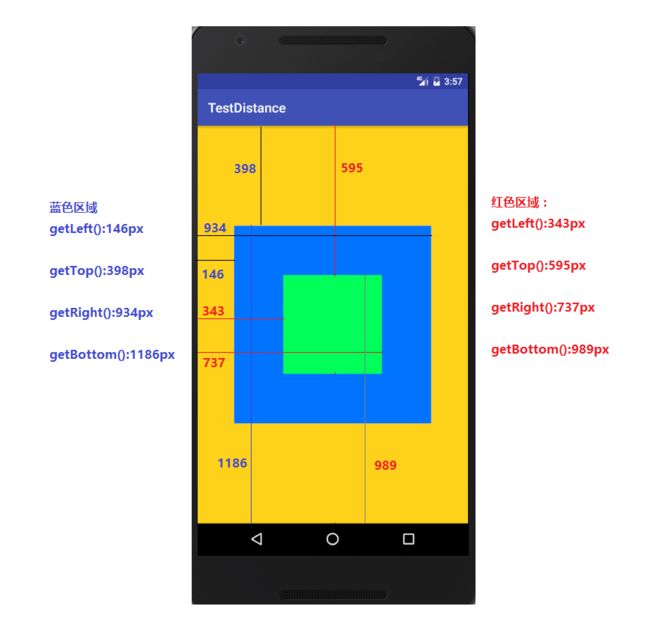
下面通过一张图可以非常直观的写出控件的left、right、top、bottom
布局代码如下:
<FrameLayout xmlns:android="http://schemas.android.com/apk/res/android"
    android:id="@+id/activity_main"
    android:layout_width="match_parent"
    android:layout_height="match_parent"
    android:background="#e3ffcc00">
    <View
        android:layout_width="300dp"
        android:layout_height="300dp"
        android:layout_gravity="center"
        android:background="#0073ff"/>
     <View
         android:layout_width="150dp"
         android:layout_height="150dp"
         android:layout_gravity="center"
         android:background="#00ff59"
         />
FrameLayout>
其中都是将dp转换成了具体的px,蓝色布局是控件View1,绿色布局是控件View2,橘黄色控件是父控件。View1,View2都是相对与父控件来控制对于的宽高度。

