GETTING STARTED WITH PICAMERA(python picamera入门)
原文地址:https://www.raspberrypi.org/learning/getting-started-with-picamera/worksheet/
#################################################################################33
这个相机模块是树莓派上一个很好的配件,允许使用者获取高清的图片或视频
CONNECT THE CAMERA MODULE
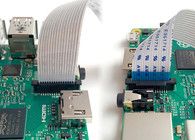
首先,关掉树莓派电源,将相机模块连接到树莓派上,然后启动树莓派,并确保相机软件能够运行。
1.在树莓派上找到相机端口,然后与摄像头相连
2.启动树莓派
3.从主菜单(the main menu)打开树莓派配置工具(the Raspberry Pi Configuration Tool)
4.确保相机软件已经启动
如果未启动,那么启动它并重启树莓派
CAMERA PREVIEW
现在你的摄像头已经连好,并且你的软件已经启动,那么开始尝试使用相机预览(the camera preview)。
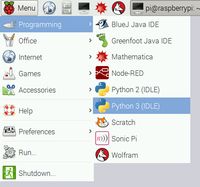
1.打开主菜单的Python 3选项(或者Python 2):
2.Opencv a new file and save it as camera.py. It's important that you do not save it as picamera.py(没搞懂为啥不能命名为picamera.py,我命名了也没问题)
3.输入以下代码:
from picamera import PiCamera
from time import sleep

camera = PiCamera()

camera.start_preview()
sleep(10)
camera.stop_preview()注意:相机预览模式仅工作在图形界面下(when a monitor is connected to the Pi),所以远程登陆(比如SSH或者VNC)无法使用相机预览
5.如果你的预览画面颠倒了,可以通过代码旋转画面:
camera.rotation = 180
camera.start_preview()
sleep(10)
camera.stop_preview()
你可以设置旋转角度为90, 180或者270度(使用其他的角度,比如100,150等好像也可以),你也可以设置为0,表示复位
6.你可以通过设置alpha参赛的值,来修改预览画面的透明度:
from picamera import PiCamera
from time import sleep

camera = PiCamera()

camera.start_preview(alpha=200)
sleep(10)
camera.stop_preview()
参数alpha取值范围为[0,255]。
STILL PICTURES
对于相机模块,最常用的就是获取图片(take still pictures)
1.修改代码如下(amend your code to reduce the sleep and add a camera.capture() line):
camera.start_preview()
sleep(5)
camera.capture('/home/pi/Desktop/image.jpg')
camera.stop_preview()2.运行代码,预览画面显示5秒后,保存一张图象并退出(Run the code and you'll see the camera preview open for 5 seconds before capturing a still picture. You'll see the preview adjust to a different resolution momentarily as the picture is taken)。
3.可以在文件夹中打开此图象(You'll see your photo on the Desktop. Double-click the file icon to open it):
4.现在,循环获取5张图象:
camera.start_preview()
for i in range(5):
    sleep(5)
    camera.capture('/home/pi/Desktop/image%s.jpg' % i)
camera.stop_preview()
变量i保存当前迭代数,取值从0到4,所以图象保存命名如下:image0.jpg,image1.jpg . . . 。
5.再次运行代码。程序将每隔5秒保存一张图片,共5张。
6.一旦第5张图片保存完后预览画面结束,可以在文件夹中查看保存的5张图片。
RECORDING VIDEO
上面的代码让你能够获取图片,下面实现录制视频功能
1.修改代码如下,舍弃函数capture,使用start_recording和stop_recording函数:
#!/usr/bin/env python
#-*- coding: utf-8 -*-

import picamera
from time import sleep

camera = picamera.PiCamera()

camera.start_preview()
camera.start_recording("/home/pi/zj/video.h264")
sleep(10)
camera.stop_recording()
camera.stop_preview()
2.运行代码,程序会录制10秒钟的视频,然后结束
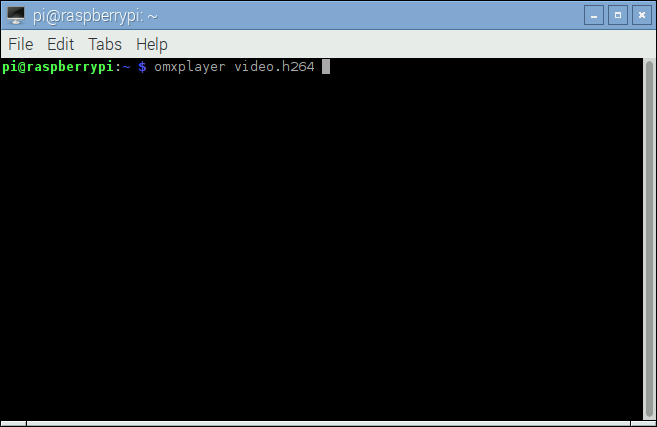
3.运行这段视频,先要打开控制台窗口,可以在任务栏中点击黑色显示器图标:
omxplayer video.h264
5.由于omxplayer的快速帧速率(due to omxplayer's fast frame rate),这个视频的播放速度会略微(slightly)比录制速度快(我试了以下,快好多)。
EFFECTS
你通过代码camera = PiCamera()得到一个camera对象。你可以配置这个camera对象的参数。相机软件提供了许多参数配置,有一些参数仅适用于预览画面,有些仅适用于捕捉的画面(截图),还有一些两者都适用。
1.可以设置截图的分辨率。默认分辨率为显示器的大小,但最大的分辨率为2592x1994(截图)和1920x1080(视频)。以下代码将分辨率设置为最大。注意,你同时需要去设置帧速(the frame rate)为15以适用这个最大分辨率:
camera.resolution = (2592, 1944)
camera.framerate = 15
camera.start_preview()
sleep(5)
camera.capture('/home/pi/Desktop/max.jpg')
camera.stop_preview()
2.最小的分辨率是64x64
3.可以在图像中添加注释文本:
#!/usr/bin/env python
#-*- coding: utf-8 -*-

import picamera
from time import sleep

camera = picamera.PiCamera()

camera.start_preview()
camera.annotate_text = "Hello World"
sleep(5)
camera.capture('/home/pi/zj/text.jpg')
camera.stop_preview()
4.可以修改亮度值,大小从0到100,默认为50:
#!/usr/bin/env python
#-*- coding: utf-8 -*-

import picamera
from time import sleep

camera = picamera.PiCamera()

camera.start_preview()
camera.brightness = 20
sleep(3)
camera.capture('/home/pi/zj/bright.jpg')
camera.stop_preview()
5.试着在一个循环中调整亮度,然后文本注释出当前亮度值:
camera.start_preview()
for i in range(100):
    camera.annotate_text = "Brightness: %s" % i
    camera.brightness = i
    sleep(0.1)
camera.stop_preview()camera.start_preview()
for i in range(100):
camera.annotate_text = "Contrast: %s" % i
camera.contrast = i
sleep(0.1)
camera.stop_preview()7.可以设置注释文本的大小:
camera.annotate_text_size = 508.可以修改注释文本的颜色。
先导入Color模块:
from picamera import PiCamera, Colorcamera.start_preview()
camera.annotate_background = Color('blue')
camera.annotate_foreground = Color('yellow')
camera.annotate_text = " Hello world "
sleep(5)
camera.stop_preview()9.参数camera.image_effect可以实现多种图像类型。选项如下:none, negative, solarize, sketch, denoise, emboss, oilpaint, hatch, gpen, pastel, watercolor, film, blur, saturation, colorswap, washedout, posterise, colorpoint, colorbalance, cartoon, deinterlace1, and deinterlace2。默认值为none。
try it out:
camera.start_preview()
camera.image_effect = 'colorswap'
sleep(5)
camera.capture('/home/pi/Desktop/colorswap.jpg')
camera.stop_preview()camera.start_preview()
for effect in camera.IMAGE_EFFECTS:
camera.image_effect = effect
camera.annotate_text = "Effect: %s" % effect
sleep(5)
camera.stop_preview()
11.使用参数camera.awb_mode可以实现白平衡模式(the auto white balance)。选项如下:off, auto, sunlight, cloudy, shade, tungsten, fluorescent, incandescent, flash, and horizon。默认选项为auto。
try it out:
camera.start_preview()
camera.awb_mode = 'sunlight'
sleep(5)
camera.capture('/home/pi/Desktop/sunlight.jpg')
camera.stop_preview()12.使用参数camera.exposure_mode可以实现不同瀑光(exposure)模式。选项如下:off, auto, night, nightpreview, backlight, spotlight, sports, snow, beach, verylong, fixedfps, antishake, and fireworks。默认选项为auto。
try it out:
camera.start_preview()
camera.exposure_mode = 'beach'
sleep(5)
camera.capture('/home/pi/Desktop/beach.jpg')
camera.stop_preview()WHAT NEXT?
Now you've got started with the camera module, what else can you do? You could try adding GPIO controls using GPIO Zero, integrate with Minecraft Pi, or even post your pictures to Twitter! Try some more camera resources:
1)Push button stop-motion
2)Minecraft photobooth
3)Tweeting Babbage
4)Parent detector
There's also an infrared version of the camera (called Pi NoIR) which gives you everything the regular camera module offers, with one difference: it doesn't use an infrared filter. This gives you the ability to see in the dark with infrared lighting. See the Infrared bird box resource for making the most of the Pi NoIR camera.
Also, see the extensive picamera documentation for more information.


