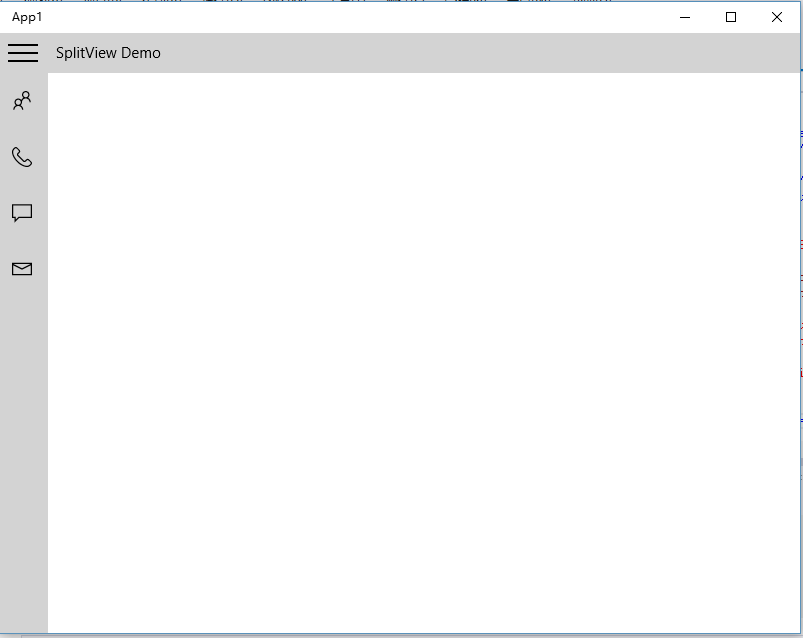
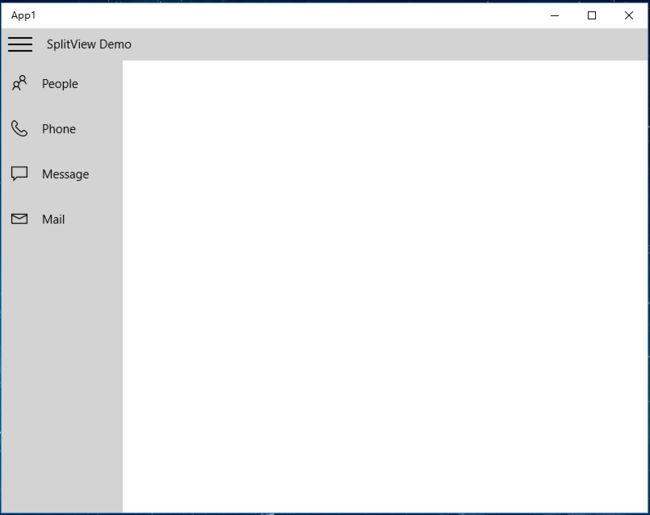
SplitView(汉堡菜单)是win10新加的一种控件,顾名思义,其实就是将视图分割成两部分,废话不多说,下面来介绍一下SplitView的基本用法。
首先介绍几个SplitView经常用到的属性。(我直接搬MSDN的。。。
| IsPaneOpen | Read/write | Gets or sets a value that specifies whether the SplitView pane is expanded to its full width. |
| PaneBackground | Read/write | Gets or sets the Brush to apply to the background of the Pane area of the control. |
| CompactPaneLength | Read/write | Gets or sets the width of the SplitView pane in its compact display mode. |
| OpenPaneLength | Read/write | Gets or sets the width of the SplitView pane when it's fully expanded. |
| DisplayMode | Read/write | Gets of sets a value that specifies how the pane and content areas of a SplitView are shown. |
DisplayMode就是控制SplitView的展开样式,有4个值,Overlay,Inline,CompactOverlay,CompactInline。具体效果可以自行编写查看。此例中pc版设置为CompactOverlay,mobile版设置为Overlay
好的,介绍完毕,那么我们开始实战。首先看看demo运行的效果。
那么接下来我们先看代码布局,我们采用将汉堡Button单独放在SplitView外面。以下是汉堡Button的布局代码,这里说一下,汉堡图标的样式采用字体图标,字体为Segoe MDL2 Assets,更多图标请点此链接->http://modernicons.io/segoe-mdl2/cheatsheet/
<Grid.RowDefinitions> <RowDefinition Height="Auto">RowDefinition> <RowDefinition Height="*">RowDefinition> Grid.RowDefinitions> <StackPanel Grid.Row="0" Height="40" Background="LightGray" Orientation="Horizontal"> <Button Background="Transparent" BorderThickness="0" VerticalAlignment="Top" Click="Menu_Click"> <Button.Content> <TextBlock Text="" FontSize="30" FontFamily="Segoe MDL2 Assets" >TextBlock> Button.Content> Button> <TextBlock Margin="10" VerticalAlignment="Center" FontFamily="40" Text="SplitView Demo">TextBlock> StackPanel>
接下来当然就是SplitView的代码了。Pane是可隐藏视图,里面采用的ListView控件,Content是主要视图。
<SplitView Grid.Row="1" x:Name="splitView" CompactPaneLength="48" OpenPaneLength="150"
                       IsPaneOpen="False" PaneBackground="LightGray" DisplayMode="CompactOverlay">
            <SplitView.Pane>
                <ListView x:Name="hambLv" IsItemClickEnabled="True" ItemClick="hambLv_ItemClick">
                    <ListView.ItemTemplate>
                        <DataTemplate>
                            <StackPanel Orientation="Horizontal">
                                <SymbolIcon Symbol="{Binding Symbol}"/>
                                <TextBlock Margin="18" Text="{Binding Text}" />
                            StackPanel>
                        DataTemplate>
                    ListView.ItemTemplate>
                ListView>
            SplitView.Pane>
            <SplitView.Content>
                <TextBlock x:Name="content" FontSize="30">TextBlock>
            SplitView.Content>
        SplitView>
至此,前台代码完成。
后台代码首先是汉堡Button控制SplitView的展开与收起。
1         private void Menu_Click(object sender, RoutedEventArgs e)
2         {
3             splitView.IsPaneOpen = !splitView.IsPaneOpen;
4         }
我们定义一个HambList新类用以封装。
1     public class HambList
2     {
3         public string Text { get; set; }
4         public Symbol Symbol { get; set; }
5     }
然后在页面代码中生成ViewItem,并作为ListView的数据源。
1 ObservableCollectionhambList = new ObservableCollection (); //这里注意要引入System.Collections.ObjectModel命名空间; 2 protected override void OnNavigatedTo(NavigationEventArgs e) 3 { 4 hambList.Clear(); 5 hambList.Add(new HambList { Text = "People", Symbol = Symbol.People }); 6 hambList.Add(new HambList { Text = "Phone", Symbol = Symbol.Phone }); 7 hambList.Add(new HambList { Text = "Message", Symbol = Symbol.Message }); 8 hambList.Add(new HambList { Text = "Mail", Symbol = Symbol.Mail }); 9 base.OnNavigatedTo(e); 10 }
1 this.hambLv.ItemsSource = hambList; //将hambList集合绑定到ListView控件
接下来,我们将List每个项的Text属性显示到Content部分的TextBlock控件里。
1         private void hambLv_ItemClick(object sender, ItemClickEventArgs e)
2         {
3             content.Text = (e.ClickedItem as HambList).Text;
4         }
最后,我们判断一下用户设备,如果是mobile就把DisplayMode设置为Overlay。
1             ResourceContext resContext = ResourceContext.GetForCurrentView();
2             string value = resContext.QualifierValues["DeviceFamily"];
3             if (value == "Mobile")
4             {
5                 splitView.DisplayMode = SplitViewDisplayMode.Overlay;
6             }
好了,本文介绍SplitView就此结束。
Demo下载链接:http://pan.baidu.com/s/1dDqHnvr

