OpenCV-细化算法(thinning algorithm)算法详解——提取二值图的骨架
昨天不是说同学问我怎么绘制出轮廓的中心线。然后我上网查了一下其实这个有专门的算法叫做细化算法。用专业术语去描述绘制出轮廓的中心线叫做(提取图像的骨架)。然后这一篇博客呢是我对这个细化算法的解读与实操~
一、thinning algorithm算法描述
图像细化(Image Thinning),一般指二值图像的骨架化(Image Skeletonization)的一种操作运算。切记:前提条件一定是二值图!
所谓的细化就是经过一层层的剥离,从原来的图中去掉一些点,但仍要保持原来的形状,直到得到图像的骨架。骨架,可以理解为图象的中轴。


细化算法有很多,我这里就着重讲一下ZHANG Algorithm
1.1 图像知识前提补充
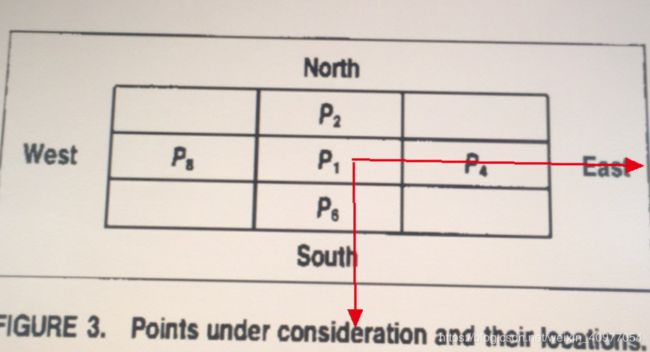
对于二值图来说,我们可以看成由0,1组成的图像(也可以理解为矩阵)。在一副图中我们要去除多余的边界点保留连接点,端点,孤立点这些重要的图像节点。算法的整体思想就是用9个格子表示这些重要点,并去掉不必要的点。


1.2 细化算法步骤讲解
step1:
扫描图像,遇到为1的点时用上述模板,把为1的点作为P1(P1为前景点)如果同时满足以下4个条件,则另P1=0 (即删除P1点)。
- 2 ≤ B ( P 1 ) ≤ 6 2\leq B(P_1)\leq 6 2≤B(P1)≤6
- A ( P 1 ) = 1 A(P_1)=1 A(P1)=1
- P 2 ∗ P 4 ∗ P 6 = 0 P_2*P_4*P_6=0 P2∗P4∗P6=0
- P 4 ∗ P 6 ∗ P 8 = 0 P_4*P_6*P8=0 P4∗P6∗P8=0
A ( P 1 ) 是 以 P 2 , P 3 . . . . . P 9 为 序 时 , 这 些 点 从 0 − > 1 变 化 的 次 数 A_(P_1)是以P_2,P_3.....P_9为序时,这些点从0 ->1变化的次数 A(P1)是以P2,P3.....P9为序时,这些点从0−>1变化的次数
B ( P 1 ) 是 P 2 , P 3 . . . . . P 9 , 非 零 ( 即 1 ) 的 个 数 B_(P_1)是P_2,P_3.....P_9,非零(即1)的个数 B(P1)是P2,P3.....P9,非零(即1)的个数
被判定为删除的点暂不删除,但要加以记录。等所有边界点都被判断完后,再一起将所有标记了的点删除,接下来进入第二阶段的删除步骤。
为什么要满足上述条件:
1、 条 件 1 为 控 制 在 端 点 和 边 界 点 之 间 。 刚 好 端 点 时 B ( P 1 ) = 2 条件1为控制在端点和边界点之间。刚好端点时B(P_1)=2 条件1为控制在端点和边界点之间。刚好端点时B(P1)=2,边界点最大 B ( P 1 ) = 8 B(P_1)=8 B(P1)=8。所以当 B ( P 1 ) ∈ [ 2 , 6 ] B(P_1)\in[2,6] B(P1)∈[2,6]时不是关键点,可以考虑进一步条件用以删除。
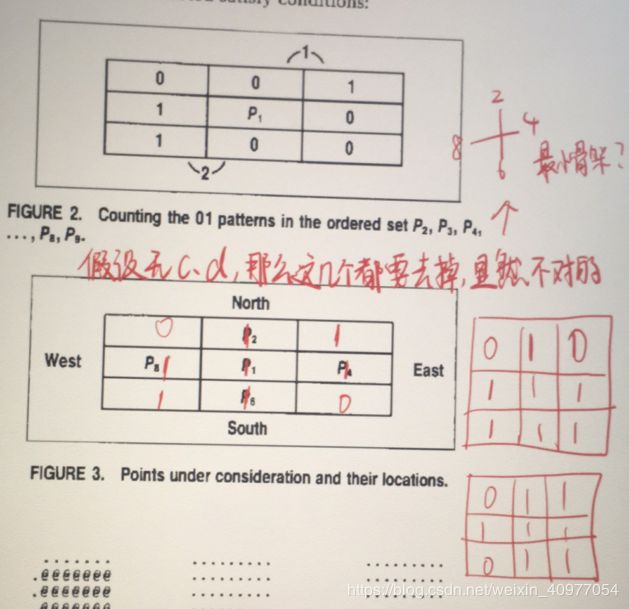
2、当 A ( P 1 ) > 1 A(P_1)>1 A(P1)>1时很有可能就是连接点,所以一定要保证 A ( P 1 ) = 1 A(P_1)=1 A(P1)=1 。
如下面这个就是 A ( P 1 ) > 1 A(P_1)> 1 A(P1)>1就是连接点。

3、 P 2 ∗ P 4 ∗ P 6 = 0 P_2*P_4*P_6=0 P2∗P4∗P6=0 和 P 4 ∗ P 6 ∗ P 8 = 0 P_4*P_6*P8=0 P4∗P6∗P8=0 这两个条件我是这样理解的

step2:
按照如下条件进行第二阶段的删除,条件为
- 2 ≤ B ( P 1 ) ≤ 6 2\leq B(P_1)\leq 6 2≤B(P1)≤6
- A ( P 1 ) = 1 A(P_1)=1 A(P1)=1
- P 2 ∗ P 4 ∗ P 6 = 0 P_2*P_4*P_6=0 P2∗P4∗P6=0
- P 2 ∗ P 4 ∗ P 8 = 0 P_2*P_4*P8=0 P2∗P4∗P8=0
同第一步一样,判定要删除的点只是加以记录而暂不删除,等待最后同时删除!对一副图像反复执行第一步与第二步的算法步骤,知道都没有可删除的点为止!!
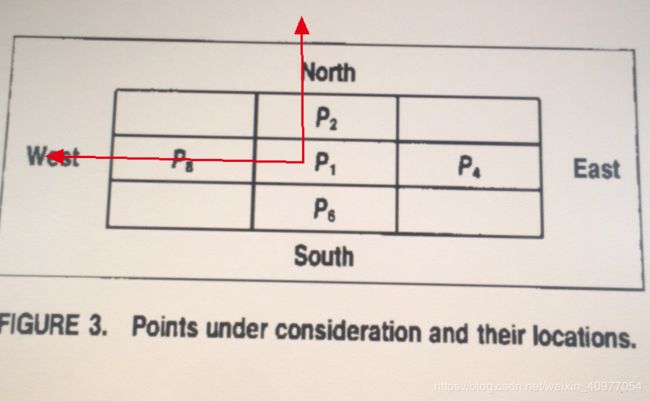
第二阶段与第一阶段不同的就在最后一个条件,因为第一阶段只是移去东南的边界点,而不考虑西北的边界点,注意p4,p6出现了2次,就是说它们有一个为0,则c,d就满足。(第一阶段 P 4 , P 6 P_4,P_6 P4,P6出现了两次所以东南方向的点更有可能被删除)

第二次时 P 2 , P 8 P_2,P_8 P2,P8出现了两次所以西北方向的点更有可能被删除$

三、源代码
# 将char类型的01的图转为int的二位list
def intarray(binstring):
    '''Change a 2D matrix of 01 chars into a list of lists of ints'''
    return [[1 if ch == '1' else 0 for ch in line]
            for line in binstring.strip().split()]


def toTxt(intmatrix):
    '''Change a 2d list of lists of 1/0 ints into lines of '#' and '.' chars'''
    return '\n'.join(''.join(('#' if p else '.') for p in row) for row in intmatrix)


# 定义像素周围的8领域
#   P9 P2 P3
#   P8 P1 P4
#   P7 P6 P5
def neighbours(x, y, image):
    '''Return 8-neighbours of point p1 of picture, in order'''
    i = image
    x1, y1, x_1, y_1 = x + 1, y - 1, x - 1, y + 1
    # print ((x,y))
    return [i[y1][x], i[y1][x1], i[y][x1], i[y_1][x1],  # P2,P3,P4,P5
            i[y_1][x], i[y_1][x_1], i[y][x_1], i[y1][x_1]]  # P6,P7,P8,P9

# 计算领域中像素从0-1变化的次数
def transitions(neighbours):
    n = neighbours + neighbours[0:1]  # P2, ... P9, P2
    return sum((n1, n2) == (0, 1) for n1, n2 in zip(n, n[1:]))


def zhangSuen(image):
    changing1 = changing2 = [(-1, -1)]
    while changing1 or changing2:
        # Step 1  循环所有前景像素点,符合条件的像素点标记为删除
        changing1 = []
        for y in range(1, len(image) - 1):
            for x in range(1, len(image[0]) - 1):
                P2, P3, P4, P5, P6, P7, P8, P9 = n = neighbours(x, y, image)
                if (image[y][x] == 1 and  # (Condition 0)
                        P4 * P6 * P8 == 0 and  # Condition 4
                        P2 * P4 * P6 == 0 and  # Condition 3
                        transitions(n) == 1 and  # Condition 2
                        2 <= sum(n) <= 6):  # Condition 1
                    changing1.append((x, y))
        # 步骤一结束后删除changing1中所有标记的点
        for x, y in changing1: image[y][x] = 0
        # Step 2 重复遍历图片,标记所有需要删除的点
        changing2 = []
        for y in range(1, len(image) - 1):
            for x in range(1, len(image[0]) - 1):
                P2, P3, P4, P5, P6, P7, P8, P9 = n = neighbours(x, y, image)
                if (image[y][x] == 1 and  # (Condition 0)
                        P2 * P6 * P8 == 0 and  # Condition 4
                        P2 * P4 * P8 == 0 and  # Condition 3
                        transitions(n) == 1 and  # Condition 2
                        2 <= sum(n) <= 6):  # Condition 1
                    changing2.append((x, y))
        # 步骤二结束后删除changing2中所有标记的点
        for x, y in changing2: image[y][x] = 0
        # 不断重复当changing1,changing2都为空的时候返回图像
        print("c1: ", changing1)
        print("c2", changing2)
    return image


rc01 = '''\
00000000000000000000000000000000000000000000000000000000000
01111111111111111100000000000000000001111111111111000000000
01111111111111111110000000000000001111111111111111000000000
01111111111111111111000000000000111111111111111111000000000
01111111100000111111100000000001111111111111111111000000000
00011111100000111111100000000011111110000000111111000000000
00011111100000111111100000000111111100000000000000000000000
00011111111111111111000000000111111100000000000000000000000
00011111111111111110000000000111111100000000000000000000000
00011111111111111111000000000111111100000000000000000000000
00011111100000111111100000000111111100000000000000000000000
00011111100000111111100000000111111100000000000000000000000
00011111100000111111100000000011111110000000111111000000000
01111111100000111111100000000001111111111111111111000000000
01111111100000111111101111110000111111111111111111011111100
01111111100000111111101111110000001111111111111111011111100
01111111100000111111101111110000000001111111111111011111100
00000000000000000000000000000000000000000000000000000000000\
'''


if __name__ == '__main__':
    print(rc01)
    image = intarray(rc01)
    print(image)
    print('\nFrom:\n%s' % toTxt(image))
    after = zhangSuen(image)
    print('\nTo thinned:\n%s' % toTxt(after))
四、参考链接
参考论文 http://agcggs680.pbworks.com/f/Zhan-Suen_algorithm.pdf
https://rosettacode.org/wiki/Zhang-Suen_thinning_algorithm#C.2B.2B 感觉是作者自己的博客链接,这里有各种其他语言的该算法实现(英文)
https://nayefreza.wordpress.com/2013/05/11/zhang-suen-thinning-algorithm-java-implementation/ 英文
https://nayefreza.wordpress.com/2013/05/11/zhang-suen-thinning-algorithm-java-implementation/ 英文
https://blog.csdn.net/jia20003/article/details/52142992 中文。推荐英语基础稍微弱一点的小伙伴先从这一篇看起,如果还有啥不明白的可以再看上面这几个链接~、
五、总结
其实这个算法我还是有一个地方不是很能弄明白,就是
P 2 ∗ P 4 ∗ P 6 = 0 和 P 4 ∗ P 6 ∗ P 8 = 0 P_2*P_4*P_6=0和 P_4*P_6*P8=0 P2∗P4∗P6=0和P4∗P6∗P8=0 这个地方。虽然我知道他要这样做,但是总是找不到一个比较好的正面解释。找了几篇博客也看了论文,在这个地方都没有解释的很清楚o(╥﹏╥)o
希望如果有小伙伴能更好的解释这个地方的可以给我留言哦_(:з」∠)_
