Android开发 和风天气API 解析天气数据
Android开发 和风天气API 解析天气数据
- 申请和风天气开发者
- 在和风天气控制台新建一个应用
- 新建一个Android Studio项目
- 添加依赖
- 下载并引用和风天气的Android SDK
- 获取和风天气API接口的数据
- 创建好布局
- 创建2个实体类:Province, City
- 具体的MainActivity.java中的代码
- 更多细节请访问我的Github上的Weather项目
申请和风天气开发者
申请和风天气开发者
申请注册成功后,登录,进入和风天气控制台界面:

在和风天气控制台新建一个应用
点击“应用管理”并新建一个应用,如图所示:

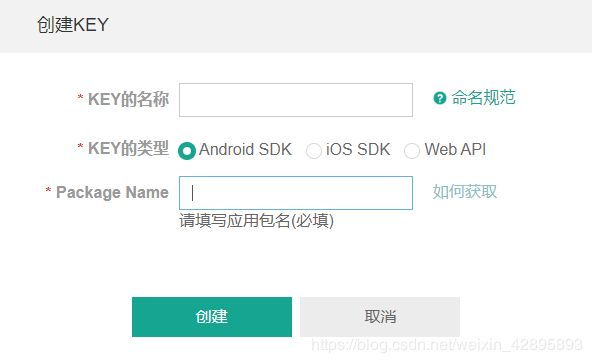
然后点击图片上的“添加key”,弹出如下界面:

输入key名,选择key的类型为Android SDK,Package Name为你创建Android Studio项目的包名,填写完毕之后点击“创建”。

创建成功后,如图:

其中的Username和Key是我们要用到的获取和风天气数据的关键。
新建一个Android Studio项目
如图所示:

注意,新建的项目的包名要和和风天气新建应用添加的key里填的包名一样。
添加依赖
在app目录下的build.gradle里的dependencies{}花括号里面添加如下依赖:
    implementation 'com.squareup.okhttp3:okhttp:3.9.0'
	implementation 'com.google.code.gson:gson:2.8.6'
然后,点击右上角的弹出的“Sync Now”来同步保存。
下载并引用和风天气的Android SDK
和风天气Android SDK

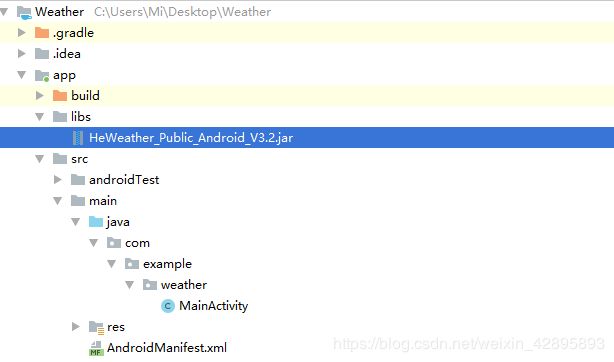
点击下载,然后把下载好的Android SDK拷贝到我们的Weather工程下的app目录里的libs文件夹中:

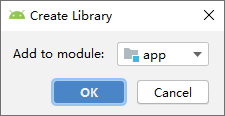
接着,在这个文件上右键,选择“Add As Library…”:

接着,点击OK:

若出现三角符号,就成功引用了下载好的和风天气Android SDK了。
![]()
获取和风天气API接口的数据
创建好布局
activity._main.xml
<LinearLayout xmlns:android="http://schemas.android.com/apk/res/android"
    xmlns:tools="http://schemas.android.com/tools"
    android:layout_width="match_parent"
    android:layout_height="match_parent"
    android:orientation="vertical"
    tools:context=".MainActivity">

    <TextView
        android:text="天气"
        android:textColor="@android:color/white"
        android:textStyle="bold"
        android:textSize="24sp"
        android:background="@color/colorPrimary"
        android:gravity="center"
        android:layout_width="match_parent"
        android:layout_height="?attr/actionBarSize"/>

    <LinearLayout
        android:layout_margin="20dp"
        android:orientation="vertical"
        android:layout_width="match_parent"
        android:layout_height="wrap_content">

        <RelativeLayout
            android:layout_margin="10dp"
            android:gravity="center"
            android:layout_width="match_parent"
            android:layout_height="50dp">

            <TextView
                android:id="@+id/province_tv"
                android:text="省份:"
                android:gravity="center"
                android:layout_width="wrap_content"
                android:layout_height="match_parent"/>
            <EditText
                android:id="@+id/province_edit"
                android:layout_toRightOf="@+id/province_tv"
                android:hint="请输入要查询的天气的省份"
                android:layout_width="match_parent"
                android:layout_height="wrap_content"/>

        RelativeLayout>

        <RelativeLayout
            android:layout_margin="10dp"
            android:gravity="center"
            android:layout_width="match_parent"
            android:layout_height="50dp">

            <TextView
                android:id="@+id/city_tv"
                android:text="城市:"
                android:gravity="center"
                android:layout_width="wrap_content"
                android:layout_height="match_parent"/>
            <EditText
                android:id="@+id/city_edit"
                android:layout_toRightOf="@+id/city_tv"
                android:hint="请输入该省份的城市"
                android:layout_width="match_parent"
                android:layout_height="wrap_content"/>

        RelativeLayout>

        <Button
            android:id="@+id/search"
            android:text="查询"
            android:layout_alignParentRight="true"
            android:layout_width="match_parent"
            android:layout_height="wrap_content"/>

    LinearLayout>

    <TextView
        android:id="@+id/city_weather"
        android:text="城市的天气"
        android:gravity="center"
        android:layout_width="match_parent"
        android:layout_height="50dp"
        android:visibility="gone"/>

    <LinearLayout
        android:id="@+id/weather_info"
        android:layout_margin="10dp"
        android:orientation="vertical"
        android:visibility="gone"
        android:layout_width="match_parent"
        android:layout_height="wrap_content">

        <LinearLayout
            android:layout_width="wrap_content"
            android:layout_height="wrap_content">

            <TextView
                android:text="天气:"
                android:layout_width="wrap_content"
                android:layout_height="wrap_content"/>
            <TextView
                android:id="@+id/weather"
                android:layout_width="wrap_content"
                android:layout_height="wrap_content"/>

        LinearLayout>

        <LinearLayout
            android:layout_width="wrap_content"
            android:layout_height="wrap_content">

            <TextView
                android:text="湿度:"
                android:layout_width="wrap_content"
                android:layout_height="wrap_content"/>
            <TextView
                android:id="@+id/shidu"
                android:layout_width="wrap_content"
                android:layout_height="wrap_content"/>

        LinearLayout>

        <LinearLayout
            android:layout_width="wrap_content"
            android:layout_height="wrap_content">

            <TextView
                android:text="生活建议:"
                android:layout_width="wrap_content"
                android:layout_height="wrap_content"/>
            <TextView
                android:id="@+id/suggestion"
                android:layout_width="wrap_content"
                android:layout_height="wrap_content"/>

        LinearLayout>

    LinearLayout>

LinearLayout>
创建2个实体类:Province, City
在包名com.example.weather路径右键,新建一个package,命名为“bean”。再在bean上右键创建2个java类,分别命名为Province和City。
具体代码如下:
Province.java
package com.example.weather.bean;

public class Province {
    private int id;
    private String name;

    public int getId() {
        return id;
    }

    public void setId(int id) {
        this.id = id;
    }

    public String getName() {
        return name;
    }

    public void setName(String name) {
        this.name = name;
    }
}
City.java
package com.example.weather.bean;

public class City {
    private int id;
    private String name;

    public int getId() {
        return id;
    }

    public void setId(int id) {
        this.id = id;
    }

    public String getName() {
        return name;
    }

    public void setName(String name) {
        this.name = name;
    }
}
具体的MainActivity.java中的代码
public class MainActivity extends AppCompatActivity implements View.OnClickListener {

    private String weatherCountry = "http://guolin.tech/api/china/";//中国的省份城市api
    private String weatherProvince, weatherCity;//获取到的省份id和城市id
    private ArrayList<Province> provinceList;//中国的省份集合
    private ArrayList<City> cityList;//具体省份的城市集合

    private String weatherUrl = "https://free-api.heweather.net/s6/weather/now?location=%s&key=%s";//和风天气 免费的api接口
    private String cityId;//具体城市天气id,如湛江,"weather_id"=CN101281001

    //注册和风天气开发者https://dev.heweather.com/
    //创建的apk 的 用户id 以及 该apk的key(包名要一致)
    private String userName = "HE1912282028221196";
    private String key = "55337274dc904af8a135d9ac9d3c80cc";//自己申请的key

    /**
     * 请输入该省份的城市
     */
    private EditText mCityEdit;
    /**
     * 查询
     */
    private Button mSearch;
    /**
     * 城市的天气
     */
    private TextView mCityWeather;
    private TextView mWeather;
    private TextView mShidu;
    /**
     * 省份:
     */
    private TextView mProvinceTv;
    /**
     * 请输入要查询的天气的省份
     */
    private EditText mProvinceEdit;

    String province, city;//接收输入的省份和城市收用的字符串
    private LinearLayout mWeatherInfo;
    private TextView mSuggestion;

    private String TAG = "MainActivity";

    @Override
    protected void onCreate(Bundle savedInstanceState) {
        super.onCreate(savedInstanceState);
        setContentView(R.layout.activity_main);
        initView();
//        使用 SDK 时,需提前进行账户初始化(全局执行一次即可)
        HeConfig.init(userName, key);
//        个人开发者、企业开发者、普通用户等所有使用免费数据的用户需要切换到免费服务域名 即 https://free-api.heweather.net/s6/sdk/
        HeConfig.switchToFreeServerNode();
    }

    private void initView() {
        mCityEdit = (EditText) findViewById(R.id.city_edit);
        mSearch = (Button) findViewById(R.id.search);
        mSearch.setOnClickListener(this);
        mCityWeather = (TextView) findViewById(R.id.city_weather);
        mWeather = (TextView) findViewById(R.id.weather);
        mShidu = (TextView) findViewById(R.id.shidu);
        mProvinceTv = (TextView) findViewById(R.id.province_tv);
        mProvinceEdit = (EditText) findViewById(R.id.province_edit);
        mWeatherInfo = (LinearLayout) findViewById(R.id.weather_info);
        mSuggestion = (TextView) findViewById(R.id.suggestion);
    }

    @Override
    public void onClick(View v) {
        switch (v.getId()) {
            default:
                break;
            case R.id.search:
                province = mProvinceEdit.getText().toString().trim();
                city = mCityEdit.getText().toString().trim();
                queryWeather();
                break;
        }
    }

    private void queryWeather() {
        provinceList = new ArrayList<Province>();//省份集合
        cityList = new ArrayList<City>();//具体省份的城市集合
        new Thread() {
            @Override
            public void run() {
                try {
                    //weatherCountry = "http://guolin.tech/api/china/"
                    URL url = new URL(weatherCountry);
                    HttpURLConnection connection = (HttpURLConnection) url.openConnection();//开启一个url的连接,用HttpURLConnection连接方式处理
                    connection.setRequestMethod("GET");//设置连接对象的请求数据的方式
                    connection.setConnectTimeout(3000);//设置连接对象的请求超时的时间

                    //将请求返回的数据流转换成字节输入流对象
                    InputStream is = connection.getInputStream();
                    //将字节输入流对象转换成字符输入流对象
                    InputStreamReader isr = new InputStreamReader(is);
                    //创建字符输入缓冲流对象
                    BufferedReader br = new BufferedReader(isr);

                    StringBuffer sb = new StringBuffer();
                    String string;

                    //读文本
                    while ((string = br.readLine()) != null) {
                        sb.append(string);
                    }

                    String result = sb.toString();

                    Log.d("MainActivity", "" + result);


                    JSONArray provinceArray = new JSONArray(result);
                    for (int i = 0; i < provinceArray.length(); i++) {
                        JSONObject provinceInfo = provinceArray.getJSONObject(i);//获取每个省份信息
                        Province provinceBean = new Province();//创建省份实体类对象
                        Gson gson = new Gson();//创建Gson解析对象

                        //反序例化,将json数据转化为实体类对象的成员变量值
                        provinceBean = gson.fromJson(provinceInfo.toString(), Province.class);
                        //添加保存好的省份对象数据进入省份集合
                        provinceList.add(provinceBean);
                    }

                    for (Province pro : provinceList) {
                        //如果该省份为用户输入的省份
                        if (pro.getName().equals(province)) {
                            //则拼接链接
                            //如:北京 weatherProvince = "http://guolin.tech/api/china/1/"
                            weatherProvince = weatherCountry + pro.getId() + "/";
                        }
                    }

                    Log.d("WeatherProvince", "" + weatherProvince);

                    //如:北京 weatherProvince = "http://guolin.tech/api/china/1/"
                    url = new URL(weatherProvince);
                    connection = (HttpURLConnection) url.openConnection();//开启一个url的连接用HttpURLConnection连接方式处理
                    connection.setRequestMethod("GET");//设置连接对象的请求数据的方式
                    connection.setConnectTimeout(3000);//设置连接对象的请求超时的时间

                    //将请求返回的数据流转换成字节输入流对象
                    is = connection.getInputStream();
                    //将字节输入流对象转换成字符输入流对象
                    isr = new InputStreamReader(is);
                    br = new BufferedReader(isr);

                    StringBuffer sb2 = new StringBuffer();
                    //读文本
                    while ((string = br.readLine()) != null) {
                        sb2.append(string);
                    }

                    String result2 = sb2.toString();

                    Log.d("MainActivity2", "" + result2);

                    JSONArray cityArray = new JSONArray(result2);
                    for (int i = 0; i < cityArray.length(); i++) {
                        JSONObject cityInfo = cityArray.getJSONObject(i);//获取具体省份城市信息
                        City cityBean = new City();//创建城市实体类对象
                        Gson gson = new Gson();//创建Gson解析对象
                        //反序例化,将json数据转化为实体类对象的成员变量值
                        cityBean = gson.fromJson(cityInfo.toString(), City.class);
                        //添加保存好的城市对象数据进入城市集合
                        cityList.add(cityBean);
                    }

                    for (City c : cityList) {
                        //如果该城市为用户输入的城市
                        if (c.getName().equals(city)) {
                            //则拼接链接
                            //如:北京 weatherCity = "http://guolin.tech/api/china/1/1/"
                            weatherCity = weatherProvince + c.getId() + "/";
                        }
                    }

                    Log.d("WeatherCity", ""+weatherCity);

                    //如:北京 weatherCity = "http://guolin.tech/api/china/1/1/"
                    url = new URL(weatherCity);
                    connection = (HttpURLConnection) url.openConnection();//开启一个url的连接用HttpURLConnection连接方式处理
                    connection.setRequestMethod("GET");//设置连接对象的请求数据的方式
                    connection.setConnectTimeout(3000);//设置连接对象的请求超时的时间

                    //将请求返回的数据流转换成字节输入流对象
                    is = connection.getInputStream();
                    //将字节输入流对象转换成字符输入流对象
                    isr = new InputStreamReader(is);
                    br = new BufferedReader(isr);

                    StringBuffer sb3 = new StringBuffer();
                    //读文本
                    while ((string = br.readLine()) != null) {
                        sb3.append(string);
                    }

                    String result3 = sb3.toString();

                    Log.d("MainActivity3", "" + result3);

                    JSONArray jsonArray = new JSONArray(result3);
                    JSONObject cityIdInfo = jsonArray.getJSONObject(0);
                    cityId=cityIdInfo.getString("weather_id");

                    //拼接字符串
                    String weatherApi = String.format(weatherUrl, cityId, key);
                    Log.d("WeatherApi", "" + weatherApi);
                    queryWeather2();
                } catch (Exception e) {
                    e.printStackTrace();
                }

            }
        }.start();

    }

    public void queryWeather2(){
        /**
         * 实况天气
         * 实况天气即为当前时间点的天气状况以及温湿风压等气象指数,具体包含的数据:体感温度、
         * 实测温度、天气状况、风力、风速、风向、相对湿度、大气压强、降水量、能见度等。
         *
         * @param context  上下文
         * @param location 地址详解
         * @param lang     多语言,默认为简体中文,海外城市默认为英文
         * @param unit     单位选择,公制(m)或英制(i),默认为公制单位
         * @param listener 网络访问回调接口
         */
        HeWeather.getWeatherNow(MainActivity.this, cityId, Lang.CHINESE_SIMPLIFIED , Unit.METRIC , new HeWeather.OnResultWeatherNowBeanListener() {
            @Override
            public void onError(Throwable e) {
                Log.i(TAG, "Weather Now onError: ", e);
            }

            @Override
            public void onSuccess(Now dataObject) {
                Log.i(TAG, " Weather Now onSuccess: " + new Gson().toJson(dataObject));
                //先判断返回的status是否正确,当status正确时获取数据,若status不正确,可查看status对应的Code值找到原因
                if ( Code.OK.getCode().equalsIgnoreCase(dataObject.getStatus()) ){
                    //此时返回数据

                    Basic basic=dataObject.getBasic();
                    String location=basic.getLocation();

                    mCityWeather.setText(location+"的天气");

                    NowBase now = dataObject.getNow();

                    String tmp=now.getTmp();
                    String cond_txt=now.getCond_txt();
                    String wind_dir=now.getWind_dir();

                    mWeather.setText("当前温度:"+tmp+"℃,"+cond_txt+","+wind_dir);
                    String hum=now.getHum();
                    mShidu.setText(hum+"%");
                } else {
                    //在此查看返回数据失败的原因
                    String status = dataObject.getStatus();
                    Code code = Code.toEnum(status);
                    Log.i(TAG, "failed code: " + code);
                }
            }
        });

        HeWeather.getWeatherLifeStyle(MainActivity.this,cityId, new HeWeather.OnResultWeatherLifeStyleBeanListener() {
            @Override
            public void onError(Throwable throwable) {

            }

            @Override
            public void onSuccess(Lifestyle lifestyle) {
                List<LifestyleBase> lifestyleBases=lifestyle.getLifestyle();
                String shushidu=lifestyleBases.get(0).getBrf();//舒适度指数
                String shushidu2=lifestyleBases.get(0).getTxt();//舒适度建议
                String sport=lifestyleBases.get(3).getBrf();//运动指数
                String sport2=lifestyleBases.get(3).getTxt();//运动建议
                String cw=lifestyleBases.get(6).getBrf();//洗车指数
                String cw2=lifestyleBases.get(6).getTxt();//洗车建议

                mSuggestion.setText("舒适度指数:"+shushidu+"\n" +
                        "舒适度建议:"+shushidu2+"\n" +
                        "运动指数:"+sport+"\n" +
                        "运动建议:"+sport2+"\n" +
                        "洗车指数:"+cw+"\n" +
                        "洗车建议:"+cw2+"\n");

                Message message=new Message();
                message.what=1;
                MainActivity.this.myHandler.sendMessage(message);
            }
        });

    }

    Handler myHandler = new Handler(){
        @Override
        public void handleMessage(@NonNull Message msg) {
            switch (msg.what){
                case 1:
                    mCityWeather.setVisibility(View.VISIBLE);
                    mWeatherInfo.setVisibility(View.VISIBLE);
                    weatherProvince = "";
                    weatherCity = "";
                    break;
            }
            super.handleMessage(msg);
        }
    };

}
最后千万不要忘记在AndroidManifest.xml中添加网络权限代码:
<uses-permission android:name="android.permission.INTERNET"/>
为了好看,我们把系统的标题栏去掉,在AndroidManifest.xml里找到android:theme改成下面这行:
android:theme="@style/Theme.AppCompat.Light.NoActionBar"
改好之后,运行一下我们弄好的项目:

输入省份以及城市,点击查询,成功查询到了天气的数据。
更多细节请访问我的Github上的Weather项目
Weather项目