pytest框架
一、pytest参数化
@pytest.mark.parametrize(argnames, argvalues, indirect=False, ids=None, scope=None)
| argnames | 由逗号分隔的代表参数名的字符串,或者一个参数字符串的列表/元组。 | ”arg1,arg2“ |
| argvalues | 如果只有一个参数,那么 argvalues是一个list。 | [1,2,3] |
| 如果有N个参数,argvalues是一个N元tuple,tuple里的每个值代表一个 参数。 | [(arg1,arg2)] |
实例:
"""使用list直接赋值”“”
import pytest

@pytest.mark.parametrize("a,b",[(1,4),(2,5),(3,6)])
def test_add(a,b):
    res_add=sum([a,b])
    res=a+b
    print(res)
    assert res==res_add,'add is wrong!'
“”“”使用变量赋值“”“
import pytest
a=[1,2,3]
b=[4,5,6]
data=[]
for i in range(len(a)):
t=(a[i],b[i])
data.append(t)
print(data)
@pytest.mark.parametrize("a,b",data)
def test_add(a,b):
res_add=sum([int(a),int(b)])
res=a+b
print(res)
assert res==res_add,'add is wrong!'二、分组
将代码里面的方法或类,通过mark标记为不同组,方便执行时分组执行。
2.1 定义分组
(1)在项目下新建一个pytest.ini文件;
(2)在当前文件下命名分组;
[pytest]

markers=
    test1
    test2    #一定要缩进,不然会被当成变量,使用时报错!


markers=test3
(3)检查分组是否被系统检测、调用;
终端运行命令
$  pytest --markers
2.2 标记分组
test.py

import pytest
@pytest.mark.test1
def test_print(a):
    print(a)
2.3 运行标记的分组用例
1.终端运行
$ pytest -m "test1"


2.py模块内运行
if __name__ == '__main__':
    pytest.main(['test.py','-m','one'])
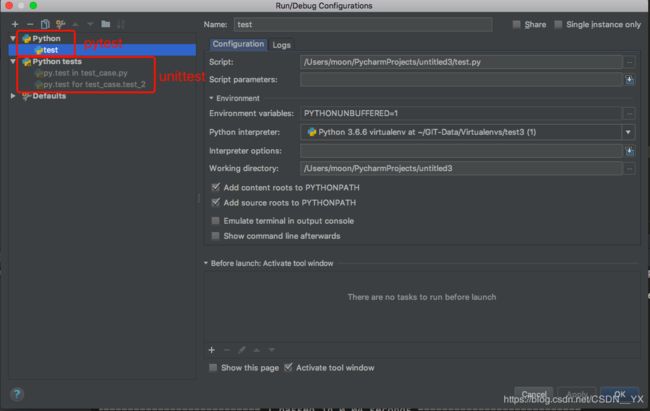
#注意:在pycharm代码运行,需要使用python环境运行,如果使用python tests运行的是unittest模块


"""
pytest.main([],[]):[]内填写参数,用,分隔;
test.py: 指定运行文件;
-m 分组名: 运行指定的分组下的测试用例 ;
"""
三、allure报告
参考文档:
https://docs.qameta.io/allure/#_python
https://testerhome.com/topics/15649
| 方法 | 用法 | 示例 |
|
|
|
|
|
|
|
|
|
|
|
@allure.title("This test has a custom title") |
| @allure.link | 将在报告中的“链接”部分,提供指向提供的网址的可点击链接。 | |
#!/usr/bin/env python
# -*- coding: utf-8 -*-
# file      : test_login_pytest.py


from common.Assert import AssertResponse
from common.request import Request
from common.get_excel import getData
from common.get_excel import writeData

import pytest
import allure


"""
Features:标注主要功能模块
Stories:标注Features功能模块下的分支功能
Title:标注Stories下测试用例名称
Step:标注测试用例的重要步骤
Severity:标注测试用例的重要级别
Description: 标注测试用例的描述
"""

@allure.feature("测试pytest框架")

class TestLogin():

    file_name = '登录接口测试用例.xlsx'
    sheet_num = 0
    #获取接口测试用例

    args=[]
    api_megs = getData(file_name, sheet_num).readaApiMeg()
    for i in range(0,len(api_megs)):
        api_meg=api_megs[i]
        arg=(api_meg["method"],api_meg["url"],api_meg["headers"],api_meg["data"],api_meg["status_code"],api_meg["status"],api_meg["message"],api_meg["row"])

        args.append(arg)
    print(args)


    @allure.story("测试allure报告")
    @allure.title("测试登录接口")
    @allure.description("通过excel编写用例传参,测试登录接口是否符合测试标准")
    @pytest.mark.login
    @pytest.mark.parametrize("method,url,headers,data,status_code,status,message,row",args)
    def test_login(self,method,url,headers,data,status_code,status,message,row):
        res=Request().request(method,url,headers,data)
        print(res)
        test_result, error_msg = AssertResponse(res).assertResult(test_status_code=status_code, test_status=status, test_msg=message)
        # 将测试结果写入excel表格
        writeData(file_name='登录接口测试用例.xlsx',sheet_num= 0).writeTestRes(row, test_result, str(error_msg))

”“”复制一份测试用例作test2“”“

if __name__ == '__main__':
    xml_dir = './report/xml'
    html_dir = './report/html'
    args = ['-q','-m','login','--alluredir',xml_dir]
    pytest.main(args)
    cmd = "allure generate %s -o %s --clean" % (xml_dir,html_dir)
    subprocess.call(cmd, shell=True)
四、pytest+allure的运行
使用命令“pytest --help”查看 全部选项
| pytest.main([]) 参数解释 | |
|---|---|
| -s -v |
运行显示详细信息 |
| -q | 运行显示简单信息 |
| -m [group_name] | 仅运行当前分组下的测试用例 |
| --alluredir [xml_path] | 在xml_path路径下生成测试报告 |
| --clean | 清空文件夹下的内容后添加 |
4.1 终端运行
前提:已安装pytest、allure插件,并且配置环境变量
$ pytest --alluredir [xml_path]
运行当前项目下所有测试用例,并且在xml_path路径下生成测试报告
$ allure generate [xml_path] -o [html_path] --clean --运行测试用例
将xml_path路径的pytest测试报告,转化为html测试报告,并且存在html_path路径下
4.2 代码运行
前提:代码的运行环境为python,若项目使用过unittest,默认运行环境为test_python。
import pytest
import subprocess

if __name__ == '__main__':

    xml_dir = './report/xml'
    html_dir = './report/html'

    args = ['-s', '--alluredir', xml_dir]
    pytest.main(args)

    cmd = "allure generate %s -o %s --clean" % (xml_dir,html_dir)
    subprocess.call(cmd, shell=True)

