基于python手动画出spectrogram(语谱图)
Spectrogram是基于STFT变换得到的,非常有助于分析信号的时频特性,在语音信号处理中常被称为"语谱图"。
python中有一些写好的模块可以直接将时域的信号转化成spectrogram,但这并不利于对其原理的理解,而且横纵左边的转换也不是很方便,在这篇博客中我们尝试直接基于python的基本操作来手东画出spectrogram。
Generate synthetic data
每台模拟电话的拨盘上都会产生2个正弦波信号,例如按下数字1就会产生频率包含697Hz和1209Hz的正弦波,697Hz表示正弦波会在1s时间内重复整个周i697次,两个不同频率的正弦波表示信号是这两个正弦波的总和。
假设采样率为4000Hz,意味着1s采样4000个点,前3s对应数字1,中间2s为silencem,最后3s对应数字2,则生成数据的代码如下:
import numpy as np
import matplotlib.pyplot as plt
import warnings
import librosa
warnings.filterwarnings("ignore", category=RuntimeWarning)

def get_signal_Hz(Hz,sample_rate,length_ts_sec):
    ## 1 sec length time series with sampling rate
    ts1sec = list(np.linspace(0,np.pi*2*Hz,sample_rate))
    ## 1 sec length time series with sampling rate
    ts = ts1sec*length_ts_sec
    return(list(np.sin(ts)))

sample_rate   = 4000
length_ts_sec = 3
## --------------------------------- ##
## 3 seconds of "digit 1" sound
## Pressing digit 2 buttom generates
## the sine waves at frequency
## 697Hz and 1209Hz.
## --------------------------------- ##
ts1  = np.array(get_signal_Hz(697, sample_rate,length_ts_sec))
ts1 += np.array(get_signal_Hz(1209,sample_rate,length_ts_sec))
ts1  = list(ts1)

## -------------------- ##
## 2 seconds of silence
## -------------------- ##
ts_silence = [0]*sample_rate*1

## --------------------------------- ##
## 3 seconds of "digit 2" sounds
## Pressing digit 2 buttom generates
## the sine waves at frequency
## 697Hz and 1336Hz.
## --------------------------------- ##
ts2  = np.array(get_signal_Hz(697, sample_rate,length_ts_sec))
ts2 += np.array(get_signal_Hz(1336,sample_rate,length_ts_sec))
ts2  = list(ts2)

## -------------------- ##
## Add up to 7 seconds
## ------------------- ##
ts = ts1 + ts_silence + ts2
Plot the generated sound signal in frequency domain
采用DFT变换来画出信号在频域上的频谱图,代码如下所示。
def get_xn(Xs,n):
    '''
    calculate the Fourier coefficient X_n of
    Discrete Fourier Transform (DFT)
    '''
    L  = len(Xs)
    ks = np.arange(0,L,1)
    xn = np.sum(Xs*np.exp(((-1)*1j*2*np.pi*ks*n)/L))
    return(xn)

def get_xns(ts):
    '''
    Compute Fourier coefficients only up to the Nyquest Limit Xn, n=1,...,L/2
    and multiply the absolute value of the Fourier coefficients by 2,
    to account for the symetry of the Fourier coefficients above the Nyquest Limit.
    '''
    mag = []
    L = len(ts)
    for n in range(int(L/2)): # Nyquest Limit
        mag.append(np.abs(get_xn(ts,n))*2)
    return(mag)
mag = get_xns(ts)
这里的"get_xns"函数是基于Nyquest限制下计算Fourier系数的,同样由于Fourier系数的对称性所以每个Fourier系数的绝对值应该double。
注:这里原博的“get_xns”中计算系数采用的是: xn = np.sum(Xsnp.exp((1j2np.piks*n)/L))/L
我个人觉得这个是错误的,虽然并不影响后续的分析。
DFT on entire dataset to visualize the signals at frequency domain for all k=1,…L/2.
可视化信号的频谱图:
# the number of points to label along xaxis
Nxlim = 10

plt.figure(figsize=(20,3))
plt.plot(mag)
plt.xlabel("Frequency (k)")
plt.title("Two-sided frequency plot")
plt.ylabel("|Fourier Coefficient|")
plt.show()
相应的频谱图为:

参考我的博客(),第k个频点上的Fourier系数 X k X_k Xk对应的频率计算公式为:
S a m p l e R a t e ∗ k N u m b e r o f S a m p l e P o i n t s N \frac{SampleRate * k}{Number of Sample Points N} NumberofSamplePointsNSampleRate∗k Hz
依据于此,将频谱图的x轴坐标转换到以Hz为单位,那么就可以看到频谱图在697Hz,1209Hz和1336Hz处有峰值出现。
def get_Hz_scale_vec(ks,sample_rate,Npoints):
    freq_Hz = ks*sample_rate/Npoints
    freq_Hz  = [int(i) for i in freq_Hz ]
    return(freq_Hz )

ks   = np.linspace(0,len(mag),Nxlim)
ksHz = get_Hz_scale_vec(ks,sample_rate,len(ts))

plt.figure(figsize=(20,3))
plt.plot(mag)
plt.xticks(ks,ksHz)
plt.title("Frequency Domain")
plt.xlabel("Frequency (Hz)")
plt.ylabel("|Fourier Coefficient|")
plt.show()
Create Spectrogram
终于进入今天的正题了~
前面已经介绍了信号的wavfeorm和spectra,这两个域分别展现了信号的时域和频域特性。为了能够更好地分析信号的时频特性,于是采用了带窗的DFT变换,即STFT变换。
信号通过STFT变换得到语谱图,python中有现成的函数"matplotlib.pyplot.spectram"来计算spectrogram,这里我们给出具体的STFT计算过程:
def create_spectrogram(ts,NFFT,noverlap = None):
    '''
          ts: original time series
        NFFT: The number of data points used in each block for the DFT.
          Fs: the number of points sampled per second, so called sample_rate
    noverlap: The number of points of overlap between blocks. The default value is 128.
    '''
    if noverlap is None:
        noverlap = NFFT/2
    noverlap = int(noverlap)
    starts  = np.arange(0,len(ts),NFFT-noverlap,dtype=int)
    # remove any window with less than NFFT sample size
    starts  = starts[starts + NFFT < len(ts)]
    xns = []
    for start in starts:
        # short term discrete fourier transform
        ts_window = get_xns(ts[start:start + NFFT])
        xns.append(ts_window)
    specX = np.array(xns).T
    # rescale the absolute value of the spectrogram as rescaling is standard
    spec = 10*np.log10(specX)
    assert spec.shape[1] == len(starts)
    return(starts,spec)

L = 256
noverlap = 84
starts, spec = create_spectrogram(ts,L,noverlap = noverlap )
Plot the hand-made spectrogram
完成STFT变换之后,就可以手动画出spectrogram:
def plot_spectrogram(spec,ks,sample_rate, L, starts, mappable = None):
    plt.figure(figsize=(20,8))
    plt_spec = plt.imshow(spec,origin='lower')

    ## create ylim
    Nyticks = 10
    ks      = np.linspace(0,spec.shape[0],Nyticks)
    ksHz    = get_Hz_scale_vec(ks,sample_rate,len(ts))
    plt.yticks(ks,ksHz)
    plt.ylabel("Frequency (Hz)")

    ## create xlim
    Nxticks = 10
    ts_spec = np.linspace(0,spec.shape[1],Nxticks)
    ts_spec_sec  = ["{:4.2f}".format(i) for i in np.linspace(0,total_ts_sec*starts[-1]/len(ts),Nxticks)]
    plt.xticks(ts_spec,ts_spec_sec)
    plt.xlabel("Time (sec)")

    plt.title("Spectrogram L={} Spectrogram.shape={}".format(L,spec.shape))
    plt.colorbar(mappable,use_gridspec=True)
    plt.show()
    return(plt_spec)
plot_spectrogram(spec,ks,sample_rate,L, starts)
得到的语谱图如下所示,可以清晰地看到前3s包含了频率为697Hz和1209Hz的信号,紧接着是2s的slience,最后3s包含了频率为693Hz和1336Hz的信号。

Frequency resolution vs time resolution
最后,我想要讨论一下在spectrogram中存在的"不确定性原则"(uncertainty principle)。
Uncertainty principle We cannot arbitrarily narrow our focus both in time and in frequency. If we want higher time resolusion, we need to give up frequency resolusion and vise verse.
在之前的spectrogram中,window size设为256,sample rate设为4000,因此每个窗包含:
time resolution : W i n d o w S i z e S a m p l e R a t e = 256 4000 = 0.064 \frac{WindowSize}{SampleRate} = \frac{256}{4000} = 0.064 SampleRateWindowSize=4000256=0.064 second
而 frequency resolution 则与 time resolution 互为倒数:
time resolution : W i n d o w S i z e S a m p l e R a t e = 256 4000 = 0.064 \frac{WindowSize}{SampleRate} = \frac{256}{4000} = 0.064 SampleRateWindowSize=4000256=0.064 second
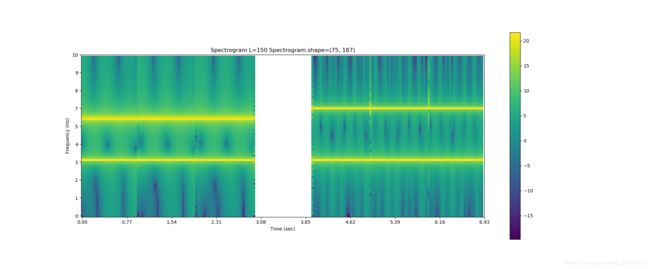
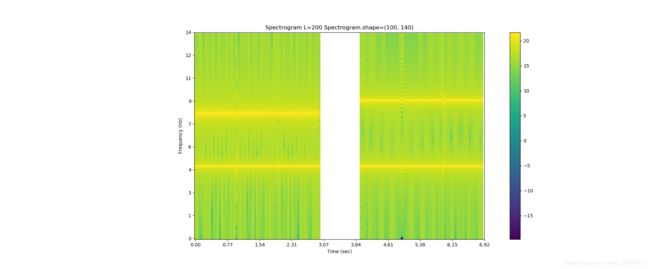
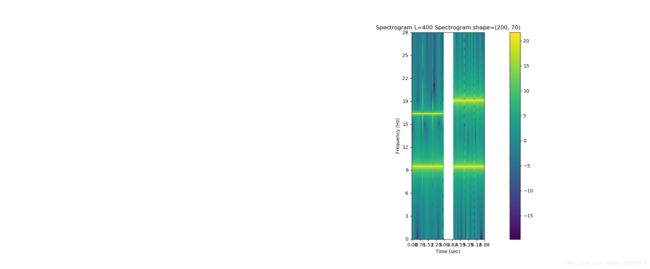
下面的几张图表现了在 frequency resolution 和 time resolution 这两个方面的权衡,如果Spectroogram采用了较大的窗,则频域信息更加清晰,反之频带较宽的话,则时域信息更加清晰。
注:这里原博的标题是Wideband spectrogram vs narrowband spectrogram,但由于信号本身就有 wideband 和 narrowband 的区别,所以采用这个标题容易引起歧义,我就改为了Frequency resolution vs time resolution。
plt_spec1 = None
for iL, (L, bandnm) in enumerate(zip([150, 200, 400],["wideband","middleband","narrowband"])):
    print("{:20} time resoulsion={:4.2f}sec, frequency resoulsion={:4.2f}Hz".format(bandnm,L/sample_rate,sample_rate/L))
    starts, spec = create_spectrogram(ts,L,noverlap = 1 )
    plt_spec = plot_spectrogram(spec,ks,sample_rate, L, starts,
                                 mappable = plt_spec1)
    if iL == 0:
        plt_spec1 = plt_spec
wideband :

middleband :

narrowband:

参考链接:
[1]: Implement the Spectrogram from scratch in python

