爬取51job招聘信息 (三)入库与配置程序
爬取51job招聘信息 (三)入库与配置程序
[本文代码参考自 《实战python网络爬虫》-黄永强 2019.6月版本]
为保证时效性 对原书代码有较大修改 本文代码2019年10月7日有效
所有代码程序均仅用于学习,若无意伤害了您的个人利益请速与我联系删除
[数据入库]
上一节中我们已经获得了数据
接下去就是数据入库了,这边我使用的是华为云的数据库,可以网页端查看,关于如何使用华为云数据库,在我个人的另外一篇博客中有详细介绍,这里不做过多说明了。
直接上代码
import time
from sqlalchemy import
from sqlalchemy.orm import sessionmaker
from sqlalchemy.ext.declarative import declarative_base
from sqlalchemy.dialects.mysql import
engine = create_engine(mysql+pymysql【账号】【密码】@【ip】3306test2,
echo = True, pool_size = 5, max_overflow = 4, pool_recycle = 7200, pool_timeout = 30)
DBSession = sessionmaker(bind=engine)
SQLsession = DBSession()
Base = declarative_base()

# 定义数据模型,映射数据表
class table_info(Base)
    __tablename__ = 'job_info'
    id = Column(Integer(), primary_key=True)
    job_id = Column(String(100), comment='职位ID')
    company_name = Column(String(100), comment='企业名称')
    company_type = Column(String(100), comment='企业类型')
    company_scale = Column(String(100), comment='企业规模')
    company_trade = Column(String(100), comment='企业经营范围')
    company_welfare = Column(String(1000), comment='企业福利')
    job_name = Column(String(3000), comment='职位名称')
    job_pay = Column(String(100), comment='职位薪酬')
    job_years = Column(String(100), comment='工龄要求')
    job_education = Column(String(100), comment='学历要求')
    job_member = Column(String(100), comment='招聘人数')
    job_location = Column(String(3000), comment='上班地址')
    job_describe = Column(Text, comment='工作描述')
    job_date = Column(String(100), comment='发布日期')
    recruit_sources = Column(String(100), comment='招聘来源')
    log_date = Column(String(100), comment='记录日期')
# 创建数据表
Base.metadata.create_all(engine)

# 写入数据库
def insert_db(info_dict)
    temp_id = info_dict['job_id']
    # 判断是否已存在记录
    info = SQLsession.query(table_info).filter_by(job_id=temp_id).first()
	# 若存在,更新数据
    if info
        info.job_id = info_dict.get('job_id','')
        info.company_name = info_dict.get('company_name','')
        info.company_type = info_dict.get('company_type','')
        info.company_trade = info_dict.get('company_trade', '')
        info.company_scale = info_dict.get('company_scale','')
        info.company_welfare = info_dict.get('company_welfare','')
        info.job_name = info_dict.get('job_name', '')
        info.job_pay = info_dict.get('job_pay', '')
        info.job_years = info_dict.get('job_years', '')
        info.job_education = info_dict.get('job_education', '')
        info.job_member = info_dict.get('job_member', '')
        info.job_location = info_dict.get('job_location', '')
        info.job_describe = info_dict.get('job_describe', '')
        info.recruit_sources = info_dict.get('recruit_sources', '')
        info.job_date = info_dict.get('job_date', '')
        info.log_date = time.strftime('%Y-%m-%d',time.localtime(time.time()))
	# 不存在则新增数据
    else
        inset_data = table_info(
        job_id = info_dict.get('job_id',''),
        company_name=info_dict.get('company_name',''),
        company_type=info_dict.get('company_type',''),
        company_trade=info_dict.get('company_trade',''),
        company_scale=info_dict.get('company_scale',''),
        company_welfare=info_dict.get('company_welfare',''),
        job_name=info_dict.get('job_name', ''),
        job_pay=info_dict.get('job_pay', ''),
        job_years=info_dict.get('job_years', ''),
        job_education=info_dict.get('job_education', ''),
        job_member=info_dict.get('job_member', ''),
        job_location=info_dict.get('job_location', ''),
        job_describe=info_dict.get('job_describe', ''),
        job_date=info_dict.get('job_date', ''),
        recruit_sources=info_dict.get('recruit_sources', ''),
        log_date=time.strftime('%Y-%m-%d', time.localtime(time.time()))
        )
        SQLsession.add(inset_data)
    SQLsession.commit()
[程序配置]
至此,我们得到5个函数,
为了让使用者不直接修改到源代码,我们可以使用conf配置文件对程序进行配置,配置文件的扩展名为【.conf】,可以支持windows、linux、mac等多系统,在我们的主函数的同意目录下添加文件 【51job.conf】
[51job]
keyword = python,java
city = 广州,北京,上海
然后再python程序中读取该文件,但是直接使用read函数读取是会报错的:
UnicodeDecodeError ‘gbk’ codec can’t decode byte 0xad in position 48 illegal multibyte sequence
原因是默认保存为utf-8格式,但是默认读取是gbk格式,这里既可以修改文件编码,也可以导入codec模块进行转换编码读取
因此 主函数代码如下:
if __name__ == '__main__'
    cf = configparser.ConfigParser()
    cf.readfp(codecs.open('51job.conf',r,utf-8-sig))
    keyword = str(cf.get('51job','keyword')).split(',')
    city = str(cf.get('51job','city')).split(',')
    print(keyword)
    print(city)
    for c in city
        city_code = get_city_code()[c]
        for k in keyword
            pageNumber = get_pageNumber(city_code,k)
            get_page(k,pageNumber)
当然在实际运行过程中,还是报了一堆错
比如 【‘dict’ object is not callable】 是因为我括号弄错了
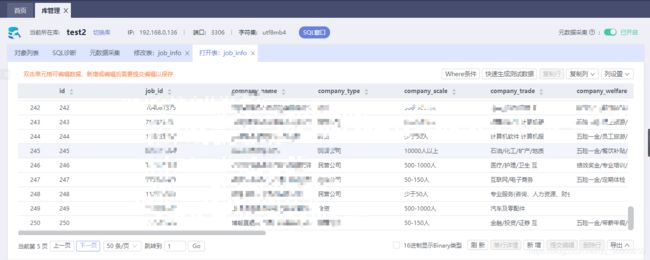
还有一堆错误,比如数据库列名称有误等等,但是最终还是成功解决和运行了,大约十分钟之后,在我的华为云数据库中就新增了200条左右数据
