原文链接:https://blog.csdn.net/weixin_42032770/article/details/107536554?utm_medium=distribute.pc_category.none-task-blog-hot-3.nonecase&depth_1-utm_source=distribute.pc_category.none-task-blog-hot-3.nonecase&request_id=#4.1%E3%80%81%E5%B8%B8%E8%A7%81%E7%9A%84%E7%BA%BF%E7%A8%8B%E8%B0%83%E5%BA%A6%E6%A8%A1%E5%9E%8B
5、定时任务
5.1、实现一个定时器
package Thread;
import java.text.ParseException;
import java.text.SimpleDateFormat;
import java.util.Date;
import java.util.Timer;
import java.util.TimerTask;
public class TimerTest {
public static void main(String[] args) throws ParseException {
//创建定时器对象
Timer timer = new Timer();
SimpleDateFormat sdf = new SimpleDateFormat("yyyy-MM-dd HH:mm:ss");
Date firstTime = sdf.parse("2020-07-25 19:10:30");
//指定定时任务
//timer.schedule(定时任务,第一次执行时间时间,间隔多久执行一次)
timer.schedule(new LogTimerTask(), firstTime, 1000 * 5);
}
}
//编写一个定时任务
class LogTimerTask extends TimerTask {
@Override
public void run() {
SimpleDateFormat sdf = new SimpleDateFormat("yyyy-MM-dd HH:mm:ss");
String strTime = sdf.format(new Date());
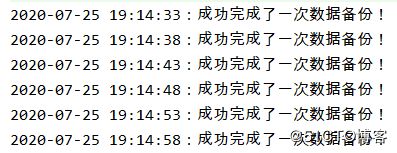
System.out.println(strTime + ":成功完成了一次数据备份!");
}
}
6、通过Callable接口实现一个线程
使用Callable接口实现线程,可以获得该线程的返回值(JDK8新特性)
一个简单的实例:
package Thread;
import java.util.concurrent.Callable;
import java.util.concurrent.ExecutionException;
import java.util.concurrent.FutureTask;
public class ThirdWay {
public static void main(String[] args) throws ExecutionException, InterruptedException {
FutureTask futureTask = new FutureTask(new Task());
Thread thread = new Thread(futureTask);
thread.start();
Object object = futureTask.get(); //通过get方法可以获取当前线程的返回值
////主线程中这里的程序必须等待get()方法结束才执行
// get()方法为了拿另一个线程的执行结果需要等待其执行完成,因此要等待较长时间
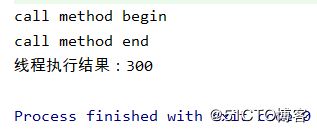
System.out.print("线程执行结果:");
System.out.println(object);
}
}
class Task implements Callable {
@Override
public Object call() throws Exception {
System.out.println("call method begin");
Thread.sleep(1000 * 10);
System.out.println("call method end");
int a = 100;
int b = 200;
return a + b;
}
}
FutureTask类相关源码public FutureTask(Callable callable) {
if (callable == null)
throw new NullPointerException();
this.callable = callable;
this.state = NEW; // ensure visibility of callable
}
    public V get() throws InterruptedException, ExecutionException {
        int s = state;
        if (s <= COMPLETING)
            s = awaitDone(false, 0L);
        return report(s);
    }
Future类中实现了get方法获取传入线程的返回结果
7、Object类中的wait和notify方法
7.1、wait和notify方法介绍
wait和notify方法不是线程对象的方法,不能通过线程对象调用。
Object object=new Object();
object.wait();//object.wait()让正在object对象上活动的线程进入等待状态,无限等待,直到被唤醒为止
object.notify();//object.notify()唤醒正在object对象上等待的线程
object.notifyAll();//object.notifyAll唤醒正在object对象上等待的所有线程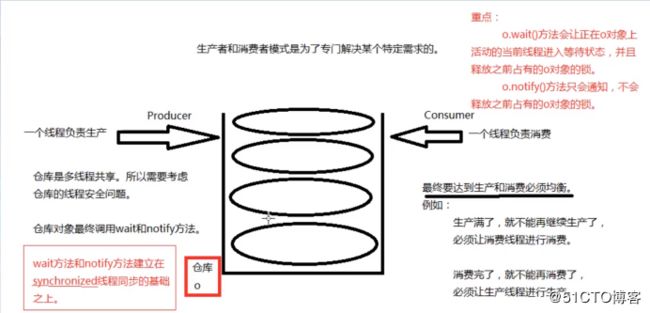
一个简单的生产者和消费者实例
模拟生产者生产一个,消费者就消费一个。让仓库始终零库存。
package Thread;

import java.awt.*;
import java.util.*;
import java.util.List;

public class Producer_Consumer {
    public static void main(String[] args) {
        List list = new ArrayList();
        Thread thread1 = new Thread(new Consumer(list), "消费者线程");
        Thread thread2 = new Thread(new Producer(list), "生产者线程");
        thread1.start();
        thread2.start();
    }
}

//消费者线程
class Consumer implements Runnable {
    //仓库
    private List list;

    public Consumer(List list) {
        this.list = list;
    }

    @Override
    public void run() {
        //消费
        while (true) {
            synchronized (list) {
                //如果仓库已经空了,消费者线程等待并释放list集合的锁
                if (list.size() == 0) {
                    try {
                        list.wait();
                    } catch (InterruptedException e) {
                        e.printStackTrace();
                    }
                }
                //仓库中有商品,消费者进行消费
                String str = list.remove(0);
                System.out.println(Thread.currentThread().getName() + " 消费 " + str);
                list.notify();  //唤醒生产者
            }

        }
    }
}

//生产者线程
class Producer implements Runnable {
    //仓库
    private List list;

    public Producer(List list) {
        this.list = list;
    }

    @Override
    public void run() {
        //生产
        while (true) {
            synchronized (list) {
                //如果仓库里有东西,则停止生产。生产者线程等待并释放list集合的锁
                if (list.size() > 0) {
                    try {
                        list.wait();
                    } catch (InterruptedException e) {
                        e.printStackTrace();
                    }
                }
                list.add("商品");
                System.out.println(Thread.currentThread().getName() + " 生产 " + list.get(0));
                list.notify();  //唤醒消费者
            }
        }
    }
}

7.3、实现奇偶数的交替输出
package Thread;

/**
 * 使用生产者和消费者模式实现两个线程交替输出:一个线程负责输出奇数,另一个线程负责输出偶数
 */
public class Number {
    public static void main(String[] args) throws InterruptedException {
        Num num = new Num(0);
        Thread thread1 = new Thread(new Odd(num), "Odd");
        Thread thread2 = new Thread(new Event(num), "Event");
        thread1.start();
        thread2.start();
    }
}

class Odd implements Runnable {
    Num num;

    public Odd(Num num) {
        this.num = num;
    }

    @Override
    public void run() {
        while (true) {
            synchronized (num) {
                try {
                    Thread.sleep(1000);
                } catch (InterruptedException e) {
                    e.printStackTrace();
                }
                if (num.getI() % 2 == 0) {
                    try {
                        num.wait();
                    } catch (InterruptedException e) {
                        e.printStackTrace();
                    }
                }
                System.out.println(Thread.currentThread().getName() + "--->" + num.printNum());
                num.notifyAll();
            }
        }
    }
}

class Event implements Runnable {
    Num num;

    public Event(Num num) {
        this.num = num;
    }

    @Override
    public void run() {
        while (true) {
            synchronized (num) {
                try {
                    Thread.sleep(1000);
                } catch (InterruptedException e) {
                    e.printStackTrace();
                }
                if (num.getI() % 2 != 0) {
                    try {
                        num.wait();
                    } catch (InterruptedException e) {
                        e.printStackTrace();
                    }
                }
                System.out.println(Thread.currentThread().getName() + "--->" + num.printNum());
                num.notifyAll();
            }
        }
    }
}

class Num {
    private int i = 0;

    public Num(int i) {
        this.i = i;
    }

    public int getI() {
        return i;
    }

    public void setI(int i) {
        this.i = i;
    }

    int printNum() {
        return i++;
    }
}
点击下方链接免费获取Android进阶资料:
https://shimo.im/docs/tXXKHgdjPYj6WT8d/