用jquery-ui Autocomplete一步一步实现输入自动补全
用jquery-ui Autocomplete一步一步实现输入自动补全
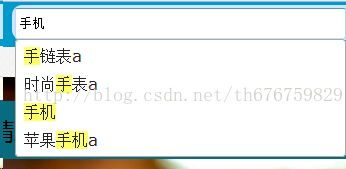
首先看一下效果,如下图:
接下来看一下实现步骤:
第一步:下载jquery-ui,地址:http://jqueryui.com/autocomplete/
第二步:在页面引用,如下图:
图中红框内的为与Autocomplete相关的,其中,1,4是以上给出的地址中可以下载,注意把对应的图片
放置在正确的目录,3是jquery库,5是关键字高亮要用到的,jquery-ui默认不支持html,如果需要高亮关
键字,需要引用5。
页面需要自动补全的输入框:
2的内容如下:(自定义样式,可根据自己需求,进行修改)
/* highlight results */
.ui-autocomplete span.hl_results {
    background-color: #ffff66;
}

/* loading - the AJAX indicator */
.ui-autocomplete-loading {
    background: white url('/css/images/ui-anim_basic_16x16.gif') right center no-repeat;
}

/* scroll results */
.ui-autocomplete {
    max-height: 250px;
    overflow-y: auto;
    /* prevent horizontal scrollbar */
    overflow-x: hidden;
    /* add padding for vertical scrollbar */
    padding-right: 5px;
}

.ui-autocomplete li {
    font-size: 16px;
}

/* IE 6 doesn't support max-height
* we use height instead, but this forces the menu to always be this tall
*/
* html .ui-autocomplete {
    height: 250px;
}
5的内容如下:
/*
* jQuery UI Autocomplete HTML Extension
*
* Copyright 2010, Scott González (http://scottgonzalez.com)
* Dual licensed under the MIT or GPL Version 2 licenses.
*
* http://github.com/scottgonzalez/jquery-ui-extensions
*/
(function( $ ) {
var proto = $.ui.autocomplete.prototype,
initSource = proto._initSource;
function filter( array, term ) {
var matcher = new RegExp( $.ui.autocomplete.escapeRegex(term), "i" );
return $.grep( array, function(value) {
return matcher.test( $( "" ).html( value.label || value.value || value ).text() );
});
}
$.extend( proto, {
_initSource: function() {
if ( this.options.html && $.isArray(this.options.source) ) {
this.source = function( request, response ) {
response( filter( this.options.source, request.term ) );
};
} else {
initSource.call( this );
}
},
_renderItem: function( ul, item) {
return $( "" )
.data( "item.autocomplete", item )
.append( $( "" )[ this.options.html ? "html" : "text" ]( item.label ) )
.appendTo( ul );
}
});
})( jQuery );
6的内容如下:
$(function() {
var cache = {};
$("#searchContent").autocomplete({
source:function(request, response) {
var term = request.term;
if (term in cache) {
response(cache[term]);
return;
}
$.ajax({
type : "POST",
url : "autoComplete.action",
data : "term=" + request.term,
dataType : "json",
success : function(data) {
// 解析为js对象
var result = JSON.parse(data);
response(result);
},
error : function() {
alert("错误");
}
});
},
minLength: 1,
/*
* 选中后的处理
* select: function(event, ui) {
var url = ui.item.id;
if(url != '#') {
location.href = '/blog/' + url;
}
},*/
html: true, // optional (jquery.ui.autocomplete.html.js required)
// optional (if other layers overlap autocomplete list)
open: function(event, ui) {
$(".ui-autocomplete").css("z-index", 1000);
}
});
});
}
后台传送的JSON数据格式:
[
{
"id": "mysql-in-a-nutshell",
"value": "MySQL in a Nutshell",
"label": "MySQL in a Nutshell"
},
{
"id": "how-to-use-php-improved-mysqli-extension-and-why-you-should",
"value": "How to Use PHP Improved MySQLi extension (and Why You Should)",
"label": "How to Use PHP Improved MySQLi extension (and Why You Should)"
},
{
"id": "is-it-time-to-remove-mysql-in-favor-of-mariadb-in-production-servers",
"value": "Is it time to Remove MySQL in favor of MariaDB in Production Servers?",
"label": "Is it time to Remove MySQL in favor of MariaDB in Production Servers?"
}
]
java后台(Struts2):
Struts配置:
result
Action(这里采用lucene搜索方式):
private String term;
private String result;
public String autoComplete() {
List abs = new ArrayList();
if (!term.trim().equals("")) {
// 索引目录
String filepath = ServletActionContext.getServletContext().getRealPath("/index");
LuceneSearch searcher = new AutocompleteQuery(new File(filepath));
List goods = searcher.search(term.trim(), "mixName");
int size = goods.size();
int min = (size > 10) ? 10 : size; //设置最大显示条目为10
if (goods != null && size > 0) {
for (int i = 0; i < min; i++) {
Goods g = goods.get(i);
AutoBean ab = new AutoBean();
ab.setId(g.getNeedName());
ab.setValue(g.getNeedName());
ab.setLabel(g.getName());
abs.add(ab);
}
JSON json = JSONSerializer.toJSON(abs);
this.result = json.toString();
return SUCCESS;
}
}
return SUCCESS;
}
以上省略了部分代码,主要是传递的json数据需要有id,value,Label属性,label中可以加入html进行高亮,value
是选中后在输入框输入的值,所以需要设置原值,不能加入html。
关键字高亮可以使用lucene的Highlighter来实现。这里不再赘述,有问题可以留言。。。
这里在需要高亮的字上加上以下标签:
参考网址:http://www.pontikis.net/blog/jquery-ui-autocomplete-step-by-step


