Python调用C++函数(SWIG,VS2013使用numpy.i完成Numpy与C++数组转换)
最近尝试使用Python调用C++函数,发现网上都是一些简单的例子,涉及到Python Numpy数组与C++数组转换的例子比较少,所以花费了一些时间,搞懂了SWIG使用numpy.i接口文件完成Numpy与C++数组转换。相比于其它几种方式,使用SWIG接口文件编写比较简单,编译也很方便,主要是不太好调试,因为是编译成.dll或者.so才能在Python中调用。
1.安装SWIG
windows:官网下载,解压到D盘,将swig.exe所在文件夹添加到系统路径,如:D:\swigwin-3.0.12\
Linux:sudo apt-get install swig
2.下载numpy.i文件
有些在numpy安装目录下直接就有,没有的话可以到GitHub下载numpy.i地址、numpy.i说明文档,numpy/tools/swig/numpy.i
3.编写自己的函数接口文件
//cos_doubles.h
void cos_doubles(double*in_array,double*out_array,intsize);
//cos_doubles.cpp
#include cos(in_array[i]);
}
} 根据numpy.i说明文档撰写cos_doubles.i文件:
/*  Example of wrapping a C function that takes a C double array as input using
 *  numpy typemaps for SWIG. */

%module cos_doubles
%{
    /* the resulting C file should be built as a python extension */
    #define SWIG_FILE_WITH_INIT
    /*  Includes the header in the wrapper code */
    #include "cos_doubles.h"
%}

/*  include the numpy typemaps */
%include "numpy.i"
/*  need this for correct module initialization */
%init %{
    import_array();
%}

/*  typemaps for the two arrays, the second will be modified in-place */
%apply (double* IN_ARRAY1, int DIM1) {(double * a, int size_a)}
%apply (double* INPLACE_ARRAY1, int DIM1) {(double *b, int size_b)}

/*  Wrapper for cos_doubles that massages the types */
%inline %{
    /*  takes as input two numpy arrays */
    void cos_doubles_func(double * a, int size_a, double* b, int size_b) {
        /*  calls the original funcion, providing only the size of the first */
        cos_doubles(a, b, size_a);
    }
%}
如果是固定大小的数组,也可以使用%apply (double IN_ARRAY1[ANY]) {(double a[63])}方式
4.使用SWIG编译生成.py和.cxx
将numpy.i、cos_doubles.h、cos_doubles.cpp、cos_doubles.i放在同一文件夹下,命令行输入(Linux与windows相同,C语言去掉-c++):
swig -c++ -python cos_doubles.i此时文件夹下会生成cos_doubles.py与cos_doubles_wrap.cxx文件
5.1.编译生成动态链接库文件(Linux)
Linux:新建setup.py文件
from distutils.core import setup, Extension
import numpy


cos_doubles_module = Extension('_cos_doubles',
                           sources=['cos_doubles_wrap.cxx', 'cos_doubles.cpp'], )

setup (name = 'cos_doubles',
       version = '0.1',
       author      = "SWIG Docs",
       description = """Simple swig example from docs""",
       ext_modules = [cos_doubles_module],
       include_dirs = [numpy.get_include()],
       py_modules = ["cos_doubles"], )
命令行输入:
python setup.py build_ext --inplace此时文件夹下会生成_cos_doubles.so文件,新建runme.py演示程序,测试能否调用:
import numpy as np
import matplotlib.pyplot as plt
import cos_doubles

x = np.arange(0, 2 * np.pi, 0.1)
y = np.empty_like(x)

cos_doubles.cos_doubles_func(x, y)
plt.plot(x, y)
plt.show()
5.2.编译生成动态链接库文件(Windows)
Windows下也可以尝试Linux下相同的方法,但是可能会报错,我反正没有成功,下面使用VS2013生成动态链接库。
1.新建一个Win32 Console Application工程 => 在向导中点next => Application type选择DLL,在Additional options中选择Empty project
2.向Header Files中加入cos_doubles.h,向Source File中加入cos_doubles.cpp和cos_doubles_wrap.cxx,向工程中加入numpy.i和cos_doubles.i (这是可能会弹出一个对话框,我选的是’否’)
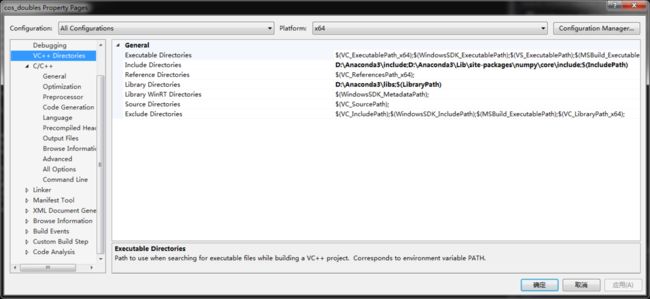
3.project>Properties中点Configuration Manager,设置Configration为Release,Platform为×64 => Configuration Properties>VC++ Directories中,在show directories for ‘Include files’中加入Python include 目录’D:\Anaconda3\include\’ numpy include目录:’D:\Anaconda3\Lib\site-packages\numpy\core\include’,show dirctories for ‘Library files’中加入Python lib目录’D:\Anaconda3\libs\’,C/C++>Preprocessor>Preprocessor Definition 加入
WIN32
_DEBUG
_CONSULE
_CRT_SECURE_NO_WARNINGS
右键工程,点击Build,运气好的话可能一次成功,跳到最后一步,如果报找不到python35_d.lib,则需要修改Python\include 目录下的 pyconfig.h, object.h 两个文件
a. 修改 pyconfig.h
修改
#ifdef _DEBUG
# define Py_DEBUG
#endif
为
#ifdef _DEBUG
//# define Py_DEBUG
#endif

修改
# ifdef _DEBUG
# pragma comment(lib,"python24_d.lib")
# else
# pragma comment(lib,"python24.lib")
# endif /* _DEBUG */
为
# ifdef _DEBUG
# pragma comment(lib,"python24.lib")
# else
# pragma comment(lib,"python24.lib")
# endif /* _DEBUG */

b. 修改object.h
修改
#if defined(Py_DEBUG) && !defined(Py_TRACE_REFS)
#define Py_TRACE_REFS
#endif
为
#if defined(Py_DEBUG) && !defined(Py_TRACE_REFS)
// #define Py_TRACE_REFS
#endif
最后Build Solution,在Release文件夹中会生成cos_doubles.dll,把它改名成_cos_doubles.pyd。把cos_doubles.py, _cos_doubles.pyd和测试文件放到同一个文件夹中,python运行测试。
