Windows下Python调用海康SDK实时视频流获取
参考链接:
1、https://blog.csdn.net/ustczhang/article/details/79087459
2、https://www.ryannn.com/archives/hikvision
按照这几篇博客来做的,中间还是遇到一些问题,可能之前的博客没有提及,我也纪录下来吧。
------------------------------------------------------------------------------------------------------------------------------------------------------
1、所需文件下载安装及环境变量配置。
以下文件都放入百度网盘。
下载链接:https://pan.baidu.com/s/1RH-6mx5SvIQ7nWQ9zyqIzg 提取码:pe4h
1.1、下载安装opencv3.4.0。
window的相对简单,如果不需要额外的contrib的包, 可以去官网下载编译好的版本。
opencv3.4.0 下载页面: https://opencv.org/releases/page/3/
1.2、下载海康SDK包。
下载页面: https://www.hikvision.com/cn/download_more_570.html
1.3、下载安装 Swig。
下载页面: http://www.swig.org/download.html
1.4、下载 OpenCV-swig 接口文件。
该文件用于预编译 OpenCV 相关函数,是一系列.i后缀的文件。所用到的东西也就cpp的Mat格式python的numpy格式。
下载页面: https://github.com/renatoGarcia/opencv-swig
1.5 下载boost库
下载页面:https://www.boost.org/users/download/
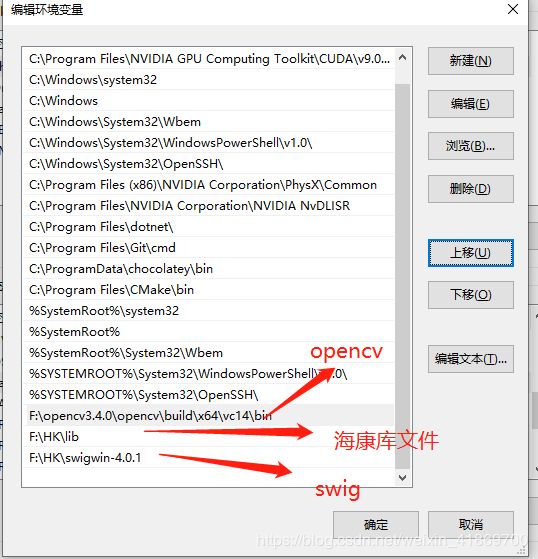
1.6、环境变量配置。
1、opencv 2、海康库文件 3、swig 4、python(看这教程的人应该都装的吧。。)
2、使用swig生成接口文件
2.1将下载好的Opencv-swig文件夹下的文件与下面三个源文件放到一起。
//HKIPcamera.cpp
#include
#include
#include
#include
#include
#include
#include
#include
#include
#include "HCNetSDK.h"
//#include "PlayM4.h"
#include "plaympeg4.h"


//#include "global.h"
//#include "readCamera.h"

#define USECOLOR 1

using namespace cv;
using namespace std;

//--------------------------------------------
int iPicNum = 0;//Set channel NO.
LONG nPort = -1;
HWND hWnd = NULL;
CRITICAL_SECTION g_cs_frameList;
list g_frameList;
LONG lUserID;
NET_DVR_DEVICEINFO_V30 struDeviceInfo;
HANDLE hThread;
LONG lRealPlayHandle = -1;

void yv12toYUV(char *outYuv, char *inYv12, int width, int height, int widthStep)
{
    int col, row;
    unsigned int Y, U, V;
    int tmp;
    int idx;

    //printf("widthStep=%d.\n",widthStep);

    for (row = 0; row>1;
            tmp = (row / 2)*(width / 2) + (col / 2);
            //         if((row==1)&&( col>=1400 &&col<=1600))
            //         {
            //          printf("col=%d,row=%d,width=%d,tmp=%d.\n",col,row,width,tmp);
            //          printf("row*width+col=%d,width*height+width*height/4+tmp=%d,width*height+tmp=%d.\n",row*width+col,width*height+width*height/4+tmp,width*height+tmp);
            //         }
            Y = (unsigned int)inYv12[row*width + col];
            U = (unsigned int)inYv12[width*height + width*height / 4 + tmp];
            V = (unsigned int)inYv12[width*height + tmp];
            //         if ((col==200))
            //         {
            //         printf("col=%d,row=%d,width=%d,tmp=%d.\n",col,row,width,tmp);
            //         printf("width*height+width*height/4+tmp=%d.\n",width*height+width*height/4+tmp);
            //         return ;
            //         }
            if ((idx + col * 3 + 2)> (1200 * widthStep))
            {
                //printf("row * widthStep=%d,idx+col*3+2=%d.\n",1200 * widthStep,idx+col*3+2);
            }
            outYuv[idx + col * 3] = Y;
            outYuv[idx + col * 3 + 1] = U;
            outYuv[idx + col * 3 + 2] = V;
        }
    }
    //printf("col=%d,row=%d.\n",col,row);
}


//解码回调 视频为YUV数据(YV12),音频为PCM数据
void CALLBACK DecCBFun(long nPort, char * pBuf, long nSize, FRAME_INFO * pFrameInfo, long nReserved1, long nReserved2)
{
    long lFrameType = pFrameInfo->nType;

    if (lFrameType == T_YV12)
    {
#if USECOLOR
        //int start = clock();
        static IplImage* pImgYCrCb = cvCreateImage(cvSize(pFrameInfo->nWidth, pFrameInfo->nHeight), 8, 3);//得到图像的Y分量
        yv12toYUV(pImgYCrCb->imageData, pBuf, pFrameInfo->nWidth, pFrameInfo->nHeight, pImgYCrCb->widthStep);//得到全部RGB图像
        static IplImage* pImg = cvCreateImage(cvSize(pFrameInfo->nWidth, pFrameInfo->nHeight), 8, 3);
        cvCvtColor(pImgYCrCb, pImg, CV_YCrCb2RGB);
        //int end = clock();
#else
        static IplImage* pImg = cvCreateImage(cvSize(pFrameInfo->nWidth, pFrameInfo->nHeight), 8, 1);
        memcpy(pImg->imageData, pBuf, pFrameInfo->nWidth*pFrameInfo->nHeight);
#endif
        //printf("%d\n",end-start);

        //Mat frametemp(pImg), frame;

        //frametemp.copyTo(frame);
        //      cvShowImage("IPCamera",pImg);
        //      cvWaitKey(1);
        EnterCriticalSection(&g_cs_frameList);
        g_frameList.push_back(pImg);
        LeaveCriticalSection(&g_cs_frameList);

#if USECOLOR
        //      cvReleaseImage(&pImgYCrCb);
        //      cvReleaseImage(&pImg);
#else
        /*cvReleaseImage(&pImg);*/
#endif
        //此时是YV12格式的视频数据,保存在pBuf中,可以fwrite(pBuf,nSize,1,Videofile);
        //fwrite(pBuf,nSize,1,fp);
    }
    /***************
    else if (lFrameType ==T_AUDIO16)
    {
    //此时是音频数据,数据保存在pBuf中,可以fwrite(pBuf,nSize,1,Audiofile);

    }
    else
    {

    }
    *******************/

}


///实时流回调
void CALLBACK fRealDataCallBack(LONG lRealHandle, DWORD dwDataType, BYTE *pBuffer, DWORD dwBufSize, void *pUser)
{
    DWORD dRet;
    switch (dwDataType)
    {
    case NET_DVR_SYSHEAD:    //系统头
        if (!PlayM4_GetPort(&nPort)) //获取播放库未使用的通道号
        {
            break;
        }
        if (dwBufSize > 0)
        {
            if (!PlayM4_OpenStream(nPort, pBuffer, dwBufSize, 1024 * 1024))
            {
                dRet = PlayM4_GetLastError(nPort);
                break;
            }
            //设置解码回调函数 只解码不显示
            if (!PlayM4_SetDecCallBack(nPort, DecCBFun))
            {
                dRet = PlayM4_GetLastError(nPort);
                break;
            }

            //设置解码回调函数 解码且显示
            //if (!PlayM4_SetDecCallBackEx(nPort,DecCBFun,NULL,NULL))
            //{
            //  dRet=PlayM4_GetLastError(nPort);
            //  break;
            //}

            //打开视频解码
            if (!PlayM4_Play(nPort, hWnd))
            {
                dRet = PlayM4_GetLastError(nPort);
                break;
            }

            //打开音频解码, 需要码流是复合流
            //          if (!PlayM4_PlaySound(nPort))
            //          {
            //              dRet=PlayM4_GetLastError(nPort);
            //              break;
            //          }
        }
        break;

    case NET_DVR_STREAMDATA:   //码流数据
        if (dwBufSize > 0 && nPort != -1)
        {
            BOOL inData = PlayM4_InputData(nPort, pBuffer, dwBufSize);
            while (!inData)
            {
                Sleep(10);
                inData = PlayM4_InputData(nPort, pBuffer, dwBufSize);
                OutputDebugString(L"PlayM4_InputData failed \n");
            }
        }
        break;
    }
}

void CALLBACK g_ExceptionCallBack(DWORD dwType, LONG lUserID, LONG lHandle, void *pUser)
{
    char tempbuf[256] = { 0 };
    switch (dwType)
    {
    case EXCEPTION_RECONNECT:    //预览时重连
        printf("----------reconnect--------%d\n", time(NULL));
        break;
    default:
        break;
    }
}

bool OpenCamera(char* ip, char* usr, char* password)
{
    lUserID = NET_DVR_Login_V30(ip, 8000, usr, password, &struDeviceInfo);
    if (lUserID == 0)
    {
        cout << "Log in success!" << endl;
        return TRUE;
    }
    else
    {
        printf("Login error, %d\n", NET_DVR_GetLastError());
        NET_DVR_Cleanup();
        return FALSE;
    }
}
DWORD WINAPI ReadCamera(LPVOID IpParameter)
{
    //---------------------------------------
    //设置异常消息回调函数
    NET_DVR_SetExceptionCallBack_V30(0, NULL, g_ExceptionCallBack, NULL);

    //cvNamedWindow("Mywindow", 0);
    //cvNamedWindow("IPCamera", 0);

    //HWND  h = (HWND)cvGetWindowHandle("Mywindow");
    //h = cvNamedWindow("IPCamera");
    //---------------------------------------
    //启动预览并设置回调数据流
    NET_DVR_CLIENTINFO ClientInfo;
    ClientInfo.lChannel = 1;        //Channel number 设备通道号
    ClientInfo.hPlayWnd = NULL;     //窗口为空,设备SDK不解码只取流
    ClientInfo.lLinkMode = 1;       //Main Stream
    ClientInfo.sMultiCastIP = NULL;

    LONG lRealPlayHandle;
    lRealPlayHandle = NET_DVR_RealPlay_V30(lUserID, &ClientInfo, fRealDataCallBack, NULL, TRUE);
    if (lRealPlayHandle<0)
    {
        printf("NET_DVR_RealPlay_V30 failed! Error number: %d\n", NET_DVR_GetLastError());
        return -1;
    }
    else
        cout << "码流回调成功!" << endl;
    Sleep(-1);
    if (!NET_DVR_StopRealPlay(lRealPlayHandle))
    {
        printf("NET_DVR_StopRealPlay error! Error number: %d\n", NET_DVR_GetLastError());
        return 0;
    }
    NET_DVR_Logout(lUserID);
    NET_DVR_Cleanup();
    return 0;
}


void init(char* ip, char* usr, char* password){
    //HANDLE hThread;
    //LPDWORD threadID;
    //---------------------------------------
    // 初始化
    NET_DVR_Init();
    //设置连接时间与重连时间
    NET_DVR_SetConnectTime(2000, 1);
    NET_DVR_SetReconnect(10000, true);
    OpenCamera(ip, usr, password);
    InitializeCriticalSection(&g_cs_frameList);
    hThread = ::CreateThread(NULL, 0, ReadCamera, NULL, 0, 0);
}

Mat getframe(){
    Mat frame1;
    EnterCriticalSection(&g_cs_frameList);
    while (!g_frameList.size()){
        LeaveCriticalSection(&g_cs_frameList);
        EnterCriticalSection(&g_cs_frameList);
    }
    list::iterator it;
    it = g_frameList.end();
    it--;
    Mat dbgframe = (*(it));
    (*g_frameList.begin()).copyTo(frame1);
    frame1 = dbgframe;
    g_frameList.pop_front();
    //imshow("camera", frame1);
    //waitKey(1);

    g_frameList.clear();   // 丢掉旧的帧
    LeaveCriticalSection(&g_cs_frameList);
    return(frame1);
}

void release(){
    ::CloseHandle(hThread);
    NET_DVR_StopRealPlay(lRealPlayHandle);
    //关闭预览
    NET_DVR_Logout(lUserID);
    //注销用户
    NET_DVR_Cleanup();
}
//HKIPcamera.h
#include
using namespace cv;
void init(char* ip, char* usr, char* password);
Mat getframe();
void release();
// HKIPcamera.i
/*  Example of wrapping a C function that takes a C double array as input using
 *  numpy typemaps for SWIG. */
%module HKIPcamera
%include
%cv_mat__instantiate_defaults
%header %{
    /*  Includes the header in the wrapper code */
    #include "HKIPcamera.h"
%}

%include "HKIPcamera.h"
通过命令行使用 swig 生成HKIPcamera_wrap.cxx和HKIPcamera.py文件(注意修改自己opencv的路径)。
swig -I"F:\opencv3.4.0\opencv\build\include" -python -c++ HKIPcamera.i链接: https://blog.csdn.net/a8572785/article/details/10427521 , 可以参考这里做个demo出来了解了解。
3、编译动态链接库。
这个步骤也是最繁琐,也是最容易出错的步骤。
先将所有文件放在一个目录下。(不会弄乱而已。)
3.1先试验opencv是否正常运行。
分成几个步骤的话后面出现问题好排查,知道哪里出现的问题。
#include
#include

using namespace std;
using namespace cv;

int main()
{
	Mat M(3, 2, CV_8UC3, Scalar(0, 0, 255));
}
使用的是Release x64, 别使用Debug版本。下面是vs的配置。正常运行的话就走下一步。
3.2修改plaympeg4.h文件。
在extern “C” __declspec(dllexport) 的“C”和 下划线之间加空格,否则会报错。
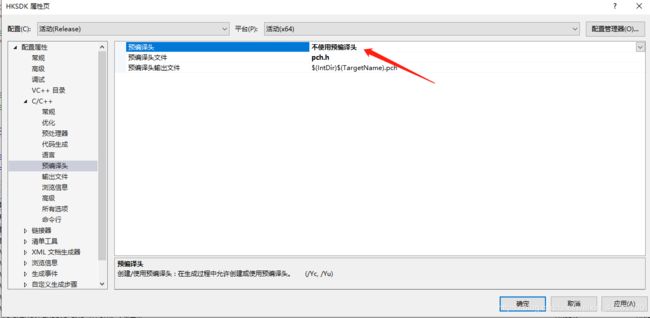
3.3 用VS创建一个动态链接库工程。
注: 使用Release x64
不使用预编译头
3.4添加编译的文件。
将HKIPcamera.h文件添加到头文件、HKIPcamera_wrap.cxx和HKIPcamera.cpp添加到源文件
3.5 配置所需要的头文件、库文件、依赖项。
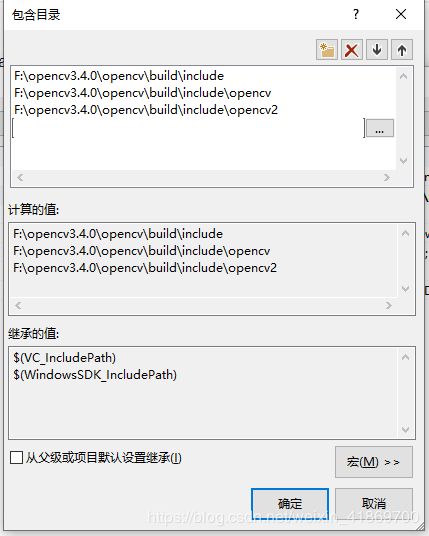
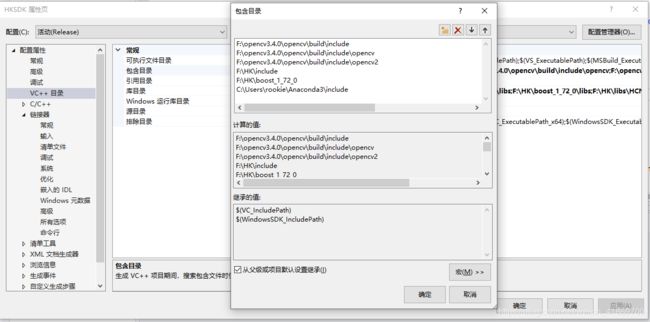
头文件:
(1)opencv头文件   (2)海康SDK头文件  (3)boost头文件  (4)python头文件
F:\opencv3.4.0\opencv\build\include
F:\opencv3.4.0\opencv\build\include\opencv
F:\opencv3.4.0\opencv\build\include\opencv2
F:\HK\include
F:\HK\boost_1_72_0
C:\Users\rookie\Anaconda3\include

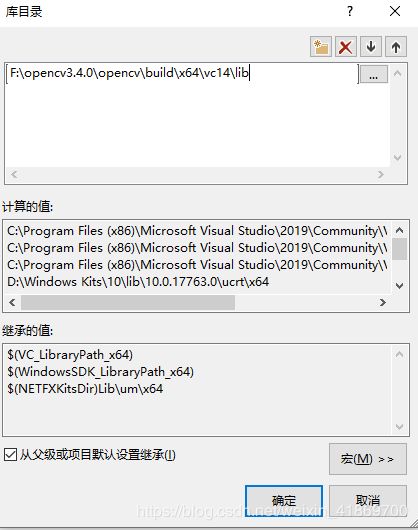
库文件:
(1)opencv库文件   (2)海康SDK库文件  (3)boost库文件  (4)python库文件
F:\opencv3.4.0\opencv\build\x64\vc14\lib
F:\HK\libs
F:\HK\libs\HCNetSDKCom
F:\HK\boost_1_72_0\libs
C:\Users\rookie\Anaconda3\libs


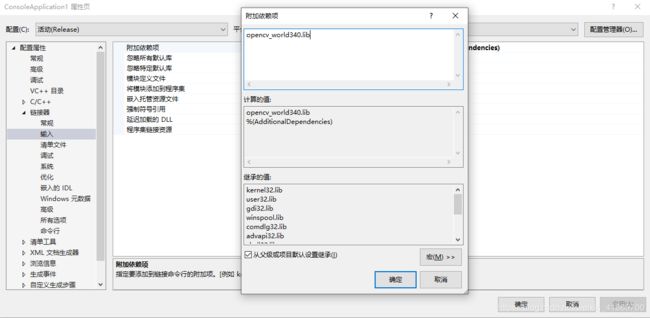
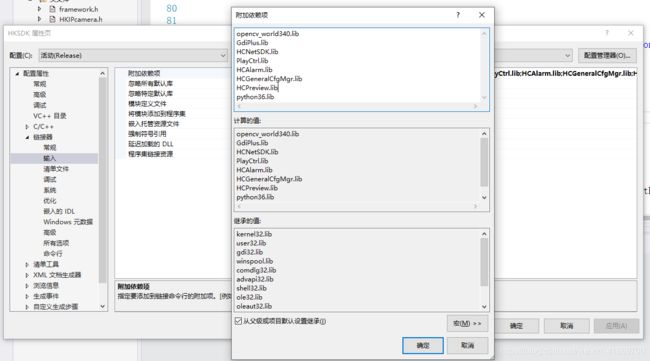
链接器:
(1)opencv   (2)海康的几个静态库  (3)python
opencv_world340.lib
GdiPlus.lib
HCNetSDK.lib
PlayCtrl.lib
HCAlarm.lib
HCGeneralCfgMgr.lib
HCPreview.lib
python36.lib编译之后得到一个动态链接库。将生成的.dll文件改名为_HKIPcamera.pyd。
3.6调用
将_HKIPcamera.pyd与HKIPcamera.py放置在同一文件目录下给python调用。可以测试一下:
import HKIPcamera

import numpy as np
import cv2


ip = str('192.168.2.64')  # 摄像头IP地址,要和本机IP在同一局域网
name = str('admin')       # 管理员用户名
pw = str('123456')        # 管理员密码

HKIPcamera.init(ip, name, pw)
while True:
    fram = HKIPcamera.getframe()
    cv2.imshow('frame', np.array(fram))
    if cv2.waitKey(24) & 0xff == 27:
        break

HKIPcamera.release()
注: 这里的python版本必须与编译时的python版本一致。如果报错是找不到DLL,查看是否环境变量设置是否漏了哪个没有配置。
