Spring深入理解之IOC、DI
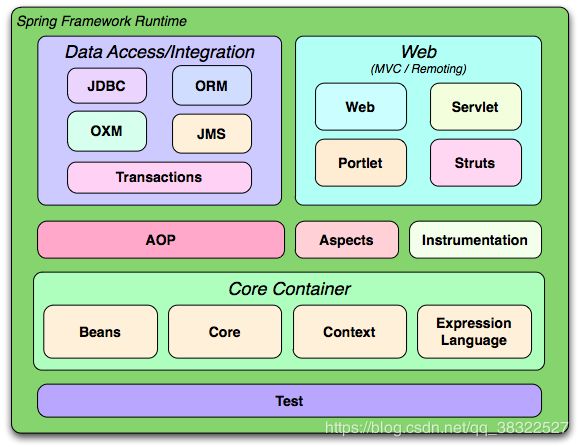
Spring的体系结构
- Container
spring-Core 、spring-beans 包含了框架的核心实现,包括IOC依懒注入等特性。
spring-context 在spring-core 基础上构建它提供一种框架方式访问对象的方法。 - Web
spring-web 提供了基本的面向WEB的功能,多文件上传、使用Servlet监听器的IOC容器初始化。
web-mvc: 包含MVC 和rest 服务相关组件 - AOP
spring-aop 提供了面向切面编程的丰富支持。
spring-aspects 提供对AspectJ的支持,以便可以方便的将面向方面的功能集成进IDE中,比如Eclipse AJDT。
instrumentation 提供对javaagent 的支持和类加载器。
instrumentation-tomcat 专门针对tomcat 进行类转换与加载管理。 - DATA
spring-jdbc: 提供了一个JDBC抽象层。
spring-tx: 编程式和声明式事物管理。
spring-orm: Object-Relational Mapping(对象关系映射),作用是在关系型数据库和业务实体对象之间作一个映射,这样在具体的操作业务对象的时候,就不需要再去和复杂的SQL语句打交道,只需简单的操作对象的属性和方法。
spring-oxm:是spring 3.0的一个新特性 o/xMapping ,实现实现类与xml之间的相互转换。
spring-jms:消息中间件。
spring-redis:redis缓存数据库。
什么是Spring的IOC(Inversion of Control)?
1、在没有ioc的情况下,获取服务采取new xxService()的方式。
2、服务和服务之间采取直接实例化或创建工厂类实例话的方式实现对象的关联,达到实例化并调用。
3、如果存在很多服务时,此时的每个service存在很混乱的情况!类和类之间存在高度耦合性(局部变更可能影响全部)。
4、Spring-IOC是一个容器,他能自动地对服务类进行统一的管理。在程序开发需要使用时,采取一种声明的方式,将类通过容器、反射自动注入至指定的服务中。
IOC对bean的管理
在使用Spring进行项目开发时,IOC用于bean的创建、bean的存储以及bean的获取操作。
最初时,使用Spring创建对象的方式为xml风格。创建一个Maven项目工程,测试Spring框架对类的创建管理。
xml构建bean
	<dependency>
		<groupId>junitgroupId>
	    <artifactId>junitartifactId>
	    <version>3.8.1version>
    dependency>
    <dependency>
		<groupId>org.springframeworkgroupId>
		<artifactId>spring-coreartifactId>
		<version>4.3.3.RELEASEversion>
	dependency>
	<dependency>
		<groupId>org.springframeworkgroupId>
		<artifactId>spring-beansartifactId>
		<version>4.3.3.RELEASEversion>
	dependency>
	<dependency>
		<groupId>org.springframeworkgroupId>
		<artifactId>spring-contextartifactId>
		<version>4.3.3.RELEASEversion>
	dependency>
新建一个TestDemo1.java
public class TestDemo1 {
	public void add() {
		System.out.println("add ......");
	}

	public TestDemo1() {
		System.out.println("TestDemo1 ......");
	}
}
创建bean1.xml,配置xml方式管理bean的创建。
<beans xmlns="http://www.springframework.org/schema/beans"
    xmlns:xsi="http://www.w3.org/2001/XMLSchema-instance"
    xmlns:p="http://www.springframework.org/schema/p"
    xsi:schemaLocation="
        http://www.springframework.org/schema/beans http://www.springframework.org/schema/beans/spring-beans.xsd">

	<bean id="testDemo1" class="cn.linkpower.TestDemo1" scope="prototype">bean>
beans>
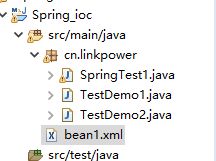
整体项目结构为:
编写一个测试类SpringTest1.java:
import org.junit.Test;
import org.springframework.context.ApplicationContext;
import org.springframework.context.support.ClassPathXmlApplicationContext;

public class SpringTest1 {

	/**
	 * 通过xml方式,加载bean
	 */
	@Test
	public void testXml() {
		//加载配置文件
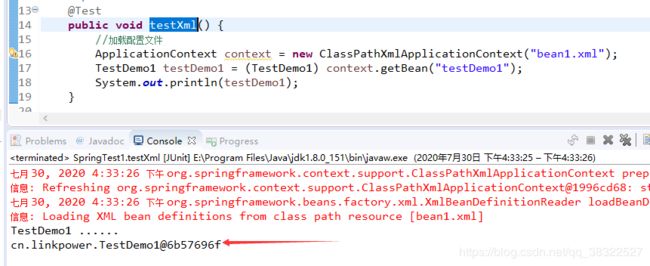
		ApplicationContext context = new ClassPathXmlApplicationContext("bean1.xml");
		TestDemo1 testDemo1 = (TestDemo1) context.getBean("testDemo1");
		System.out.println(testDemo1);
	}
}
其中,获取指定name属性的bean为:

采取的是 org.springframework.context.support.AbstractApplicationContext中的

终究还是调用的是ConfigurableListableBeanFactory中的getBean(name)。


反射构建bean
但是,Spring本身提供了一种无需写入xml的方式,创建bean。
	/**
	 * 通过 java 类反射的形式,加载类
	 */
	@Test
	public void createBeanTest(){
		DefaultListableBeanFactory beanFactory = new DefaultListableBeanFactory();
		TestDemo1 testDemo1 = beanFactory.createBean(TestDemo1.class);
		testDemo1.add();
	}

测试发现,可以通过org.springframework.beans.factory.support.DefaultListableBeanFactory.DefaultListableBeanFactory()的createBean(Class,构建一个bean,并能实例话这个bean调用其中定义的方法。

从源码中可以看出,bd.setScope(SCOPE_PROTOTYPE);设置为多例。
同时也能看出,在创建bean的时候,给定了这个bean对象一个boolean allowCaching属性。
查看源代码比较逻辑bd.allowCaching = ClassUtils.isCacheSafe(beanClass, getBeanClassLoader());。
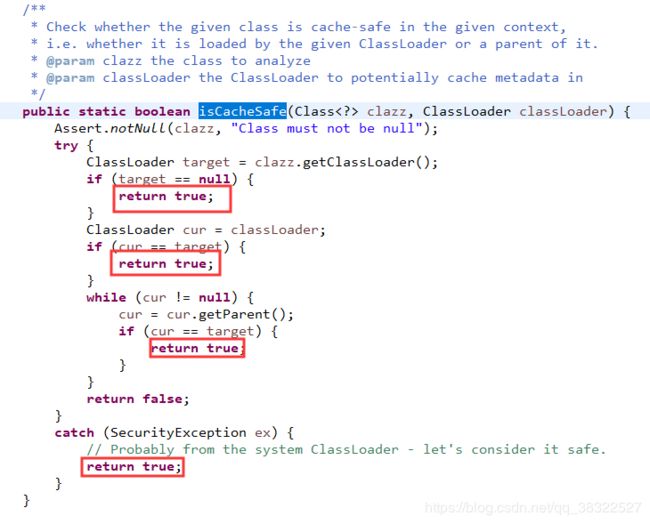
不难看出,当无这个类的加载对象,或者出现异常时,都是默认为true。
至于参数Class clazz, ClassLoader classLoader比较的是什么,继续往下看,做一次分析。
这个比较方法中,分别对比了Class和getBeanClassLoader(),其中getBeanClassLoader()默认为:

写一个demo,查看内容是什么?

IOC存储bean
上面针对Spring说到,Spring-ioc具有创建bean、存储bean和提供bean获取三种操作。
针对创建bean已经做了相关简述,接下来继续看bean的存储和bean获取。
编写一段测试代码:
	@Test
	public void beanStore() {
		DefaultListableBeanFactory beanFactory = new DefaultListableBeanFactory();
		//创建对应的bean
		TestDemo1 testDemo1 = beanFactory.createBean(TestDemo1.class);
		//TestDemo2 testDemo2 = beanFactory.createBean(TestDemo2.class);
		//保存单例模式的bean,并对bean设置好别名
		beanFactory.registerSingleton("test1", testDemo1);
		//beanFactory.registerSingleton("test2", testDemo2);

		//beanFactory.registerScope(scopeName, scope);

		//拿到指定的bean
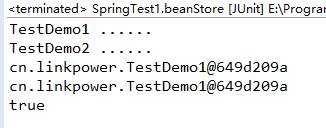
		TestDemo1 testDemo11 = (TestDemo1) beanFactory.getBean("test1");
		System.out.println(testDemo11);
		TestDemo1 testDemo12 = (TestDemo1) beanFactory.getBean("test1");
		System.out.println(testDemo12);
		System.out.println(testDemo11 == testDemo12);
	}
依赖注入
spring针对bean的创建、管理等操作外,还有依赖注入这项技术。
其次,Spring通过DI(依赖注入)实现IOC(控制反转)。常用的注入方式主要有三种:根据类型、根据名称和根据构造方法。
关于依赖注入的类型,参照org.springframework.beans.factory.support.AbstractBeanDefinition。
什么叫依赖注入
把有依赖关系的类放到容器中,解析出这些类的实例,就是依赖注入。目的是实现类的解耦。
《什么是依赖注入》
在平时的开发中,或多或少都需要创建controller、service、dao等,这些又需要互相关联依赖。如:

这就是最常见的三层架构。
在不使用Spring框架之前,单一的使用Servlet来实现类与类关联时,往往需要实例话各种对象信息,然后类与类实现嵌套,极大地增加了类与类之间地耦合度。
依赖注入demo实现
创建UserServiceImpl类,其中注入UserDao类。
/**
 * 测试依赖注入
 * @author 765199214
 *
 */
public class UserServiceImpl {

	private UserDao userDao;

	public UserDao getUserDao() {
		return userDao;
	}

	public void setUserDao(UserDao userDao) {
		this.userDao = userDao;
	}

	public void UserServiceTest() {
		userDao.test();
	}
	public UserServiceImpl() {
		System.out.println("UserServiceImpl()....");
	}

}
class UserDao{
	public void test() {
		System.out.println("UserDao test .....");
	}

	public UserDao() {
		System.out.println("UserDao().......");
	}

}
创建dependentTest()测试方法:
/**
	 * 依赖注入测试demo
	 */
	@Test
	public void dependentTest() {
		DefaultListableBeanFactory beanFactory = new DefaultListableBeanFactory();
		//根据参数类型注入,boolean dependencyCheck 为true,需要保证注入对象存在
		beanFactory.registerSingleton("userDao", beanFactory.createBean(UserDao.class));;
		//创建 userServiceImpl,采取类型依赖注入
		UserServiceImpl userServiceImpl = (UserServiceImpl) beanFactory.createBean(UserServiceImpl.class,
				AbstractBeanDefinition.AUTOWIRE_BY_TYPE, true);
		//保存至ioc容器中
		beanFactory.registerSingleton("userServiceImpl", userServiceImpl);

		//获取容器中的bean
		UserServiceImpl userServiceImpl1 = (UserServiceImpl) beanFactory.getBean("userServiceImpl");
		userServiceImpl1.UserServiceTest();
	}
UserServiceImpl userServiceImpl = (UserServiceImpl)beanFactory.createBean(UserServiceImpl.class, AbstractBeanDefinition.AUTOWIRE_BY_TYPE, true);
自动识别依赖注入的类的信息,此处依据类型。
由于UserDao已经注册至DefaultListableBeanFactory,所以此处代码为自动识别UserServiceImpl中的注入对象UserDao,并关联。
bean的定义
Spring采取配置文件或者注解方式,在项目启动时,进行bean的定义和创建。
现在的开发采取注解的方式,很便捷的实现了类的创建,但理解Spring还是需要从最初的配置文件加载bean说起。
bean的属性定义
在xml文件中,注入bean至ioc容器时,通常需要定义很多配置项。从org.springframework.beans.factory.support.AbstractBeanDefinition类中就可以看出很多配置性的参数信息。
<bean id="testDemo1" class="cn.linkpower.TestDemo1" scope="prototype">bean>
id:主键唯一id
name:别名
class:类全路径
scope:单例或多例,prototype(多例)、Singleton(单例,默认的)
当然,远远不止这些属性配置,如下所示factory-method属性。
public class Bean2 {
	public void add() {
		System.out.println("bean2.........");
	}
}
class Bean2Factory {
	//静态的方法,返回Bean2对象
	public static Bean2 getBean2() {
		return new Bean2();
	}
}
配置文件中,需要增加静态方法等信息,所以需要这么写:
<bean id="bean2" class="cn.bean.Bean2Factory" factory-method="getBean2">bean>
这里为什么没写 Bean2 类的bean配置,那是因为new和配置是一回事!
除了factory-method属性,还有factory-bean属性:
public class Bean3 {
	public void add() {
		System.out.println("bean2.........");
	}
}
class Bean3Factory {
	//普通的方法,返回Bean3对象
	public Bean3 getBean3() {
		return new Bean3();
	}
}
xml的配置方式为:
<bean id="bean3Factory" class="cn.bean.Bean3Factory">bean>

<bean id="bean3" factory-bean="bean3Factory" factory-method="getBean3">bean>
使用
factory-bean指向一个已实例化好配置的类,结果差不多的。
以及set方法设置属性值:
public class Book {
	private String bookname;
	//set方法
	public void setBookname(String bookname) {
		this.bookname = bookname;
	}
	public void demobook() {
		System.out.println("book..........."+bookname);
	}
}
xml的配置方式实例化对象,并给定一个值:
<bean id="book" class="cn.property.Book">

	<property name="bookname" value="java从入门到放弃">property>
bean>
以及向构造方法中设定一个变量值信息:
public class PropertyDemo1 {
	private String username;
	//有参构造
	public PropertyDemo1(String username) {
		this.username = username;
	}
}
此时的xml可以这么写:
<bean id="demo" class="cn.property.PropertyDemo1">

	<constructor-arg name="username" value="专注写bug">constructor-arg>
bean>
以及平时使用的UserServiceImpl和UserDao的依赖注入,也能使用配置文件的方式实现:
/**
 * 测试依赖注入
 * @author 765199214
 *
 */
public class UserServiceImpl {
	private UserDao userDaoxx;
	// 省略其他
}
class UserDao{

}
在xml配置文件中,可以采取如下方式写明:
<bean id="userDao" class="cn.linkpower.di.UserDao">bean>

<bean id="userService" class="cn.linkpower.di.UserService">

	<property name="userDaoxx" ref="userDao">property>
bean>
[总结:]总体而言,bean的属性定义包含以下几点信息:
id;
name;
scope;
class;
parent;
lazyInit;
properties;
depends等。
bean的定义存储
采取
xml或者properties文件的形式,创建bean的配置项。
加载、解析bean
采取xml或其他文件方式,定义bean的配置信息。此时Spring需要使用ioc的方式,根据配置的文件信息,实例化指定的类,则需要Spring具有对bean的加载和解析操作。
bean的加载、解析和注册
在 org.springframework.beans.factory.support.BeanDefinitionReader 类中,就对加载操作定义了相关的操作接口。(ctrl + shift + h)
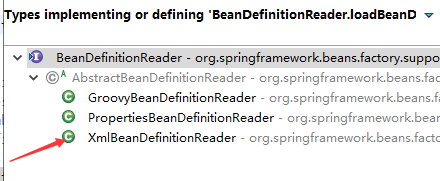
在org.springframework.beans.factory.xml.XmlBeanDefinitionReader中存在一个加载xml文件的处理方法:


得到xml文件流后,将文件流转化为Docment处理类。

上述的操作,实现了以下的操作:
1、读取指定的xml文件。
2、将xml文件中配置的信息,转化为Document对象。
除了加载xml文件,转化xml文件至Document对象外,还需要将Document对象解析注册至BeanDefinition。这个操作又分为解析和注册。
在上图中的2处,进行了文件的解析操作,代码逻辑流程如下所示:
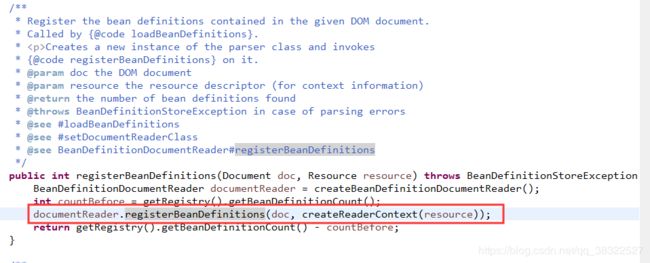


org.springframework.beans.factory.xml.DefaultBeanDefinitionDocumentReader.doRegisterBeanDefinitions(Element) 源码逻辑为:
/**
* Register each bean definition within the given root {@code elements will cause recursion in this method. In
// order to propagate and preserve default-* attributes correctly,
// keep track of the current (parent) delegate, which may be null. Create
// the new (child) delegate with a reference to the parent for fallback purposes,
// then ultimately reset this.delegate back to its original (parent) reference.
// this behavior emulates a stack of delegates without actually necessitating one.
BeanDefinitionParserDelegate parent = this.delegate;
this.delegate = createDelegate(getReaderContext(), root, parent);
if (this.delegate.isDefaultNamespace(root)) {
String profileSpec = root.getAttribute(PROFILE_ATTRIBUTE);
if (StringUtils.hasText(profileSpec)) {
String[] specifiedProfiles = StringUtils.tokenizeToStringArray(
profileSpec, BeanDefinitionParserDelegate.MULTI_VALUE_ATTRIBUTE_DELIMITERS);
if (!getReaderContext().getEnvironment().acceptsProfiles(specifiedProfiles)) {
if (logger.isInfoEnabled()) {
logger.info("Skipped XML bean definition file due to specified profiles [" + profileSpec +
"] not matching: " + getReaderContext().getResource());
}
return;
}
}
}
preProcessXml(root);
parseBeanDefinitions(root, this.delegate);
postProcessXml(root);
this.delegate = parent;
}
其中的parseBeanDefinitions(root, this.delegate);操作,则是对Document类元素进行遍历和解析操作。

总结和写demo
综上所述,xml配置文件中的bean的注入以及获取到其中的bean,其基本流程如下所示:
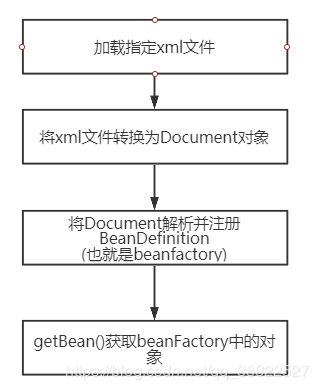
根据这个逻辑顺序,可以编写一个demo:
- 随便定义一个需要实例化的类
public class UserDao {
	public void test() {
		System.out.println("UserDao test .....");
	}
	public UserDao() {
		System.out.println("UserDao().......");
	}
}
- 编写xml文件
<bean id="userDao" class="cn.linkpower.di.UserDao">bean>
- 编写测试类
	@Test
	public void spring() {
		//1、获取beanfactory对象
		DefaultListableBeanFactory beanFactory = new DefaultListableBeanFactory();
		//2、获取xml文件解析器
		XmlBeanDefinitionReader xmlBeanDefinitionReader = new XmlBeanDefinitionReader(beanFactory);
		//3、加载指定xml文件,并自动解析、注册配置文件中的bean至beanFactory中
		xmlBeanDefinitionReader.loadBeanDefinitions("bean1.xml");
		UserDao ud = beanFactory.getBean(UserDao.class);
		Assert.notNull(ud,"UserDao 不能为空");
		ud.test();
	}
![]()
其次,根据上述Demo,进行Debug测试查看流程也能合理分析出Spring对bean的操作过程。
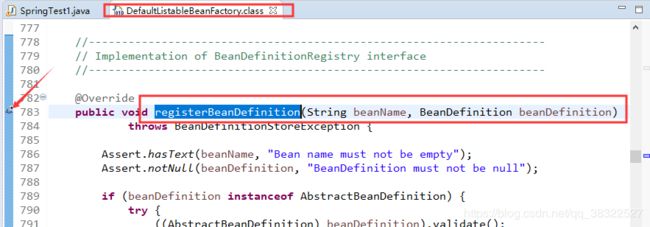
上述流程,分析得出任何配置文件等,最后都会解析注册至beanfactory中,可以再org.springframework.beans.factory.support.DefaultListableBeanFactory中的registerBeanDefinition方法前增加断点测试。如下所示:
debug运行上述的demo,查看程序栈顺序:

