SpringBoot+Layui+Mybatis-plus实现数据查询分页
目录
(一)最终效果展示
(二)前后端接口约定
(三)前端环境搭建
html代码:
(四)后端环境搭建
1.快速引入spring boot项目相关依赖
2.引入mybatis-plus相关maven依赖
3.创建数据表
4. 创建java bean
5. 配置application.proprties
6.完善实体类
7.添加配置类
8.编写mapper
9.编写Service
10.controller层
(一)最终效果展示
(1)先看mysql数据库中的数据表
(2)浏览器中的前端页面展示
第一页数据
第二页数据
第三页数据
SpringBoot+Layui+Mybatis-plus实现数据查询分页,我使用了类似restful请求风格,那也约定个接口吧.
(二)前后端接口约定
前端请求:
http://localhost:8080/page?page=1&limit=2后端返回:
{
"code":0,
"msg":"",
"count":7,
"data":[
{"id":2,"lastName":"lihua","email":"[email protected]","gender":1,"age":21},

{"id":3,"lastName":"Black","email":"[email protected]","gender":1,"age":30}
]
}
ps:由于使用了layui-table,因此接口约定要遵循layui框架中的数据表格的接口约定规则 .
layui-table数据接口返回样例的网址:
https://www.layui.com/demo/table/user/?page=1&limit=30(三)前端环境搭建
使用了layui框架中的数据表格,如果不了解layui框架.
文档地址:
https://www.layui.com/doc/视频教程:
https://www.bilibili.com/video/BV1ct411n7SN?from=search&seid=52397874462078531html代码:
table模块快速使用
/*引入layui.css*/
(四)后端环境搭建
后端spring boot项目遵循SSM架构.不过我用mybatis-plus替换掉了mybatis.
不熟悉mybatis-plus的话,可以去官网学习一下
https://mp.baomidou.com/
ps:干货分享
优秀spring boot教程:
https://www.bilibili.com/video/BV1Et411Y7tQ?from=search&seid=15895932864185398265优秀mybatis-plus教程:
https://www.imooc.com/learn/1130


https://www.imooc.com/learn/1171
spring boot整合mybatis-plus博客:
https://blog.csdn.net/qq_42681787/article/details/105181645
后端项目结构图
1.快速引入spring boot项目相关依赖
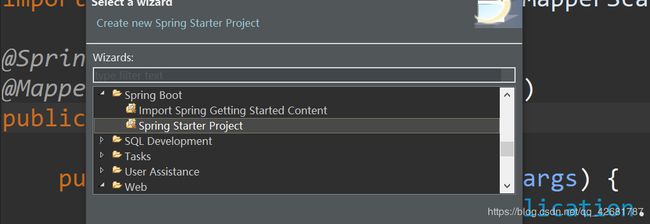
将STS与eclipse集成,快速新建SpringBoot项目,勾选如下选项
一路next,pom.xml文件会帮我们配置好.
ps:由于我们使用的数据源使阿里巴巴的druid,在springboot项目构建模板并没有这一选项,我们还需要手动引入(同理,后面的mybatis-plus相关依赖也需要手动引入)
进入mvnrepository官网搜索相关依赖,添加到pom.xml文件中
https://mvnrepository.com/
			com.alibaba
			druid
			1.1.21
2.引入mybatis-plus相关maven依赖
同理,进入mvnrepository官网搜索相关依赖,添加到pom.xml文件中
			com.baomidou
			mybatis-plus
			3.3.1
引入mybatis-plus在spring boot中的场景启动器
    com.baomidou
    mybatis-plus-boot-starter
    3.3.1
ps:切记不可再在pom.xml文件中引入mybatis与mybatis-spring的maven依赖,这一点,mybatis-plus的官方文档中已经说明的很清楚了.
最终的pom.xml文件
	4.0.0

		org.springframework.boot
		spring-boot-starter-parent
		2.2.5.RELEASE


	com.example
	mybatisplus
	0.0.1-SNAPSHOT
	mybatisplus
	Demo project for Spring Boot


		1.8


			com.alibaba
			druid
			1.1.21


			com.baomidou
			mybatis-plus
			3.3.1


			com.baomidou
			mybatis-plus-boot-starter
			3.3.1


			org.springframework.boot
			spring-boot-starter-web


			mysql
			mysql-connector-java
			runtime


			org.springframework.boot
			spring-boot-starter-test
			test


					org.junit.vintage
					junit-vintage-engine


				org.springframework.boot
				spring-boot-maven-plugin
3.创建数据表
(1)SQL语句
-- 创建表
CREATE TABLE tbl_employee(
   id INT(11) PRIMARY KEY AUTO_INCREMENT,
   last_name VARCHAR(50),
   email VARCHAR(50),
   gender CHAR(1),
   age INT
);
INSERT INTO tbl_employee(last_name,email,gender,age) VALUES('Tom','[email protected]',1,22);
INSERT INTO tbl_employee(last_name,email,gender,age) VALUES('Jerry','[email protected]',0,25);
INSERT INTO tbl_employee(last_name,email,gender,age) VALUES('Black','[email protected]',1,30);
INSERT INTO tbl_employee(last_name,email,gender,age) VALUES('White','[email protected]',0,35);
(2) 数据表结构
ps:由于后端测试的过程中,我对数据做了测试修改,可能看到的数据表与前端展示的最终数据不大相同,理清思路就行.
4. 创建java bean
根据数据表新建相关实体类
package com.example.demo.pojo;

public class Employee {
	private Integer id;
	private String lastName;
	private String email;
	private Integer gender;
	private Integer age;
	public Employee() {
		super();
		// TODO Auto-generated constructor stub
	}
	public Employee(Integer id, String lastName, String email, Integer gender, Integer age) {
		super();
		this.id = id;
		this.lastName = lastName;
		this.email = email;
		this.gender = gender;
		this.age = age;
	}
	public Integer getId() {
		return id;
	}
	public void setId(Integer id) {
		this.id = id;
	}
	public String getLastName() {
		return lastName;
	}
	public void setLastName(String lastName) {
		this.lastName = lastName;
	}
	public String getEmail() {
		return email;
	}
	public void setEmail(String email) {
		this.email = email;
	}
	public Integer getGender() {
		return gender;
	}
	public void setGender(Integer gender) {
		this.gender = gender;
	}
	public Integer getAge() {
		return age;
	}
	public void setAge(Integer age) {
		this.age = age;
	}
	@Override
	public String toString() {
		return "Employee [id=" + id + ", lastName=" + lastName + ", email=" + email + ", gender=" + gender + ", age="
				+ age + "]";
	}


}
5. 配置application.proprties
数据源使用druid
spring.datasource.username=root
spring.datasource.password=20182022
spring.datasource.url=jdbc:mysql://127.0.0.1:3306/my?useUnicode=true&characterEncoding=UTF-8&useSSL=false&serverTimezone=GMT%2B8
spring.datasource.driver-class-name=com.mysql.cj.jdbc.Driver

spring.datasource.type=com.alibaba.druid.pool.DruidDataSource

logging.level.com.example.demo.mapper=debug
6.完善实体类
由于我们的数据表名于实体类的类名不一致,并且实体类于数据表还存在字段名不对应的情况,因此我们需要引入mybatis-plus的注解.
package com.example.demo.pojo;

import java.io.Serializable;

import org.springframework.stereotype.Component;

import com.baomidou.mybatisplus.annotation.IdType;
import com.baomidou.mybatisplus.annotation.TableField;
import com.baomidou.mybatisplus.annotation.TableId;
import com.baomidou.mybatisplus.annotation.TableName;
/*
 * MybatisPlus会默认使用实体类的类名到数据中找对应的表.
 *
 */
@Component
@TableName(value = "tbl_employee")
public class Employee implements Serializable{
	/**
	 *
	 */
	private static final long serialVersionUID = 1L;
	/*
	 * @TableId:
	 * 	 value: 指定表中的主键列的列名, 如果实体属性名与列名一致,可以省略不指定.
	 *   type: 指定主键策略.
	 */
	@TableId(value="id" , type =IdType.AUTO)
	private Integer id;
	@TableField(value = "last_name")
	private String lastName;
	private String email;
	private Integer gender;
	private Integer age;
	public Employee() {
		super();
		// TODO Auto-generated constructor stub
	}
	public Employee(Integer id, String lastName, String email, Integer gender, Integer age) {
		super();
		this.id = id;
		this.lastName = lastName;
		this.email = email;
		this.gender = gender;
		this.age = age;
	}
	public Integer getId() {
		return id;
	}
	public void setId(Integer id) {
		this.id = id;
	}
	public String getLastName() {
		return lastName;
	}
	public void setLastName(String lastName) {
		this.lastName = lastName;
	}
	public String getEmail() {
		return email;
	}
	public void setEmail(String email) {
		this.email = email;
	}
	public Integer getGender() {
		return gender;
	}
	public void setGender(Integer gender) {
		this.gender = gender;
	}
	public Integer getAge() {
		return age;
	}
	public void setAge(Integer age) {
		this.age = age;
	}
	@Override
	public String toString() {
		return "Employee [id=" + id + ", lastName=" + lastName + ", email=" + email + ", gender=" + gender + ", age="
				+ age + "]";
	}


}
7.添加配置类
分页借助于mybatis-plus的分页插件,需要我们编写配置类向spring boot注册分页插件
package com.example.demo.config;

import org.springframework.context.annotation.Bean;
import org.springframework.context.annotation.Configuration;

import com.baomidou.mybatisplus.extension.plugins.PaginationInterceptor;

@Configuration
public class MybatisPlusConfig {
	@Bean
	public PaginationInterceptor paginationInterceptor() {

		return new PaginationInterceptor();
	}

}
8.编写mapper
package com.example.demo.mapper;

import org.apache.ibatis.annotations.Mapper;


import com.baomidou.mybatisplus.core.mapper.BaseMapper;
import com.example.demo.pojo.Employee;
/**
 *
 * @author zhou'en'xian
 *基于Mybatis-plus实现:  让XxxMapper接口继承 BaseMapper接口即可.
 *BaseMapper : 泛型指定的就是当前Mapper接口所操作的实体类类型
 */
@Mapper
public interface EmpolyeeMapper extends BaseMapper {


}
9.编写Service
service层的接口:
package com.example.demo.service;

import java.util.LinkedHashMap;

public interface EmployeeService {
	LinkedHashMapselect(int page,int limit);

}
service接口的实现类:
package com.example.demo.service;


import java.util.LinkedHashMap;
import java.util.List;


import org.springframework.beans.factory.annotation.Autowired;
import org.springframework.stereotype.Service;

import com.baomidou.mybatisplus.core.conditions.query.QueryWrapper;
import com.baomidou.mybatisplus.core.metadata.IPage;
import com.baomidou.mybatisplus.extension.plugins.pagination.Page;
import com.example.demo.mapper.EmpolyeeMapper;
import com.example.demo.pojo.Employee;
@Service
public class EmployeeServiceImp implements EmployeeService{
	@Autowired
	private EmpolyeeMapper employeeMapper;

	@Override
	public LinkedHashMap select(int page, int limit) {
		QueryWrapperqueryWrapper=new QueryWrapper();
		Pagepages=new Page(page,limit);
		IPageiPage=employeeMapper.selectPage(pages, queryWrapper);
		List list=iPage.getRecords();
		long count=iPage.getTotal();
		LinkedHashMaplinkedHashMap=new LinkedHashMap();
		linkedHashMap.put("code", 0);
		linkedHashMap.put("msg", "");
		linkedHashMap.put("count", count);
		linkedHashMap.put("data", list);
		return linkedHashMap;
	}


}
ps: 其中QueryWrapper类,Page类,IPage类都是mybatis-plus中的核心类,具体用法.可参考我的另外一篇博客:
https://blog.csdn.net/qq_42681787/article/details/10518164510.controller层
package com.example.demo.controller;

import java.util.LinkedHashMap;


import org.springframework.beans.factory.annotation.Autowired;
import org.springframework.web.bind.annotation.CrossOrigin;
import org.springframework.web.bind.annotation.RequestMapping;
import org.springframework.web.bind.annotation.RestController;

import com.example.demo.service.EmployeeService;

@RestController
public class EmployeeController {
	@Autowired
	private EmployeeService employeeService;
	@RequestMapping("/page")
	@CrossOrigin(allowedHeaders = "*", allowCredentials = "true")
	public LinkedHashMap pageData(int page,int limit) {
		return employeeService.select(page, limit);
	}


}
ps:其中@CrossOrigin(allowedHeaders = "*", allowCredentials = "true")是为了解决layui-table数据请求出现的跨域请求的问题.


