【Deep Learning】VGG16之feature map学习笔记
最近学习BeautyGAN需要用到VGG16提取的feature map进行训练,简单学习了一些关于VGG16和feature map相关的内容。
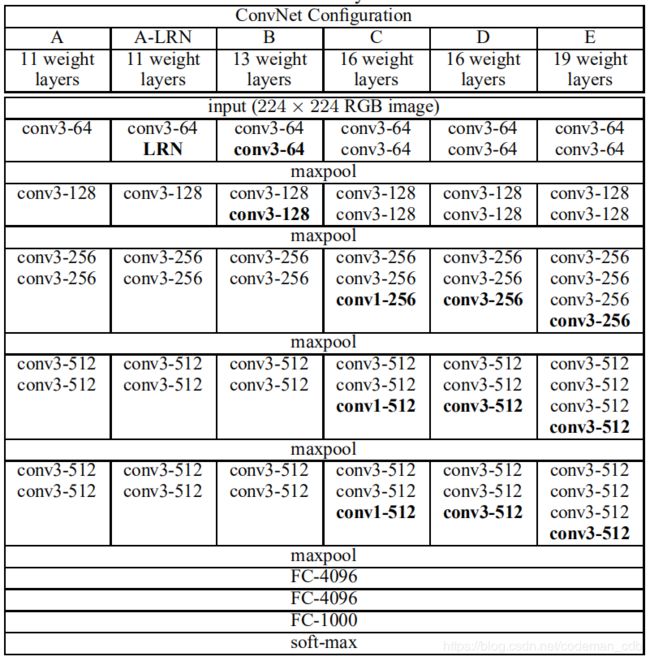
VGG16网络结构
VGG16总共有16层,13个卷积层和3个全连接层,第一次经过64个卷积核的两次卷积,第二次经过两次128个卷积核卷积,第三次经过三层256卷积核卷积,第四次经过512个卷积核,每次卷积后进行一次pooling,最后经过三次全连接。
feature map是什么?
feature map可以理解为卷积网络从输入图片中提取出来的特征,层数越深,提取的特征越高级。
feature map的数量
feature map的数量和卷积核(filter)的数量有关。每一个卷积核提取一种特征,得到一个feature map。
feature map的作用
每一个feature map代表图片的一种特征,这些特征可以反映图片的内容。如BeautyGAN中,使用feature map进行人物身份保持。
feature map可视化
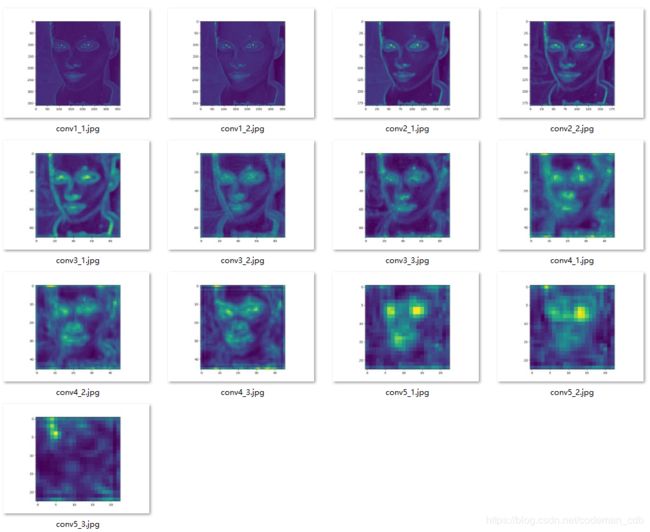
简单实现了feature map的可视化,输出VGG16每一层的feature map。
可以看到随着层数增加,feature map越来越抽象,可能看不到不过没关系,毕竟这些高级特征是给计算机识别的,不是给人识别的,果然越高级的东西越难懂。
VGG16的feature map结构及可视化
输入图片尺寸为361x361x3,VGG16每一层的feature map结构如下:
shape of layer conv1_1 is (361, 361, 64)
shape of layer conv1_2 is (361, 361, 64)
shape of layer pool1 is (181, 181, 64)
shape of layer conv2_1 is (181, 181, 128)
shape of layer conv2_2 is (181, 181, 128)
shape of layer pool2 is (91, 91, 128)
shape of layer conv3_1 is (91, 91, 256)
shape of layer conv3_2 is (91, 91, 256)
shape of layer conv3_3 is (91, 91, 256)
shape of layer pool3 is (46, 46, 256)
shape of layer conv4_1 is (46, 46, 512)
shape of layer conv4_2 is (46, 46, 512)
shape of layer conv4_3 is (46, 46, 512)
shape of layer pool4 is (23, 23, 512)
shape of layer conv5_1 is (23, 23, 512)
shape of layer conv5_2 is (23, 23, 512)
shape of layer conv5_3 is (23, 23, 512)
shape of layer pool5 is (12, 12, 512)
可视化结果如图,可以看到层数越深,feature map越抽象。
最后附上代码,可以输出每一层的特征图和所有特征子图,不过输出全部子图性能很差,不知道什么原因越到后面越慢,从昨晚开始跑了20个小时还没跑完conv4_3,开始几秒可以输出一幅,后面差不多1分钟才能输出一幅,怀疑是matplotlib.pyplot的问题,以后有时间再分析优化吧。重新分析了BeautyGAN论文,应该还是要把VGG16融合到GAN里,不能单独输出特征图再给GAN使用,因为BeautyGAN训练过程中生成器输出的“假”图也需要使用VGG16提取特征,所以二者必须在同一进程中执行,需要将两个模型合并或连接到一起。
# -*- coding:utf-8 -*-
import matplotlib
import numpy as np
import tensorflow as tf
import time
from PIL import Image
import matplotlib.pyplot as plt
import os

# VGG 自带的一个常量,之前VGG训练通过归一化,所以现在同样需要作此操作
VGG_MEAN = [103.939, 116.779, 123.68]  # rgb 三通道的均值


class VGGNet():
    """
    创建 vgg16 网络 结构
    从模型中载入参数
    """

    def __init__(self, data_dict):
        """
        传入vgg16模型
        :param data_dict: vgg16.npy (字典类型)
        """
        self.data_dict = data_dict

    def get_conv_filter(self, name):
        """
        得到对应名称的卷积层
        :param name: 卷积层名称
        :return: 该卷积层输出
        """
        return tf.constant(self.data_dict[name][0], name='conv')

    def get_fc_weight(self, name):
        """
        获得名字为name的全连接层权重
        :param name: 连接层名称
        :return: 该层权重
        """
        return tf.constant(self.data_dict[name][0], name='fc')

    def get_bias(self, name):
        """
        获得名字为name的全连接层偏置
        :param name: 连接层名称
        :return: 该层偏置
        """
        return tf.constant(self.data_dict[name][1], name='bias')

    def conv_layer(self, x, name):
        """
        创建一个卷积层
        :param x:
        :param name:
        :return:
        """
        # 在写计算图模型的时候,加一些必要的 name_scope,这是一个比较好的编程规范
        # 可以防止命名冲突, 二可视化计算图的时候比较清楚
        with tf.name_scope(name):
            # 获得 w 和 b
            conv_w = self.get_conv_filter(name)
            conv_b = self.get_bias(name)

            # 进行卷积计算
            h = tf.nn.conv2d(x, conv_w, strides=[1, 1, 1, 1], padding='SAME')
            '''
            因为此刻的 w 和 b 是从外部传递进来,所以使用 tf.nn.conv2d()
            tf.nn.conv2d(input, filter, strides, padding, use_cudnn_on_gpu = None, name = None) 参数说明:
            input 输入的tensor, 格式[batch, height, width, channel]
            filter 卷积核 [filter_height, filter_width, in_channels, out_channels]
                分别是:卷积核高,卷积核宽,输入通道数,输出通道数
            strides 步长 卷积时在图像每一维度的步长,长度为4
            padding 参数可选择 “SAME” “VALID”

            '''
            # 加上偏置
            h = tf.nn.bias_add(h, conv_b)
            # 使用激活函数
            h = tf.nn.relu(h)
            return h

    def pooling_layer(self, x, name):
        """
        创建池化层
        :param x: 输入的tensor
        :param name: 池化层名称
        :return: tensor
        """
        return tf.nn.max_pool(x,
                              ksize=[1, 2, 2, 1],  # 核参数, 注意:都是4维
                              strides=[1, 2, 2, 1],
                              padding='SAME',
                              name=name
                              )

    def fc_layer(self, x, name, activation=tf.nn.relu):
        """
        创建全连接层
        :param x: 输入tensor
        :param name: 全连接层名称
        :param activation: 激活函数名称
        :return: 输出tensor
        """
        with tf.name_scope(name, activation):
            # 获取全连接层的 w 和 b
            fc_w = self.get_fc_weight(name)
            fc_b = self.get_bias(name)
            # 矩阵相乘 计算
            h = tf.matmul(x, fc_w)
            #  添加偏置
            h = tf.nn.bias_add(h, fc_b)
            # 因为最后一层是没有激活函数relu的,所以在此要做出判断
            if activation is None:
                return h
            else:
                return activation(h)

    def flatten_layer(self, x, name):
        """
        展平
        :param x: input_tensor
        :param name:
        :return: 二维矩阵
        """
        with tf.name_scope(name):
            # [batch_size, image_width, image_height, channel]
            x_shape = x.get_shape().as_list()
            # 计算后三维合并后的大小
            dim = 1
            for d in x_shape[1:]:
                dim *= d
            # 形成一个二维矩阵
            x = tf.reshape(x, [-1, dim])
            return x

    def build(self, x_rgb):
        """
        创建vgg16 网络
        :param x_rgb: [1, 224, 224, 3]
        :return:
        """
        start_time = time.time()
        print('模型开始创建……')
        # 将输入图像进行处理,将每个通道减去均值
        r, g, b = tf.split(x_rgb, [1, 1, 1], axis=3)
        '''
        tf.split(value, num_or_size_split, axis=0)用法:
        value:输入的Tensor
        num_or_size_split:有两种用法:
            1.直接传入一个整数,代表会被切成几个张量,切割的维度有axis指定
            2.传入一个向量,向量长度就是被切的份数。传入向量的好处在于,可以指定每一份有多少元素
        axis, 指定从哪一个维度切割
        因此,上一句的意思就是从第4维切分,分为3份,每一份只有1个元素
        '''
        # 将 处理后的通道再次合并起来
        x_bgr = tf.concat([b - VGG_MEAN[0], g - VGG_MEAN[1], r - VGG_MEAN[2]], axis=3)

        #        assert x_bgr.get_shape().as_list()[1:] == [224, 224, 3]

        # 开始构建卷积层
        # vgg16 的网络结构
        # 第一层:2个卷积层 1个pooling层
        # 第二层:2个卷积层 1个pooling层
        # 第三层:3个卷积层 1个pooling层
        # 第四层:3个卷积层 1个pooling层
        # 第五层:3个卷积层 1个pooling层
        # 第六层: 全连接
        # 第七层: 全连接
        # 第八层: 全连接

        # 这些变量名称不能乱取,必须要和vgg16模型保持一致
        # 另外,将这些卷积层用self.的形式,方便以后取用方便
        self.conv1_1 = self.conv_layer(x_bgr, 'conv1_1')
        self.conv1_2 = self.conv_layer(self.conv1_1, 'conv1_2')
        self.pool1 = self.pooling_layer(self.conv1_2, 'pool1')

        self.conv2_1 = self.conv_layer(self.pool1, 'conv2_1')
        self.conv2_2 = self.conv_layer(self.conv2_1, 'conv2_2')
        self.pool2 = self.pooling_layer(self.conv2_2, 'pool2')

        self.conv3_1 = self.conv_layer(self.pool2, 'conv3_1')
        self.conv3_2 = self.conv_layer(self.conv3_1, 'conv3_2')
        self.conv3_3 = self.conv_layer(self.conv3_2, 'conv3_3')
        self.pool3 = self.pooling_layer(self.conv3_3, 'pool3')

        self.conv4_1 = self.conv_layer(self.pool3, 'conv4_1')
        self.conv4_2 = self.conv_layer(self.conv4_1, 'conv4_2')
        self.conv4_3 = self.conv_layer(self.conv4_2, 'conv4_3')
        self.pool4 = self.pooling_layer(self.conv4_3, 'pool4')

        self.conv5_1 = self.conv_layer(self.pool4, 'conv5_1')
        self.conv5_2 = self.conv_layer(self.conv5_1, 'conv5_2')
        self.conv5_3 = self.conv_layer(self.conv5_2, 'conv5_3')
        self.pool5 = self.pooling_layer(self.conv5_3, 'pool5')

        print('创建模型结束:%4ds' % (time.time() - start_time))


# 指定 model 路径
vgg16_npy_pyth = './model/vgg16.npy'


def read_img(img_name):
    """
    读取图片
    :param img_name: 图片路径
    :return: 4维矩阵
    """
    img = Image.open(img_name)
    np_img = np.array(img)  # 224, 224, 3
    # 需要传化 成 4 维
    np_img = np.asarray([np_img], dtype=np.int32)  # 这个函数作用不太理解 (1, 224, 224, 3)
    return np_img


def save_feature_map(feature_batch, layer_name):
    """
    创建特征子图,创建叠加后的特征图
    :param layer_name:
    :param feature_batch: 一个卷积层所有特征图
    :return:
    """
    feature_map = np.squeeze(feature_batch, axis=0)

    feature_map_combination = []
    #plt.figure()

    path = os.getcwd() + '\\data\\feature_maps\\' + layer_name + '\\'
    if not os.path.exists(path):
        os.makedirs(path)

    # 取出 featurn map 的数量
    num_pic = feature_map.shape[2]

    for i in range(0, num_pic):
        plt.imshow(feature_map[:, :, i])
        plt.savefig(path + str(i) + '.jpg')


def save_feature_map_sum(feature_batch, layer_name):
    """
    将每张子图进行相加
    :param layer_name:
    :param feature_batch:
    :return:
    """
    feature_map = np.squeeze(feature_batch, axis=0)

    feature_map_combination = []

    # 取出 featurn map 的数量
    num_pic = feature_map.shape[2]

    # 将 每一层卷积的特征图,拼接层 5 × 5
    for i in range(0, num_pic):
        feature_map_split = feature_map[:, :, i]
        feature_map_combination.append(feature_map_split)

    # 按照特征图 进行 叠加代码
    feature_map_sum = sum(one for one in feature_map_combination)

    plt.imshow(feature_map_sum)
    path = os.getcwd() + '\\data\\feature_maps\\layer_sum\\'
    if not os.path.exists(path):
        os.makedirs(path)
    plt.savefig(path + layer_name + '.jpg')


def get_feature_maps(img_path):
    # 读取 内容图像
    content_val = read_img(img_path)
    print('shape of image: ' + str(content_val.shape))

    content = tf.placeholder(tf.float32, shape=content_val.shape)

    # 载入模型, 注意:在python3中,需要添加一句: encoding='latin1'
    data_dict = np.load(vgg16_npy_pyth, encoding='latin1').item()

    # 创建图像的 vgg 对象
    vgg_for_content = VGGNet(data_dict)

    # 创建 每个 神经网络
    vgg_for_content.build(content)

    content_features = [vgg_for_content.conv1_1,
                        vgg_for_content.conv1_2,
                        vgg_for_content.pool1,
                        vgg_for_content.conv2_1,
                        vgg_for_content.conv2_2,
                        vgg_for_content.pool2,
                        vgg_for_content.conv3_1,
                        vgg_for_content.conv3_2,
                        vgg_for_content.conv3_3,
                        vgg_for_content.pool3,
                        vgg_for_content.conv4_1,
                        vgg_for_content.conv4_2,
                        vgg_for_content.conv4_3,
                        vgg_for_content.pool4,
                        vgg_for_content.conv5_1,
                        vgg_for_content.conv5_2,
                        vgg_for_content.conv5_3,
                        vgg_for_content.pool5
                        ]

    init_op = tf.global_variables_initializer()
    with tf.Session() as sess:
        sess.run(init_op)

        content_features_result = sess.run([content_features],
                                           feed_dict={
                                               content: content_val
                                           })

        for i in range(0, len(content_features_result[0])):
            feature_batch = content_features_result[0][i]
            layer_name = str(content_features[i].name).split('/')[0].split(':')[0]
            print('shape of layer ' + layer_name + ' is ' + str(feature_batch[0].shape))
            # save_feature_map(feature_batch, layer_name)
            save_feature_map_sum(feature_batch, layer_name)


get_feature_maps('./data/mk1.png')

